# Welcome to Valorx

Your one stop destination for learning, exploring, and mastering our products.

## Explore Valorx Documentation Portal&#x20;

<table data-card-size="large" data-view="cards" data-full-width="false"><thead><tr><th></th><th></th><th></th><th data-hidden data-card-cover data-type="image"></th><th data-hidden data-type="image"></th><th data-hidden data-card-target data-type="content-ref"></th></tr></thead><tbody><tr><td><h3>Fusion</h3></td><td>Build dynamic Excel-based apps powered by Salesforce data.</td><td></td><td><a href="https://2963095262-files.gitbook.io/~/files/v0/b/gitbook-x-prod.appspot.com/o/spaces%2FROl4tJKPb7tWD1v4rDvJ%2Fuploads%2FKDiHAgjR2oo5yQmQ7UJn%2FFusion.png?alt=media&amp;token=b6630cd8-9cec-4f0b-a593-721224640c0d">Fusion.png</a></td><td><a href="https://2963095262-files.gitbook.io/~/files/v0/b/gitbook-x-prod.appspot.com/o/spaces%2FROl4tJKPb7tWD1v4rDvJ%2Fuploads%2Fnf4uTux1O9Q0XRzyiwvR%2FFrame%201686563156-1.png?alt=media&amp;token=b113d8fc-fb84-41e0-983b-c111b8fb6670">Frame 1686563156-1.png</a></td><td><a href="https://docs.valorx.com/valorx-fusion/">Fusion</a></td></tr><tr><td><h3>Wave</h3></td><td>Design, manage, and publish powerful data grids in Browser Extension and Salesforce.</td><td></td><td><a href="https://2963095262-files.gitbook.io/~/files/v0/b/gitbook-x-prod.appspot.com/o/spaces%2FROl4tJKPb7tWD1v4rDvJ%2Fuploads%2FuE1rCXRqv6KzuKZ2VcHE%2FWave.png?alt=media&amp;token=563b3d7c-f113-4e67-a244-02277c88dd4c">Wave.png</a></td><td><a href="https://2963095262-files.gitbook.io/~/files/v0/b/gitbook-x-prod.appspot.com/o/spaces%2FROl4tJKPb7tWD1v4rDvJ%2Fuploads%2FKI8P82ISCcfOZrp0MqKv%2FFrame%201686563156-2.png?alt=media&amp;token=acc98b52-0d67-4a93-b4fb-78eaefa7ab3d">Frame 1686563156-2.png</a></td><td><a href="https://docs.valorx.com/valorx-wave/">Wave</a></td></tr><tr><td><h3>Release Notes</h3></td><td>Stay updated with the latest features, enhancements, and fixes across releases.</td><td></td><td><a href="https://2963095262-files.gitbook.io/~/files/v0/b/gitbook-x-prod.appspot.com/o/spaces%2FROl4tJKPb7tWD1v4rDvJ%2Fuploads%2FYMzJBUKy9MdDJDw5fv56%2FRelease%20notes.png?alt=media&amp;token=59b31898-f43b-4d61-a002-e2e364a583fe">Release notes.png</a></td><td><a href="https://2963095262-files.gitbook.io/~/files/v0/b/gitbook-x-prod.appspot.com/o/spaces%2FROl4tJKPb7tWD1v4rDvJ%2Fuploads%2FUMKJgw9wHB8IuLbFxjdz%2F(new)%20The-latest-from-Valorx-for-Wave-S.jpg?alt=media&amp;token=d582cc7c-3831-4244-b1f2-166536cee825">(new) The-latest-from-Valorx-for-Wave-S.jpg</a></td><td><a href="https://docs.valorx.com/release-notes/">Release Notes</a></td></tr></tbody></table>


# Fusion Documentation

Leverage Fusion's efficiency to deliver the speed and simplicity of spreadsheets to CRM data management.

## What is Valorx Fusion?

With Fusion, you can establish a 2-way connection between Salesforce and Spreadsheets, such as Microsoft Excel and Google Sheets. As a result, you can work in CRM using the spreadsheet.

Fusion turns your existing spreadsheets into your Salesforce interface. So, you can use the spreadsheets' potent and known features to address data complexities and exceed your CRM's capabilities. You can work on thousands of records at once and see live Salesforce data, including multiple objects in a single view. Thus, you can accomplish more than ever before with your CRM data using CRM-connected spreadsheets.&#x20;

To tackle any business requirements, Fusion Design Studio allows App designers to build Fusion Apps by converting an existing Microsoft Excel workbook into a Valorx App or build a new Valorx App from the ground up.

## Why Fusion?

* **Enhanced High-Volume Quoting and Bulk Updates:** Handle thousands of quote lines at speed with bulk editing. Also, enable multi-dimensional and professional services quoting. Save from hours to days on building quotes and deliver it to the customers faster.
* **Keep your existing spreadsheets:** With Fusion, connect your sheets to live Salesforce data, and honor the controls already set in your CRM (permissions, validation rules, picklists, and more). Don’t change a thing.
* **Powerful data visualizations for improved planning and predictability:** Build accurate forecasts with live CRM data, and view in different timescales. View multiple data sets in one place to develop accurate demand plans.
* **Utilize the power of Design Studio:** Fusion Design Studio equips the App Designers with the ability to craft brand new Fusion Apps that cater to the unique requirements of users within your team. These apps are specifically designed to enhance productivity, streamline workflows, and address specific business needs.


# Fusion for Windows

Use Fusion’s efficiency to work directly in your CRM from your customized spreadsheets, leveraging the best of both.

### All about Fusion

<table data-card-size="large" data-view="cards"><thead><tr><th></th></tr></thead><tbody><tr><td><a href="https://docs.valorx.com/valorx-fusion/"><strong>Complete Fusion Documentation</strong></a></td></tr></tbody></table>

### Fusion Features                                                           &#x20;

<table data-card-size="large" data-view="cards"><thead><tr><th></th><th></th><th></th><th></th><th></th><th></th><th></th><th></th><th></th><th></th><th></th><th></th><th></th></tr></thead><tbody><tr><td><a href="/valorx-fusion"><strong>What is Valorx Fusion?</strong></a></td><td></td><td><a href="/valorx-fusion/getting-started/what-is-a-valorx-app"><strong>What is a Valorx App?</strong></a></td><td></td><td><a href="/valorx-fusion/getting-started/getting-started-with-valorx"><strong>Getting Started with Valorx</strong></a><a href="https://docs.valorx.com/getting-started/getting-started-with-valorx"> </a></td><td></td><td><a href="/valorx-fusion/getting-started/building-your-first-app"><strong>Building Your First App</strong></a> </td><td></td><td><a href="/valorx-fusion/design-studio/the-power-of-design-studio"><strong>Design Studio</strong></a> </td><td></td><td><a href="/valorx-fusion/design-studio/open-an-app-in-design-studio"><strong>Open an App in Design Studio</strong></a></td><td></td><td><a href="/valorx-fusion/design-studio/data-modeling"><strong>Data Modelling</strong> </a></td></tr><tr><td><a href="/valorx-fusion/design-studio/maps"><strong>Fusion Maps</strong></a></td><td></td><td><a href="/valorx-fusion/design-studio/tasks"><strong>Fusion Tasks</strong></a></td><td></td><td><a href="/valorx-fusion/design-studio/workflow-and-ux"><strong>Workflow and UX</strong></a></td><td></td><td><a href="/valorx-fusion/runtime/runtime-ux"><strong>Fusion Runtime</strong></a>  </td><td></td><td><a href="/valorx-fusion/runtime/toolbox"><strong>Fusion Toolbox</strong></a></td><td></td><td><a href="/valorx-fusion/runtime/supported-platforms"><strong>Supported Platforms</strong></a></td><td></td><td></td></tr></tbody></table>

### Fusion Settings

<table data-card-size="large" data-view="cards"><thead><tr><th></th><th></th><th></th><th></th><th></th></tr></thead><tbody><tr><td><a href="/valorx-fusion/settings/valorx-fusion-settings"><strong>Valorx Fusion Settings</strong></a></td><td></td><td><a href="/valorx-fusion/settings/app-settings"><strong>App Settings</strong></a></td><td></td><td><a href="/valorx-fusion/settings/logs"><strong>Fusion Logs</strong></a></td></tr></tbody></table>

### Fusion App Store

<table data-card-size="large" data-view="cards"><thead><tr><th></th><th></th><th></th><th></th><th></th></tr></thead><tbody><tr><td><a href="/valorx-fusion/app-store/app-store-submission"><strong>App Store Submission</strong></a></td><td></td><td><a href="/valorx-fusion/app-store/installing-app"><strong>Installing App</strong></a></td><td></td><td><a href="/valorx-fusion/app-store/customizing-app"><strong>Customizing App</strong></a></td></tr></tbody></table>

### Other Information

<table data-card-size="large" data-view="cards"><thead><tr><th></th><th></th><th></th><th></th><th></th></tr></thead><tbody><tr><td><a href="/valorx-fusion/miscellaneous/mass-rollout-of-valorx"><strong>Mass Rollout of Valorx</strong></a></td><td></td><td><a href="/valorx-fusion/miscellaneous/open-source-licenses"><strong>Open Source Licenses</strong></a></td><td></td><td><a href="/valorx-fusion/valorx-home/valorx-home"><strong>Valorx Home</strong></a></td></tr></tbody></table>


# Fusion Templates Library

Download these ready-to-use Fusion Apps for free from the Valorx App Store.

***

{% tabs %}
{% tab title="Quote Line Editor for Salesforce CPQ " %}
Manage large Salesforce CPQ Quote in Excel using this template. Expand and collapse bundles and add multiple custom fields. Launch it from Salesforce.

Click [**here**](https://valorx.com/fusion-templates/quote-line-editor-for-salesforce-cpq/) to learn more and open this App in Fusion.
{% endtab %}

{% tab title="Advance Pricing Management and Salesforce CPQ " %}
This app is the one stop shop for all Salesforce CPQ Pricing configurations. Manage List Prices, Percent of Total, Contracted Price, Option Price, Block Price, Cost-and-Markup, and Discount Schedule with the power of Valorx!

Click [**here**](https://valorx.com/fusion-templates/advance-pricing-management-for-salesforce-cpq/) to learn more and open this App in Fusion.
{% endtab %}
{% endtabs %}

***

{% tabs %}
{% tab title="Product and Pricing for Commerce Cloud " %}
Manages Salesforce Commerce Cloud products and Pricing across multiple Price Lists and Currencies in one view.

Click [**here**](https://valorx.com/fusion-templates/product-and-pricing-for-commerce-cloud/) to learn more and open this App in Fusion.
{% endtab %}

{% tab title="Contract Price Management " %}
Easily manage contract prices across accounts, product family and date ranges. This is built on top of standard Salesforce CPQ data model – get a copy of the App and start managing your contract pricing.

Click [**here**](https://valorx.com/fusion-templates/contract-price-management/) to learn more and open this App in Fusion.
{% endtab %}
{% endtabs %}

***

{% tabs %}
{% tab title="User Management " %}
Add and update user records in a single click. Manage license and permission set for users in mass.

Click [**here**](https://valorx.com/fusion-templates/user-management/) to learn more and open this App in Fusion.
{% endtab %}

{% tab title="Product and Bundle Management for Salesforce CPQ " %}
This App allows you to manage Salesforce CPQ product and bundles in a bulkified manner.

Click [**here**](https://valorx.com/fusion-templates/product-and-bundle-management-for-salesforce-cpq/) to learn more and open this App in Fusion.
{% endtab %}
{% endtabs %}

***

{% tabs %}
{% tab title="Case Management" %}
Service cloud features like case management, case commenting, reassignment and referencing past cases made easy with this App.

Click [**here**](https://valorx.com/fusion-templates/case-management/) to learn more and open this App in Fusion.
{% endtab %}

{% tab title="Permission Set Management " %}
View all permission sets, add or remove users to permission sets. Add users based on record id or email address in single click.

Click [**here**](https://valorx.com/fusion-templates/permission-set-management/) to learn more and open this App in Fusion.
{% endtab %}

{% tab title="Campaign App " %}
Add and update contacts to your campaign. Switch from campaign to campaign. Bulk update responses and campaign attributes in a single App.

Click [**here**](https://valorx.com/fusion-templates/campaign-app/) to learn more and open this App in Fusion.
{% endtab %}
{% endtabs %}

***

{% tabs %}
{% tab title="Account Realignment " %}
Account Realignment allows bulk ownership reassignment for Account.

Click [**here**](https://valorx.com/fusion-templates/account-realignment/) to learn more and open this App in Fusion.
{% endtab %}

{% tab title="Product Management " %}
Update your product catalogue in bulk. Manage multiple pricing and what if scenarios grouped by product family.

Click [**here**](https://valorx.com/fusion-templates/product-management/) to learn more and open this App in Fusion.
{% endtab %}

{% tab title="Lead Generation " %}
View, Score and Qualify all your Leads from a single location. Allows bulk uploads and consolidations of leads.

Click [**here**](https://valorx.com/fusion-templates/lead-generation/) to learn more and open this App in Fusion.
{% endtab %}
{% endtabs %}

***

{% tabs %}
{% tab title="Price Book Management " %}
Manage multiple Price Book and Price Book Entry.

Click [**here**](https://valorx.com/fusion-templates/price-book-management/) to learn more and open this App in Fusion.
{% endtab %}

{% tab title="Opportunities List " %}
View your opportunities and update activities quickly. You can even work on this App offline.

Click [**here**](https://valorx.com/fusion-templates/opportunities-list/) to learn more and open this App in Fusion.
{% endtab %}

{% tab title="CPQ Price Matrices " %}
Visualize multiple price matrices in a single view across multiple pricelists. Update different pricing tiers all at once using this easy-to-use App.

Click [**here**](https://valorx.com/fusion-templates/cpq-price-matrices/) to learn more and open this App in Fusion.
{% endtab %}
{% endtabs %}

{% tabs %}
{% tab title="Profile Management " %}
Manage Profiles, User Assignments in a single UI. User can dynamically add and remove fields from Profile sheet.

Click [**here**](https://valorx.com/fusion-templates/profile-management/) to learn more and open this App in Fusion.
{% endtab %}

{% tab title="Event Management " %}
Manage Campaigns and Members in one view.

Click [**here**](https://valorx.com/fusion-templates/event-management/) to learn more and open this App in Fusion.
{% endtab %}

{% tab title="License Management " %}
Manage Licenses in bulk.

Click [**here**](https://valorx.com/fusion-templates/license-management/) to learn more and open this App in Fusion.
{% endtab %}
{% endtabs %}

***


# Support & Resources

From getting started to getting more out of Valorx products, we’ve got support & resources that can help.

## Valorx Support&#x20;

From helping over calls to providing potential assistance, the Valorx Support Team will enable you to unlock the full potential of your CRM.&#x20;

<table data-view="cards"><thead><tr><th></th><th></th><th></th><th data-hidden data-card-cover data-type="files"></th></tr></thead><tbody><tr><td><a href="https://valorx.com/fusion-support/"><strong>Fusion Support</strong></a></td><td></td><td></td><td><a href="https://2963095262-files.gitbook.io/~/files/v0/b/gitbook-x-prod.appspot.com/o/spaces%2FROl4tJKPb7tWD1v4rDvJ%2Fuploads%2F03gmezzMYZZsVjEbrMTU%2F1.jpg?alt=media&amp;token=702a2d7e-9c9c-46fd-b1e2-276e4f4c9531">1.jpg</a></td></tr><tr><td><a href="https://valorx.com/wave-support/"><strong>Wave Support</strong></a></td><td></td><td></td><td><a href="https://2963095262-files.gitbook.io/~/files/v0/b/gitbook-x-prod.appspot.com/o/spaces%2FROl4tJKPb7tWD1v4rDvJ%2Fuploads%2Fky8vmmiOTq6IA1i0Fmzk%2F2.jpg?alt=media&amp;token=45d1a9bf-6091-4e9b-a6c6-d4eff62ebf81">2.jpg</a></td></tr></tbody></table>

## Valorx Resources

Explore how simplification makes a difference in excelling.

<table data-view="cards"><thead><tr><th></th><th></th><th></th><th data-hidden data-card-cover data-type="files"></th></tr></thead><tbody><tr><td><a href="https://valorx.com/resources/?type=case-study"><strong>Case Studies</strong></a></td><td></td><td></td><td><a href="https://2963095262-files.gitbook.io/~/files/v0/b/gitbook-x-prod.appspot.com/o/spaces%2FROl4tJKPb7tWD1v4rDvJ%2Fuploads%2F1zHp8F28yV7MPXmfLmwB%2F5.jpg?alt=media&amp;token=82e44357-833d-4383-889a-fdc9f7ea25b4">5.jpg</a></td></tr><tr><td><a href="https://valorx.com/resources/?type=article"><strong>Articles</strong></a></td><td></td><td></td><td><a href="https://2963095262-files.gitbook.io/~/files/v0/b/gitbook-x-prod.appspot.com/o/spaces%2FROl4tJKPb7tWD1v4rDvJ%2Fuploads%2F1zHp8F28yV7MPXmfLmwB%2F5.jpg?alt=media&amp;token=82e44357-833d-4383-889a-fdc9f7ea25b4">5.jpg</a></td></tr></tbody></table>


# FAQs

Got a query? Find the answers to the most frequently asked questions.

## General

<details>

<summary>What is the difference between Fusion and Wave?</summary>

Wave is tailored for lightweight Salesforce data management, offering a spreadsheet-like experience in your browser for fast data editing. Fusion, on the other hand, lets you interface with complex Salesforce data models, ideal for intricate tasks like forecasting and quoting by connecting your existing spreadsheets.

</details>

## Fusion

<details>

<summary>Who is Valorx Fusion for?</summary>

Valorx Fusion is largely for sales administrators and sales professionals. With Valorx Fusion, Salesforce administrators can optimize the entire Salesforce experience for their organization, simplifying data management, data modeling, quote building, bundle configuring, and much more. Sales professionals can work much more efficiently with Salesforce, using the familiar interface of Excel. That means accurate, up-to-date records in Salesforce; faster quote delivery to prospects; and more time to focus on selling instead of data entry and management.

</details>

<details>

<summary>Why connect Salesforce and Excel?</summary>

Salesforce is a powerful CRM that tracks countless data points across the customer journey and provides a number of tools to nurture and engage with prospects. Excel, with decades of product development behind it, remains a highly versatile, user-friendly data analysis and management tool. Connecting Salesforce to Excel with Valorx Fusion allows you to work with all of Salesforce’s data in real time with the speed and ease of Excel. Edit in bulk, apply conditional formatting, work offline, and eliminate the need to import and export data for good.

</details>

<details>

<summary>How does Valorx Fusion’s Salesforce &#x26; Excel connector work?</summary>

Valorx Fusion creates a 2-way connection between your Excel spreadsheets and Salesforce. This allows you to work with Salesforce data directly in your Excel spreadsheet in real-time. When you save your work, all your Salesforce records are updated to reflect the latest changes.

</details>

<details>

<summary>Does Valorx Fusion import data from Excel into Salesforce?</summary>

Valorx Fusion eliminates the need to import or export data. It turns your Excel spreadsheet into your Salesforce interface, allowing you to manage your Salesforce data directly from your Excel spreadsheet with a seamless connection.

</details>

<details>

<summary>Why would I use Valorx Fusion?</summary>

Valorx Fusion allows professionals to work in Excel with Salesforce data and build high-volume quotes, without that data ever leaving Salesforce. This eliminates the need for moving data sets around or being entirely dependent on the Salesforce interface. Instead, professionals maintain high data hygiene and get to work the way they’re used to using Excel to manage their Salesforce data.

</details>

## Wave

<details>

<summary>Is Wave actually free?</summary>

Absolutely! Wave has a completely free plan available to all users. This means you can experience the efficiency and convenience of using Wave at no cost. The free plan for Wave has some limitations to the number of orgs, records, and custom objects you can manage, which are lifted in paid subscriptions for those who have the need.

</details>

<details>

<summary>Who uses Valorx Wave?</summary>

Valorx Wave is perfect for Salesforce admins, sales reps, IT leaders, and revenue operations professionals aiming to swiftly manage data within Salesforce. It streamlines data updates, visualizes relationships, and enables bulk edits without long data load processes. Put simply, anyone who spends a few hours in Salesforce everyday can optimize their productivity by adopting Wave.

</details>

<details>

<summary>If I switch to Wave, do I have to stop using my other tools?</summary>

Not at all! One of our core values at Valorx is not to reinvent the wheel, but to make it better. Wave seamlessly integrates into your existing Salesforce environment, allowing you to work faster and smarter without having to discard your current tools or workflows.

</details>

<details>

<summary>How does Wave ensure the security of my data?</summary>

With Wave, your data never leaves Salesforce. The application maintains a two-way integration, allowing for real-time syncs and updates without the risk of data breaches. You can trust that your information remains secure while benefiting from our enhanced features.

</details>

<details>

<summary>With Wave's spreadsheet-like grid, do I need to be proficient in spreadsheets to use it?</summary>

While Wave mimics a spreadsheet interface for familiarity, you don't need to be a spreadsheet expert to utilize it. Wave is designed for intuitive use, making data management faster and more accessible for both spreadsheet novices and pros alike.

</details>


# Introduction

Valorx is the quickest way for you to interact with your CRM.

**Valorx** brings your **Customer Relationship Management (CRM)** into spreadsheet such as **Microsoft Excel** and **Google Sheet**. This tool is built in such a way that Customer can use their favorite spreadsheets the way they used to, and at the same time, enjoy the security and functionality which **CRM** provides.                                                                                                                &#x20;

To tackle any business requirements, **Valorx Design Studio** allows App designers to build Valorx Apps by converting an existing Microsoft Excel workbook into a Valorx App, or build a new Valorx App from ground up.

### **Discover What’s New**

Explore the [**Fusion Version 22 Release Notes**](/valorx-fusion/versions-and-release-notes/windows/fusion-version-22) to learn about our latest features and enhancements.

{% hint style="info" %}
Download Fusion Client:

<a href="https://api.valorx.com/api/download/latest" class="button primary" data-icon="windows">Windows</a> <a href="https://appsource.microsoft.com/en-us/product/office/WA200001612?tab=Overview" class="button secondary" data-icon="apple">Mac</a> <a href="https://workspace.google.com/marketplace/app/valorx_for_salesforce/823192635690" class="button secondary" data-icon="google">Google Sheets</a>
{% endhint %}

### Product Demo

A picture is worth a thousand words. Is a video worth a million words? Here is a quick video to showcase the capabilities of Valorx Fusion.

{% embed url="<https://www.youtube.com/watch?v=o7Mf5YN5n3U>" %}

### Excited to learn more?

{% content-ref url="/pages/-MGEcCEg230e9fjxPKZT" %}
[Building your first App](/valorx-fusion/getting-started/building-your-first-app)
{% endcontent-ref %}

{% content-ref url="/pages/-MGBDf8SVa0ERLD9vXqk" %}
[Design Studio](/valorx-fusion/design-studio/the-power-of-design-studio)
{% endcontent-ref %}

{% content-ref url="/pages/-MGBDh3EJCMyr-LnLtgo" %}
[Runtime](/valorx-fusion/runtime/runtime-ux)
{% endcontent-ref %}

{% content-ref url="/pages/-MGBH9FdTCFcf1Ih0t-t" %}
[App Store](/valorx-fusion/app-store/app-store-submission)
{% endcontent-ref %}


# What is a Valorx App?

**Valorx App** is a **Microsoft Excel template** that is tailored to work with the **objects/entities and fields** in your **CRM**.&#x20;

Take a look at the below example of **Valorx** **App** - it looks just like an Excel file that you work with everyday, but it has deeply integrated with [**Salesforce**](https://www.salesforce.com/). In this example, the table is constructed using the records from the Opportunity object in **Salesforce**. Users can easily retrieve data, work on the data using Excel's functionalities, and save the data back to **Salesforce** with just a button click.

![](https://2472585788-files.gitbook.io/~/files/v0/b/gitbook-legacy-files/o/assets%2F-MFqFFf4143HS0_Wagnz%2F-MGG0ucOkbD1kILZXnBF%2F-MGG2WyMo047sFZ0OBq4%2Fimage.png?alt=media\&token=bf6973c5-ce5e-4874-924f-22fc19c8af30)

### It needs little to no training:partying\_face:&#x20;

Using a **Valorx** **App** is exactly like using an Excel workbook. All the functionalities (Data Filters, Formulas, Conditional Formatting, Pivot Table, Charts and so on) will continue to work, because they are still in Excel.

To access Valorx functionalities, users need to click on the buttons in the **Valorx** **Fusion** **Ribbon** - exactly the same way they would use normal Excel functionalities like inserting a Pivot Table or Chart.

![](https://2472585788-files.gitbook.io/~/files/v0/b/gitbook-legacy-files/o/assets%2F-MFqFFf4143HS0_Wagnz%2F-MGG0ucOkbD1kILZXnBF%2F-MGGD5eIQzyTHgOY3F5e%2Fimage.png?alt=media\&token=e5a5b6b6-9a96-43a0-bbcd-2b33dcdc177d)

Majority of the **Valorx** **Fusion** **Ribbon** buttons are customizable by App Designers in **Design** **Studio**. These buttons are governed by the **Workflow** and **UX**.

{% content-ref url="/pages/-MGBEhaZWG0WoFXynrhd" %}
[Workflow and UX](/valorx-fusion/design-studio/workflow-and-ux)
{% endcontent-ref %}

### Designers and Runtime Users

In **Valorx** **Fusion**, there are two ways to interact with a **Valorx** **Fusion** App - **Design Studio** and **Runtime**.

**Design** **Studio** is built for App Designers to model, configure, and modify **Valorx** **Fusion** Apps, which will be available for the users.

{% content-ref url="/pages/-MGBDf8SVa0ERLD9vXqk" %}
[Design Studio](/valorx-fusion/design-studio/the-power-of-design-studio)
{% endcontent-ref %}

Runtime is where a user will run a **Valorx** **Fusion** App, and use it to retrieve and modify data from your **CRM**. Runtime user will not be able to modify the **Valorx** **Fusion** App in the cloud.

{% content-ref url="/pages/-MGBDh3EJCMyr-LnLtgo" %}
[Runtime](/valorx-fusion/runtime/runtime-ux)
{% endcontent-ref %}

### Single Source of Truth

All your **Valorx** **Apps** are stored in your **CRM**, which means everyone in your team will be using the same Excel template for their day-to-day operations. Only dedicated Valorx Designers can modify your **Valorx** **Apps**. This minimizes the confusion around having multiple versions of Excel workbooks shared across your team.


# Getting Started with Valorx Fusion

The beginning of an epic journey...

Excited to know more about Valorx App and its installation, and packages. This is the first step that any user will look.

Let us have a look at the below points here:

1. &#x20;Installing Valorx Fusion
2. &#x20;Valorx Managed Packages
3. Fusion Auto Update Policy

## Installing Valorx Fusion

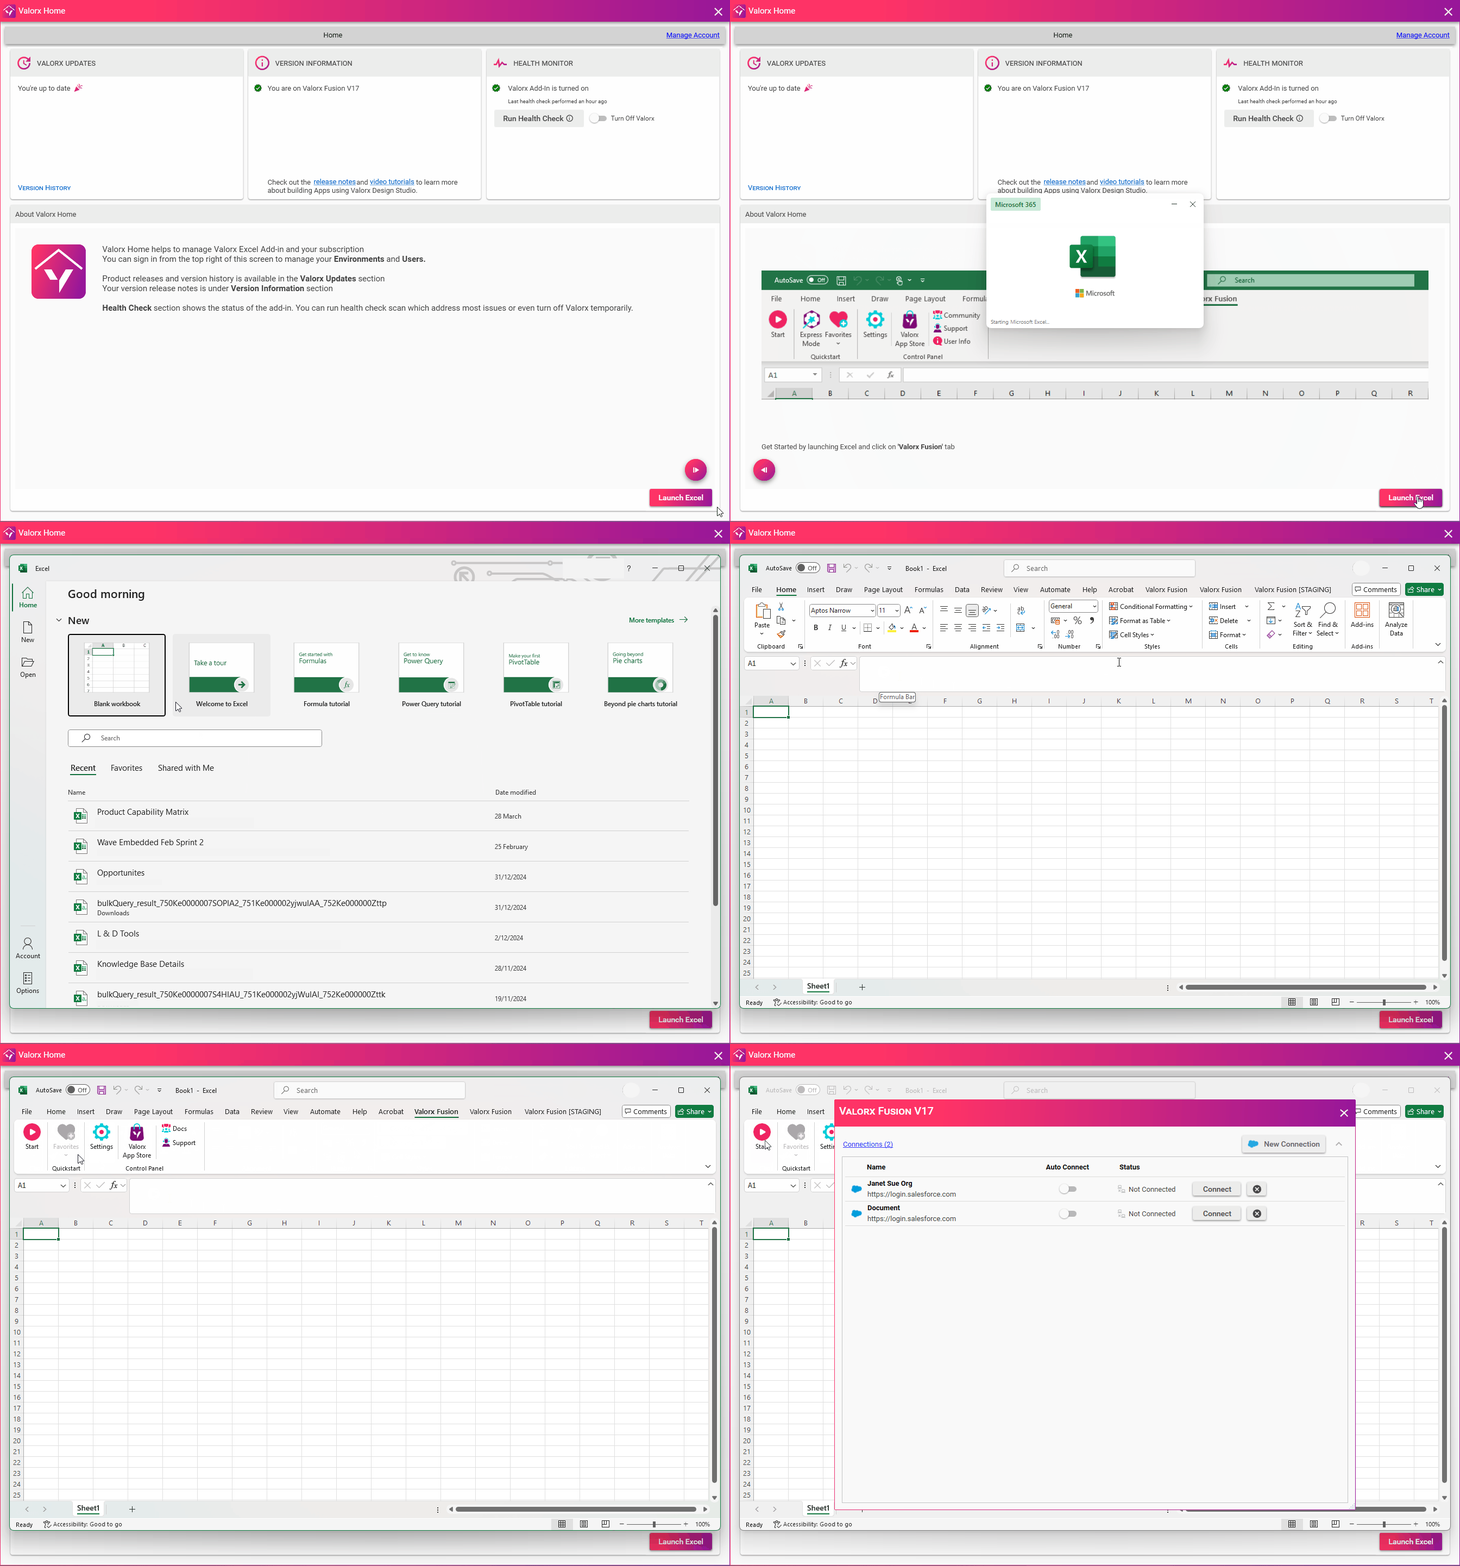
To set up Valorx Fusion on your computer, follow these steps:

{% stepper %}
{% step %}
**Download** the latest version of <a href="https://api.valorx.com/api/download/latest" class="button primary" data-icon="windows">Valorx Fusion</a>
{% endstep %}

{% step %}
**Run the installer** and follow the on-screen instructions to complete the installation.

<figure><img src="https://2472585788-files.gitbook.io/~/files/v0/b/gitbook-x-prod.appspot.com/o/spaces%2F-MFqFFf4143HS0_Wagnz%2Fuploads%2FSw85046356TE7ThcF6e9%2FInstall%20using%20Software.gif?alt=media&amp;token=f94c0f6f-94c7-40aa-975d-fb2a18174eff" alt=""><figcaption></figcaption></figure>
{% endstep %}

{% step %}
Once the installation is complete, **open Microsoft Excel**.

* You should see the **Valorx Fusion ribbon tab** in Excel. This confirms that Valorx Fusion has been successfully installed.

<figure><img src="https://2472585788-files.gitbook.io/~/files/v0/b/gitbook-x-prod.appspot.com/o/spaces%2F-MFqFFf4143HS0_Wagnz%2Fuploads%2FfpzSExKtXgTu6jNfDOcj%2FLaunch%20Excel.gif?alt=media&amp;token=35c2ed8f-ef3e-4268-8d72-823af3658d50" alt=""><figcaption></figcaption></figure>
{% endstep %}
{% endstepper %}

{% hint style="info" %}
**Design** **Studio** is currently supported on Microsoft Windows only. Runtime users can run **Valorx** **Fusion** on other platforms. Please go to Supported Platforms to learn more.
{% endhint %}

{% content-ref url="/pages/-MGBEtjhh2hGQpZvjgGo" %}
[Supported Platforms](/valorx-fusion/runtime/supported-platforms)
{% endcontent-ref %}

## Valorx Managed Package

**Valorx** **Fusion** can run on trial for 15 days without the Valorx managed package installed. During this period, your Apps will be hosted in Valorx infrastructure. Once the managed package is installed, you can transport all your **Valorx** **Fusion** apps to your **Salesforce** environment.&#x20;

{% hint style="success" %}
Valorx does not keep a backup of your Apps after they have been moved.
{% endhint %}

If you wish to install the Valorx managed package, please visit our [**Salesforce AppExchange listing**](https://appexchange.salesforce.com/appxListingDetail?listingId=a0N3A00000G0y2PUAR).

## Fusion Auto Update Policy

To provide customers with a seamless experience and ensure systems remain stable, secure, and up to date, Fusion has introduced an Automatic Update Policy beginning with version **18.4**.

### Update Process

**Manual Updates**

* Users will continue to receive update notifications in **Valorx Home**.
* Updates can be installed manually at any time by selecting **Update Now**.

**Automatic Updates**

* Fusion will intelligently detect stable updates.
* If an update is not installed manually within **30 days**, Fusion will apply the update automatically.

### Policy Scope

* Applies to all customers using **Fusion V18.4 and later**.
* Automatic updates are **enabled by default**.

### Policy Benefits

This policy ensures that all customers benefit from:

* Ongoing stability improvements
* Enhanced performance
* Critical security fixes
* Timely adoption of new features

### Support Considerations

Fusion may be unable to provide support for customers running outdated versions that are not aligned with this policy.

### Customer Action

No action is required. Updates will be applied automatically unless the policy has been disabled at the customer’s request.

* To request that automatic updates be turned off, contact **<support@valorx.com>**.

## Getting Started

Once the installation is completed, open a blank Excel sheet, and user should see **Valorx** **Fusion** **Ribbon** tab. This means you have successfully installed **Valorx** **Fusion**.

Click on **Valorx Fusion Ribbon** tab, and click on **Start** to get started with **Valorx** **Fusion**.

![](https://2472585788-files.gitbook.io/~/files/v0/b/gitbook-x-prod.appspot.com/o/spaces%2F-MFqFFf4143HS0_Wagnz%2Fuploads%2F3sxiYXFEcwdiecdyh4gm%2FRelease%20Notes%20Fusion%20V15%20-%2010.png?alt=media\&token=c21b21bf-74fd-44e7-ba72-745467269e4f)

{% content-ref url="/pages/-MGBFxiQS408XtXfs6YG" %}
[Connections List](/valorx-fusion/getting-started/getting-started-with-valorx/connections-list)
{% endcontent-ref %}


# Salesforce Setup

User Licensing, Access Control, Permission Sets, and Community Partner

Salesforce setup begins when a user installs Valorx Managed Package from [**AppExchange**](https://appexchange.salesforce.com/appxListingDetail?listingId=a0N3A00000G0y2PUAR). Salesforce Admins would be able to install it in **Sandbox** or **Production** Orgs.

Once Valorx package is installed, Salesforce Admins can proceed to the below setup steps:\
1\. [**Assign Licenses to Users**](#assign-licenses-to-users): Production level access.\
2\. [**Configure Valorx User Access**](#configure-valorx-user-access): Configures access at different levels.\
3\. [**Assign Permission Sets**](#assign-permission-sets)**:** User-level functionality that gives access to various tools and functions.\
4\. [**Enable API Access**](#enable-api-access): Ensure users have the **API Enabled** permission, configured via their **Profile** or an assigned **Permission Set**.\
5\. [**Configure Valorx Fusion Connected App**](#configure-valorx-fusion-connected-app): To ensure Fusion users can access and use Fusion without authentication issues\
6\. [**Assigning Licenses to Community Partner**](#assigning-license-to-community-partner)**:** Grant licenses to Community Partner users who need access to Fusion

{% hint style="info" %}
Access Control is only honored in Production environment.&#x20;

Sandboxes are usually used for development and UAT. To streamline the process, runtime users can run any apps in sandboxes, as long as they have the Valorx Permission set assigned to them.
{% endhint %}

## Assign Licenses to Users

Salesforce Admins should be able to provide licenses to the users who require Valorx access. \
On the **setup → installed packages**, find the Valorx package.\
\
Against the Valorx package, click on **Manage Licenses**.

<figure><img src="https://2472585788-files.gitbook.io/~/files/v0/b/gitbook-x-prod.appspot.com/o/spaces%2F-MFqFFf4143HS0_Wagnz%2Fuploads%2Fhra1wYCH9cXECLksXvn2%2FAssaigning%20License.png?alt=media&amp;token=9ada4019-a998-49fd-9630-22efe08beab6" alt=""><figcaption></figcaption></figure>

Package Manager window will open where you will find an overview of Valorx licenses along with a list of users who currently possess the license. Additionally, you will be provided with options to either add or remove user license assignments.

The first section "**Enable for Platform Integrations**" will have the information regarding the below

1. **Package Name**: This refers to the name of the package that is being managed within the Salesforce platform. It serves as a unique identifier for the particular package.
2. **Status**: The "Status" represents the current condition or state of the package. It could indicate whether it is active, inactive, installed, uninstalled, or any other relevant status.
3. **Expiration Date**: The "Expiration Date" is the date when the current license or subscription for the package is set to expire. After this date, the access or usage of the package might be restricted, or a renewal might be required.
4. **Enable for Platform Integrations**: This is a feature or setting that allows the software package or integration to interact and integrate with other platforms, systems, or applications within the Salesforce. Enabling this option ensures that the package can seamlessly work with other integrated components.
5. **Publisher**: The "Publisher" refers to the organization or entity that developed and released the software package or integration. It identifies the source or origin of the package.
6. **Allowed Licenses**: "Allowed Licenses" denotes the total number of user licenses that the organization is permitted to assign for this particular package. It signifies the maximum number of users who can use this package.
7. **Used Licenses**: "Used Licenses" indicates the current number of user licenses that have been assigned and are actively being used by users for the specific package.

<figure><img src="https://2472585788-files.gitbook.io/~/files/v0/b/gitbook-x-prod.appspot.com/o/spaces%2F-MFqFFf4143HS0_Wagnz%2Fuploads%2FVknvc25U37fpplYH9JCY%2FCommunity%20Partner%2014.png?alt=media&amp;token=2c874487-4c83-495f-9d97-94eab036a886" alt=""><figcaption></figcaption></figure>

In the second section of "**Licensed Users**", you have the option to add or remove users. To add users, simply click on "**Add User**." This action will display a list of available users from which you can make your selection. After choosing the desired users, click "**Add**," and their information will be displayed under the "Selected Users" section.

<figure><img src="https://2472585788-files.gitbook.io/~/files/v0/b/gitbook-x-prod.appspot.com/o/spaces%2F-MFqFFf4143HS0_Wagnz%2Fuploads%2FM87K5kKN1vkBcfGHMnqP%2FCommunity%20Partner%2015.png?alt=media&amp;token=7b6d321b-7661-457f-b601-d7078a044e28" alt=""><figcaption></figcaption></figure>

In this section, you can discover details about the permitted number of licenses and the current allocation status. Access to Valorx Fusion is granted exclusively to users who have been assigned a license.

<figure><img src="https://2472585788-files.gitbook.io/~/files/v0/b/gitbook-x-prod.appspot.com/o/spaces%2F-MFqFFf4143HS0_Wagnz%2Fuploads%2Fb5HIRIEFEkGttv99GT9k%2FCommunity%20Partner%2016.png?alt=media&amp;token=bb758fa6-5941-49bf-9a05-616cf56ba710" alt=""><figcaption></figcaption></figure>

## Configure Valorx User Access

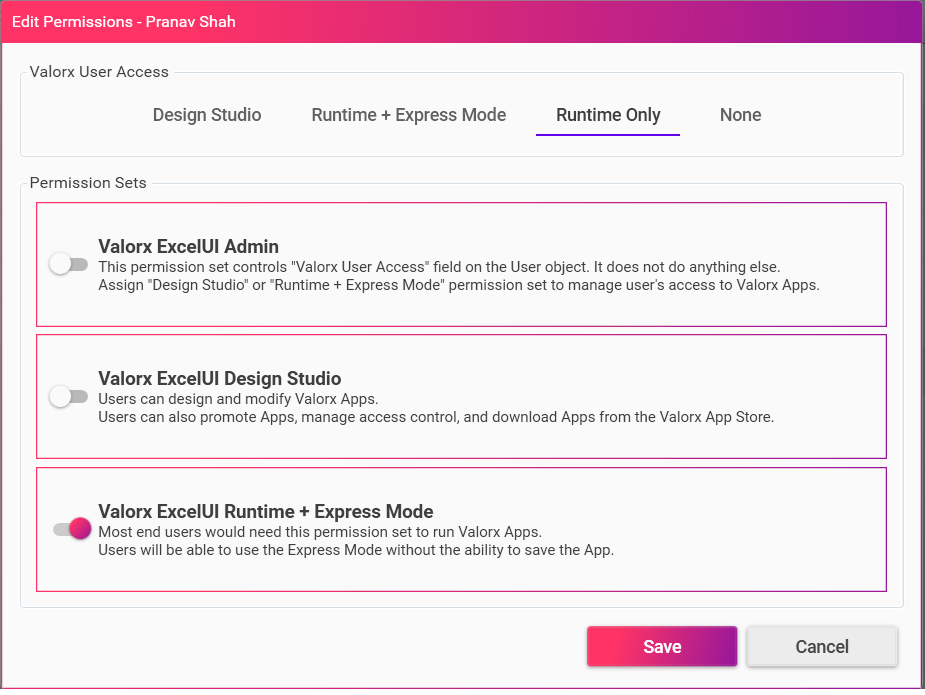
As a part of our managed package, we ship a field on the User object called **Valorx User Access** (see image below). This can control user’s access level using this picklist.&#x20;

There are three different access levels available:&#x20;

* **Design Studio:** Design or any changes to the app can be made with the permission level.
* **Runtime + Express Mode:** Run the Valorx apps along with the ability to create apps in Express mode.
* **Runtime** **Only:** Run the app but no changes can be made.

<figure><img src="https://2472585788-files.gitbook.io/~/files/v0/b/gitbook-x-prod.appspot.com/o/spaces%2F-MFqFFf4143HS0_Wagnz%2Fuploads%2F3uCCDAXCNBCepm2AwP2J%2FSalesforce%20Setup%201.png?alt=media&amp;token=897c1039-ce1a-49ae-9ecd-b58b1290bfec" alt=""><figcaption></figcaption></figure>

<figure><img src="https://2472585788-files.gitbook.io/~/files/v0/b/gitbook-x-prod.appspot.com/o/spaces%2F-MFqFFf4143HS0_Wagnz%2Fuploads%2F3G6mVH2kJdrCIfuaKycJ%2FSalesforce%20Setup%201.png?alt=media&amp;token=a57883e6-d62e-4ba5-84f8-d378aa923b53" alt=""><figcaption></figcaption></figure>

{% hint style="info" %}
Recommended Action: Add Valorx User Access field to User layout (one-time).
{% endhint %}

## Assign Permission Sets

Valorx ships with three standard permission sets. **Admin**, **Design Studio,** and **Runtime + Express Mode**.&#x20;

**Admin:** Admin permission set controls **Valorx User Access** field on the User object. **Valorx User Access** controls user’s access levels in the Valorx client. Admin permission set does not include **Runtime** or Design Studio permissions.

**Design Studio**: Assign **Design Studio** permission set to those who need to design and promote apps. This permission set includes everything included in Runtime + Express Mode permission set.

**Runtime + Express Mode**: These permission sets provide different levels of access to Valorx package components. Most end users would require **Runtime + Express Mode** permission set.

<figure><img src="https://2472585788-files.gitbook.io/~/files/v0/b/gitbook-x-prod.appspot.com/o/spaces%2F-MFqFFf4143HS0_Wagnz%2Fuploads%2F2YlLuM5mEkqEhPHN0jVJ%2FPermission.png?alt=media&amp;token=1e6b3e71-c1ee-4b01-bf19-2c12c81e2574" alt=""><figcaption></figcaption></figure>

Valorx also provides an option to assign the licenses through Valorx Admin. Click [**Valorx Administration**](/valorx-fusion/getting-started/getting-started-with-valorx/valorx-administration) to know how to provide the Licenses through Valorx Admins.

{% hint style="info" %}
**License to Community Partner:** This is an optional license offered to users based on the specific needs of the organization. It grants limited permissions exclusively to designated community users within a Salesforce organization.
{% endhint %}

## Enable API Access

To use Valorx Fusion, users must have the **API Enabled** permission in Salesforce. This can be configured on the user’s **Profile** or via an assigned **Permission Set**.

#### **Steps to Enable API Access**

1. Log in to Salesforce as an Admin and navigate to **Setup**.
2. In Setup, go to **Administration → Users**.
3. Do one of the following:
   * Select **Profiles**, then choose the relevant user profile, or
   * Select **Permission Sets**, then choose the relevant permission set
4. Scroll to **System Permissions**.
5. Click **Edit**.

<figure><img src="https://2472585788-files.gitbook.io/~/files/v0/b/gitbook-x-prod.appspot.com/o/spaces%2F-MFqFFf4143HS0_Wagnz%2Fuploads%2FbEnpjUtSlCk2TNUHMhhH%2FSalesforce%20Profile%20Settings.gif?alt=media&amp;token=138ba559-b9f6-422d-a71c-4a6a8f499f56" alt=""><figcaption></figcaption></figure>

6. Locate and enable **API Enabled**.
7. Click “**Save**”.

<figure><img src="https://2472585788-files.gitbook.io/~/files/v0/b/gitbook-x-prod.appspot.com/o/spaces%2F-MFqFFf4143HS0_Wagnz%2Fuploads%2FIFE7MEF6feySiPdQNXGl%2FSalesforce%20Profile%20Settings%20Part%202.gif?alt=media&amp;token=92af6c10-1473-4653-b89c-e9d9b6f4074e" alt=""><figcaption></figcaption></figure>

***

## Configure Valorx Fusion Connected App

Valorx Fusion uses a Salesforce Connected App to establish a secure connection between Fusion and Salesforce. The Connected App handles authentication and allows users to sign in to Fusion using their Salesforce credentials.

The required Connected App varies depending on your Fusion version and platform. Starting with **Fusion v21.20 and later**, a new Connected App (**Valorx Fusion v2**) is required for Fusion Windows Client users.&#x20;

If the **Valorx Fusion Managed Package v2.4** is not yet installed, this Connected App must be configured manually to support updated authentication and security enhancements. Earlier versions of Fusion continue to use the previous Connected App (**Valorx Fusion**). Fusion **Mac and the Google Sheets Add-in** use a separate Connected App (**Valorx Fusion Cloud**).

{% hint style="danger" %}

## Action required by July 10, 2026

All organizations must implement the new Valorx Fusion Connected App by this date to ensure uninterrupted and more secure connectivity between Valorx Fusion and Salesforce.
{% endhint %}

*Use the quick-lookup table below, or jump straight to the scenario that matches your setup.*

| Fusion Version                       | Required Connected App |
| ------------------------------------ | ---------------------- |
| Fusion v21.20 and later              | Valorx Fusion v2       |
| Fusion Mac and Google Sheets Add-ins | Valorx Fusion Cloud    |
| Fusion v21 and earlier               | Valorx Fusion          |

### What You Need To Do, Based On Your Setup

{% hint style="success" %}

### <mark style="color:$success;background-color:$success;">NO ACTION NEEDED</mark>   Managed Package v2.4 installed

Managed Package v2.4 includes both new Connected Apps (Valorx Fusion v2 and Valorx Fusion Cloud), so most of the setup is handled for you automatically.

**Fusion Windows Client v21.20 or v21.30**: You'll be given a choice between the Legacy Connected App (Valorx Fusion) and the New Connected App (Valorx Fusion v2) when setting up your connection. We recommend choosing Valorx Fusion v2, since it includes the latest authentication and security improvements.
{% endhint %}

{% hint style="warning" %}

### <mark style="color:$warning;background-color:$warning;">ACTION NEEDED</mark>    Older Managed Package (v1.9 or earlier) + Windows Client v21.20 or later

Your Fusion Windows Client needs the new Valorx Fusion v2 Connected App, but since your Managed Package hasn't been upgraded, it won't be installed for you automatically.

**Action needed:** Ask your Salesforce Admin to manually install the Valorx Fusion v2 Connected App. This is a one-time setup. See the [installation steps below](#configure-valorx-fusion-connected-app-v2).

**Risk if not done:** Users won't be able to log in to Fusion until this is installed.

***TIP:** If you upgrade to Managed Package v2.4 instead, this Connected App is installed for you automatically, no manual step required.*
{% endhint %}

{% hint style="warning" %}

### <mark style="color:$warning;background-color:$warning;">ACTION NEEDED</mark>    Managed Package v2.4 installed + Windows Client v21.10 or lower

Your Fusion Windows Client is on an older version that isn't compatible with the new Valorx Fusion v2 Connected App.

**Action needed:** Install the **Fusion Windows Client v21.20 or later.**

**Risk if not done:** Users won't be able to log in to Fusion until this is installed.
{% endhint %}

{% hint style="danger" %}

### <mark style="color:$danger;background-color:$danger;">HIGH RISK</mark>     Older Managed Package (v1.9 or earlier) + Windows Client older than v21.20

This combination is at high risk. Users on this setup may lose the ability to log in to Fusion without warning.

**Action:** Upgrade as soon as possible. See the Recommended Fix below.

**Risk if skipped:** Users may lose access to Fusion without warning after 10th July 2026.
{% endhint %}

### Recommended Fix (Fastest Path)

Upgrading both components is the simplest way to stay fully supported.

<table><thead><tr><th width="234">Component</th><th width="103">Version</th><th>Notes</th></tr></thead><tbody><tr><td>Valorx Managed Package</td><td>v2.4</td><td>Includes Valorx Fusion v2 and Valorx Fusion Cloud</td></tr><tr><td>Valorx Windows Client</td><td>v21.30</td><td>Latest available version</td></tr></tbody></table>

{% hint style="info" %}
Download Latest Windows Fusion Client and Managed Package:

<a href="https://api.valorx.com/api/download/latest" class="button primary" data-icon="windows">Windows</a> <a href="https://appexchange.salesforce.com/listingDetail?listingId=a0N3A00000G0y2PUAR&#x26;tab=e" class="button primary" data-icon="puzzle">Fusion Managed Package</a>&#x20;
{% endhint %}

### Can't Upgrade Managed Package Right Now?

| Your setup                                              | Add this                             | What it means                                              |
| ------------------------------------------------------- | ------------------------------------ | ---------------------------------------------------------- |
| Older Managed Package + Windows Client v21.20 or v21.30 | Manually install Valorx Fusion v2    | Select "New Connected App" when setting up the connection. |
| Older Managed Package + Mac or Google Sheets            | Manually install Valorx Fusion Cloud | Select "New Connected App" when setting up the connection. |

### Configure Valorx Fusion Connected App v2

{% hint style="warning" %}
Use this section if you are installing or upgrading to **Fusion v21.20** or later. **Valorx Fusion v2** is required for these versions and includes updated authentication and security settings. If **Managed Package v2.4 is not installed**, the Connected App must be configured manually.
{% endhint %}

If users are unable to log in, the following error may appear if access is blocked:

<figure><img src="https://2472585788-files.gitbook.io/~/files/v0/b/gitbook-x-prod.appspot.com/o/spaces%2F-MFqFFf4143HS0_Wagnz%2Fuploads%2F8xFKInoNFdkOnk7mhuuV%2FError.png?alt=media&amp;token=cf69ac21-a36e-4099-af88-91597c6b775f" alt=""><figcaption></figcaption></figure>

Follow the steps below to manually install the Valorx Fusion v2 Connected App in your Salesforce organization.

{% stepper %}
{% step %}
**Go to Setup**

In your Salesforce org, click the gear icon (⚙) at the top right corner of the screen, then select Setup from the dropdown menu.
{% endstep %}

{% step %}
**Search for Connected Apps OAuth Usage**

In the Quick Find search box on the left sidebar, type Connected Apps OAuth Usage and select it from the search results.
{% endstep %}

{% step %}
**Select Valorx Fusion v2**

In the Connected Apps OAuth Usage list, locate and click on Valorx Fusion v2 to open its details.
{% endstep %}

{% step %}
**Click Install**

On the Valorx Fusion v2 details page, click the Install button to begin the installation process.
{% endstep %}

{% step %}
**Confirm the Popup**

A confirmation popup will appear. Click Install in the popup to proceed with the installation.
{% endstep %}

{% step %}
**Installation Confirmed**

A confirmation page will be displayed, indicating that Valorx Fusion v2 has been successfully installed as a Connected App in your Salesforce org.

<figure><img src="https://2472585788-files.gitbook.io/~/files/v0/b/gitbook-x-prod.appspot.com/o/spaces%2F-MFqFFf4143HS0_Wagnz%2Fuploads%2F5aRNROopq5GNKZmOtN02%2FInstall%20Fusion%20Connected%20App%20v2.gif?alt=media&amp;token=b225a402-ccda-4062-91cb-8f026afed2be" alt=""><figcaption></figcaption></figure>
{% endstep %}
{% endstepper %}

### If Valorx Fusion Does Not Appear in the List

If you already have the Fusion managed package is already installed but **“Valorx Fusion”** is not listed under ***Connected Apps OAuth Usage***, follow the steps below:

1. Using a **Salesforce System Administrator** user, open Excel and click the **Valorx Fusion** tab on the Ribbon.
2. Click **Start** button.
3. Click **New Connection**.
4. Enter a name and choose the appropriate **Salesforce endpoint**, then click **Add**.
5. Log in using the **System Administrator** Salesforce credentials.
6. Once the connection is successful, go back to **Salesforce Setup** → **Connected Apps OAuth Usage**.
7. You should now see **Valorx Fusion** in the list, ready for installation.

***

## OAuth Authentication Errors

The following sections describe common OAuth errors that may occur when connecting to Fusion and how to resolve them.

### Error: OAUTH\_APP\_BLOCKED

<div align="left"><figure><img src="https://2472585788-files.gitbook.io/~/files/v0/b/gitbook-x-prod.appspot.com/o/spaces%2F-MFqFFf4143HS0_Wagnz%2Fuploads%2FxE597dswIzVvQMrHn3Ps%2FError%201C.png?alt=media&amp;token=6ba2fc87-4711-4b29-81b6-9542cb255f14" alt="" width="349"><figcaption></figcaption></figure></div>

**Issue:** Users may see the following error while connecting to Fusion:

* **Connection Failed**
* **App Name:** Valorx Fusion
* **Error Code:** OAUTH\_APP\_BLOCKED
* **Error Message:** This app is blocked by admin

This error occurs when the Valorx Fusion Connected App is explicitly blocked in Salesforce. When blocked, all login attempts are denied, including attempts by System Administrators.

#### Resolution

1. Go to **Setup**.
2. Search for **Connected Apps OAuth Usage**.
3. Select **Valorx Fusion**.
4. If the **Unblock** button appears, click **Unblock**.

<figure><img src="https://2472585788-files.gitbook.io/~/files/v0/b/gitbook-x-prod.appspot.com/o/spaces%2F-MFqFFf4143HS0_Wagnz%2Fuploads%2FID2XPPimGfgq51Zi3cya%2FAdmin%20unblocked.gif?alt=media&amp;token=d9195223-bbfc-4eab-bf19-69e869815437" alt=""><figcaption><p>Unblock Valorx Fusion</p></figcaption></figure>

### Error: OAUTH\_APP\_ACCESS\_DENIED

<div align="left"><figure><img src="https://2472585788-files.gitbook.io/~/files/v0/b/gitbook-x-prod.appspot.com/o/spaces%2F-MFqFFf4143HS0_Wagnz%2Fuploads%2FBgNS8kSwM2eqm5pw66or%2FError%202.png?alt=media&amp;token=bc93ae09-a0c6-4680-a03c-c248d3776480" alt="" width="351"><figcaption></figcaption></figure></div>

**Issue**: Users may see the following error:

* **Connection Failed**
* **App Name:** Valorx Fusion
* **Error Code:** OAUTH\_APP\_ACCESS\_DENIED
* **Error Message:** User is not admin approved to access this app

This error occurs when the Connected App is configured with the following setting:

* **Permitted Users:** Admin-approved users are pre-authorized

In this configuration, users must be explicitly granted access through Profiles or Permission Sets. If users are not allow listed, Salesforce blocks OAuth authentication.

#### Resolution

**Option 1 — Approve Specific Users (Recommended)**

1. Go to **Setup**.
2. Search for **Manage Connected Apps**.
3. Click **Valorx Fusion**.
4. Click **Manage Profiles**.
5. Select the required Profiles.
6. Click **Save**.

<figure><img src="https://2472585788-files.gitbook.io/~/files/v0/b/gitbook-x-prod.appspot.com/o/spaces%2F-MFqFFf4143HS0_Wagnz%2Fuploads%2FzlddYTevQWeS8u6YeMlT%2FManage%20Profiles.gif?alt=media&amp;token=bb99e00c-22df-4879-9f9b-8bbbb8a625df" alt=""><figcaption></figcaption></figure>

**Option 2 — Allow All Users to Self-Authorize**

If admin approval is not required:

1. Go to **Setup → App Manager**.
2. Click **Valorx Fusion**.
3. Click **Edit Policies**.
4. **Under OAuth Policies**, for Permitted user set to:
   * **Permitted Users = All users may self-authorize**
5. Click **Save**.

<figure><img src="https://2472585788-files.gitbook.io/~/files/v0/b/gitbook-x-prod.appspot.com/o/spaces%2F-MFqFFf4143HS0_Wagnz%2Fuploads%2FR9q9ppkeBhkpv7HhjI2t%2Fall%20user%20can%20access.gif?alt=media&amp;token=b3402363-8122-4802-85ed-b416d8af50bd" alt=""><figcaption></figcaption></figure>

### Permitted Users Option Locked (Admin-Approved Only)

<div align="left"><figure><img src="https://2472585788-files.gitbook.io/~/files/v0/b/gitbook-x-prod.appspot.com/o/spaces%2F-MFqFFf4143HS0_Wagnz%2Fuploads%2Fast1cDbLVe4rlaavtSyT%2Fimage%20(5).png?alt=media&amp;token=ff2fa37b-9fd8-422e-8f63-0f939fa3ab31" alt=""><figcaption></figcaption></figure></div>

**Issue**: While configuring the Connected App:

* The **Permitted Users** setting is greyed out and cannot be edited.
* Users may also encounter the **OAUTH\_APP\_ACCESS\_DENIED** error.

This occurs when Salesforce **API Access Control** is enabled at the org level.

When the following security setting is enabled:

> For admin-approved users, limit API access to only allowlisted connected apps.

Salesforce automatically:

* Forces Connected Apps to **Admin-approved users**
* Locks the **Permitted Users** setting
* Requires manual authorization of users
* Prevents user self-authorization

This is expected Salesforce security behavior.

#### Resolution

Since the setting cannot be modified, users must be explicitly authorized.

**Steps to Authorize Users**

1. Go to **Setup**.
2. Search for **Manage Connected Apps**.
3. Select **Valorx Fusion**.
4. Click **Manage Profiles**.
5. Add the required Profiles.
6. Click **Save**.
7. Ask users to reconnect to Fusion.

<figure><img src="https://2472585788-files.gitbook.io/~/files/v0/b/gitbook-x-prod.appspot.com/o/spaces%2F-MFqFFf4143HS0_Wagnz%2Fuploads%2FzlddYTevQWeS8u6YeMlT%2FManage%20Profiles.gif?alt=media&amp;token=bb99e00c-22df-4879-9f9b-8bbbb8a625df" alt=""><figcaption></figcaption></figure>

### Salesforce Reference

For additional details about API access restrictions, refer to Salesforce documentation:

Restrict Access to APIs with Connected Apps\
<https://help.salesforce.com/s/articleView?id=xcloud.security_api_access_control_all_users.htm&type=5>

***

## Assigning License to Community Partner

A community user is an individual with authorized entry to a designated community within a Salesforce organization. In Salesforce, the access and permissions for community users can be managed using diverse settings and configurations. Companies have the flexibility to tailor what community users can see, modify, and engage with, thereby ensuring proper protection of sensitive information and data.

#### Clone Permission Set:

1. Log in to Salesforce and go to Setup. Search for the "**Permission Sets**" and select it from the list.
2. Look for "**Valorx ExcelUI Admin**", "**Valorx ExcelUI Design Studio**" or "**Valorx ExcelUI Runtime + Express Mode**" from the list of Permission Sets and click on "**Clone**" depending on which permission set needs to be assigned.

<figure><img src="https://2472585788-files.gitbook.io/~/files/v0/b/gitbook-x-prod.appspot.com/o/spaces%2F-MFqFFf4143HS0_Wagnz%2Fuploads%2F1WkfMtrGl188m1XG8fVf%2FSalesforce%20Setup%203.png?alt=media&amp;token=f0c21f0e-fabd-4063-a2ad-27f0bcc9086f" alt=""><figcaption></figcaption></figure>

3. Provide a descriptive logical name and API name under "**Enter Permission set information**" for the cloned permission set, then click "**Save**."

<figure><img src="https://2472585788-files.gitbook.io/~/files/v0/b/gitbook-x-prod.appspot.com/o/spaces%2F-MFqFFf4143HS0_Wagnz%2Fuploads%2FM5wyC3MUwVWdt1OqB760%2FSalesforce%20Setup%204.png?alt=media&amp;token=e071300e-3e9c-47e7-8247-3076698b6484" alt=""><figcaption></figcaption></figure>

3. Now open the permission set that you have created by cloning.
4. Click on "**Object Settings**" under Apps from the Permission Set Overview window.

<figure><img src="https://2472585788-files.gitbook.io/~/files/v0/b/gitbook-x-prod.appspot.com/o/spaces%2F-MFqFFf4143HS0_Wagnz%2Fuploads%2FTFVbp7ixj5ToTrlSa1wC%2FCommunity%20Partner%2020.png?alt=media&amp;token=a19dcbfd-be21-47c0-80f3-5c4f774ee5d1" alt=""><figcaption></figcaption></figure>

5. Click on the "**App**" object and then click on the "**Edit**" button.

<figure><img src="https://2472585788-files.gitbook.io/~/files/v0/b/gitbook-x-prod.appspot.com/o/spaces%2F-MFqFFf4143HS0_Wagnz%2Fuploads%2FB7CmNENzafp53taOagXh%2FCommunity%20Partner%2021.png?alt=media&amp;token=cfcdea88-dbd0-4486-9131-10f5d79ace28" alt=""><figcaption></figcaption></figure>

6. Uncheck the box next to "**View All**" in the Object Permissions section and click on "**Save**".

<figure><img src="https://2472585788-files.gitbook.io/~/files/v0/b/gitbook-x-prod.appspot.com/o/spaces%2F-MFqFFf4143HS0_Wagnz%2Fuploads%2FUCgRP8h3wF3iV6ukdhH8%2FCommunity%20Partner%2022.png?alt=media&amp;token=7f03e94f-99f2-4646-a2df-b452a3e08edf" alt=""><figcaption></figcaption></figure>

7. Open the "**Access Control**" object and repeat steps 6 and 7 to remove the "**View All**" access.

<figure><img src="https://2472585788-files.gitbook.io/~/files/v0/b/gitbook-x-prod.appspot.com/o/spaces%2F-MFqFFf4143HS0_Wagnz%2Fuploads%2FoE4IJpuPE3G5k4c6ZTBC%2FCommunity%20Partner%2023.png?alt=media&amp;token=fa849e0c-90ae-4bb0-9f65-c989d658d05b" alt=""><figcaption></figcaption></figure>

7. Go back to the Object Settings and look for any other objects with the "**View All**" permission.
8. For each object found with this permission, open it and follow Step 6 and 7 to remove the "**View All**" access.

#### Grant the partner community user a new (cloned) permission set.

1. In Salesforce setup, navigate to Users > Users and open the specific partner community user's profile.
2. Under "**Permission Sets**," click "**Edit Permission Set Assignment**."
3. Assign the desired cloned permission set and click **Save**.

<figure><img src="https://2472585788-files.gitbook.io/~/files/v0/b/gitbook-x-prod.appspot.com/o/spaces%2F-MFqFFf4143HS0_Wagnz%2Fuploads%2F1ZKSW9D57TaKP8VUslBL%2FCommunity%20Partner%2024.png?alt=media&amp;token=59b8eb13-597d-4c3e-9ea2-c0c93e2627ae" alt=""><figcaption></figcaption></figure>

#### **Enable Customer Access to Files**

1. Start by opening the App Launcher and search for “**Valorx**” in the search box.

<figure><img src="https://2472585788-files.gitbook.io/~/files/v0/b/gitbook-x-prod.appspot.com/o/spaces%2F-MFqFFf4143HS0_Wagnz%2Fuploads%2F1D7fM5HNXvhVPmGH35lR%2FCommunity%20Partner.png?alt=media&amp;token=46c8f645-ce6f-4dec-b93b-db0454c6a361" alt=""><figcaption></figcaption></figure>

2. Select the Valorx App and pick the app you want to share from the “**App Name**” list.

<figure><img src="https://2472585788-files.gitbook.io/~/files/v0/b/gitbook-x-prod.appspot.com/o/spaces%2F-MFqFFf4143HS0_Wagnz%2Fuploads%2F3Art67PYnP5wUg1ck3E0%2FCommunity%20Partner%2017.png?alt=media&amp;token=90023cae-8cdd-4914-bbc2-0fb5398c50a6" alt=""><figcaption></figcaption></figure>

3. Navigate to the "**Notes and Attachments**" section and click on View All to see all the existing files.

<figure><img src="https://2472585788-files.gitbook.io/~/files/v0/b/gitbook-x-prod.appspot.com/o/spaces%2F-MFqFFf4143HS0_Wagnz%2Fuploads%2FhzH9TFsUadirxq23HWhm%2FCommunity%20Partner%2018.png?alt=media&amp;token=dbb47af9-0b21-4c30-9fb9-fa3764e9478c" alt=""><figcaption></figcaption></figure>

4. Choose the first file click on down arrow and click on “**Share**” from the menu at the top right corner.
5. A Share window will pop up, where you can expand the “**Who Can Access**” section.
6. Turn on "**Customer Access**" for the App Name and click on Done.

<figure><img src="https://2472585788-files.gitbook.io/~/files/v0/b/gitbook-x-prod.appspot.com/o/spaces%2F-MFqFFf4143HS0_Wagnz%2Fuploads%2FCJ23FuipYbH0j0P8R04H%2FCommunity%20Partner%2019.png?alt=media&amp;token=2c8270d6-f103-4298-b42b-37de3420145b" alt=""><figcaption></figcaption></figure>

***Note***: Repeat **Steps 4-6** for each file in the “**Notes and Attachments**” section.

7. Access Salesforce "**Setup**" and look for "**Sharing Settings**"; click on it to open.
8. Under "**Default Sharing Settings**," click on **Edit**.

<figure><img src="https://2472585788-files.gitbook.io/~/files/v0/b/gitbook-x-prod.appspot.com/o/spaces%2F-MFqFFf4143HS0_Wagnz%2Fuploads%2FgoP2eBEeqDA4k2OuQwxi%2FCommunity%20Partner%204.png?alt=media&amp;token=22bdc67a-faea-4514-9f24-6d839ff785f9" alt=""><figcaption></figcaption></figure>

9. Find the "**App**" object and change its "**Default External Access**" to "**Public Read Only**" from the drop-down menu.
10. Save the changes made to the "**Default Sharing Settings.**"

<figure><img src="https://2472585788-files.gitbook.io/~/files/v0/b/gitbook-x-prod.appspot.com/o/spaces%2F-MFqFFf4143HS0_Wagnz%2Fuploads%2FIMtrA8zs6lXj4F59trOf%2FSalesforce%20Setup%202.png?alt=media&amp;token=805415d8-ee31-4d1f-bb2b-4c5183b1d71b" alt=""><figcaption></figcaption></figure>

#### Check the following once you complete assigning the new permission set and enabling the customer access to the related files:

* [x] Test the connection using Valorx Fusion with the partner community user. The app with "**Customer Access**" sharing enabled will now be accessible to the user.
* [x] To provide access to an additional app, follow steps 2-7 under the "[**Enable Customer Access to Files**](#enable-customer-access-to-files)" section mentioned above.


# Connections List

Once the installation of **Valorx Fusion** is completed successfully, then users need to create a **New Connection**. This screen will allow you to connect to the existing connections, or manage your connections.

After the installation, the user should see **Valorx** **Fusion** **Ribbon** tab in the Excel sheet. This means you have successfully installed **Valorx** **Fusion**.&#x20;

![](https://2472585788-files.gitbook.io/~/files/v0/b/gitbook-x-prod.appspot.com/o/spaces%2F-MFqFFf4143HS0_Wagnz%2Fuploads%2F3sxiYXFEcwdiecdyh4gm%2FRelease%20Notes%20Fusion%20V15%20-%2010.png?alt=media\&token=c21b21bf-74fd-44e7-ba72-745467269e4f)

#### New Connection

Users should first create a connection before creating an app. Users can create new connection under four different Login Endpoints like Login, Sandbox, Custom Domain and Community.&#x20;

Follow the below steps to create a **New Connection**.

1. Click on **Valorx Fusion Ribbon** tab and click on **Start**.
2. **Connections** window will open and now users needs to click on **New** **Connection**.
3. Provide the name of the connection under **Connection Name**.
4. A **Salesforce Connection** window will open which will have four Login Endpoint like Login, Sandbox, Custom Domain and Community.

* **Login** : Users can create the connection with their **Salesforce Org**  by providing **Salesforce** **Login** credentials.
* **Sandbox** : Users can create the connection with Salesforce Sandbox Org by providing the login credentials.
* **Custom Domain** : As the name suggests here, users can create
* **Community** : Community URL needs to be validated when adding a new connection to the start screen.\
  ***Example*** : If provided URL has a pattern of "\*.lightning.force.com" then provide a valid suggestion.

Click on **Add** then, provide the login credentials for **Salesforce.**

<div align="left"><img src="https://2472585788-files.gitbook.io/~/files/v0/b/gitbook-x-prod.appspot.com/o/spaces%2F-MFqFFf4143HS0_Wagnz%2Fuploads%2FsHH5bLw2NxxdkLv70Beh%2FRelease%20Notes%20Fusion%20V15%20-%2011.png?alt=media&amp;token=686f3d00-d8c2-4e27-91fe-9173b6180caf" alt=""></div>

<div align="left"><img src="https://2472585788-files.gitbook.io/~/files/v0/b/gitbook-legacy-files/o/assets%2F-MFqFFf4143HS0_Wagnz%2F-MlTP2jOsSMgWdp95JUd%2F-MlTQXmUO7F7lxk5FLxL%2FSalesforce%20Connection.PNG?alt=media&amp;token=6ece6d94-a62c-487e-b097-173427180e60" alt="" width="563"></div>

### **Missing Package/Configuration**

Users may receive the below **Missing Package/Configuration** message when they do not have the **Valorx Package** installed or expired. This validation message will guide the users to verify few points if the package is installed and active.&#x20;

* Check if the **Valorx Managed Package** is installed. Install the package from [**AppExchange**](https://appexchange.salesforce.com/appxListingDetail?listingId=a0N3A00000G0y2PUAR) in case it is not installed.
* Contact **<Support@valorx.com>** if the package has expired.
* If the package is installed check if the [**Valorx Licence**](/valorx-fusion/getting-started/getting-started-with-valorx/salesforce-setup#assign-licenses-to-users) and [**Permissions**](/valorx-fusion/getting-started/getting-started-with-valorx/salesforce-setup#assign-permission-sets) are assigned.

![](https://2472585788-files.gitbook.io/~/files/v0/b/gitbook-legacy-files/o/assets%2F-MFqFFf4143HS0_Wagnz%2F-Mkvb1FZxIBaB1MNLzww%2F-Mkvcl2_llRyBdC8YLHE%2FMicrosoftTeams-image%20\(9\).png?alt=media\&token=f38df7c4-2c06-4278-8eb6-f498b3e99fae)

### **Missing Prerequisite Step**

Users may receive the below **Missing Prerequisite Site** message when the permissions are not set however, the **Valorx Package** is installed.

* Check if the **Valorx Managed Package** is installed correctly.
* Check whether the permission set is assigned to the account which are needed to access the Valorx resources.

![](https://2472585788-files.gitbook.io/~/files/v0/b/gitbook-legacy-files/o/assets%2F-MFqFFf4143HS0_Wagnz%2F-MkvgWsqxEsFvYS94a78%2F-Mkvie6XOfpRtsMN4iDz%2FMicrosoftTeams-image%20\(11\).png?alt=media\&token=caf5104d-45cf-45bb-966d-d4a1cab8939a)

### **CRM Environment not found**

Users need to follow the below steps when they receive the below message for **CRM Environment not found.**&#x20;

* Please connect with your Valorx Administrator to white-label the mentioned Org Id.
* Valorx Administrators can white-label the Org Id(s) by logging into their Valorx account over the Valorx website.

![](https://2472585788-files.gitbook.io/~/files/v0/b/gitbook-legacy-files/o/assets%2F-MFqFFf4143HS0_Wagnz%2F-MkvctHqaF6gdSRo5kfp%2F-MkvgUA73l3yLNbQ58ux%2FMicrosoftTeams-image%20\(10\).png?alt=media\&token=46a1083d-2e40-4fd2-a0c2-3303e47ab9e0)

### Auto Connect

Users can mark the frequently used connections as Auto Connect if they do not wish to click on the Connect button every time.&#x20;

Follow the below steps to mark the apps to **Auto-Connect**.

* Click on **Start** and open **Connections** window.
* Now select the drop-down then, the list of all the Apps under that connection will show.

![](https://2472585788-files.gitbook.io/~/files/v0/b/gitbook-x-prod.appspot.com/o/spaces%2F-MFqFFf4143HS0_Wagnz%2Fuploads%2FWZGxFR4SWIovGrbwYAGJ%2FFusion%20Docs%20Update%20as%20per%20V15%20-%201.png?alt=media\&token=19cd4ef7-04e9-4a0a-b4f2-3d393012033c)

Users will find the below headers for every connection.

* **Name**: Users can find the list of connections under this header and even users can edit the name of the connection from here.
* **Auto Connect**: Users can **Auto Connect** the connections by moving the button from left to right.
* **Status**: Users can find the status of the connection like **Connected** or **Not Connected**. Users can easily log out the connection by clicking on **Log Out**. Users can even connect to the connection by clicking on **Connect**. Every connection which is connected will have **Admin** button where, users can find the information of the **Valorx Package details** by clicking on **Admin** button.

![](https://2472585788-files.gitbook.io/~/files/v0/b/gitbook-x-prod.appspot.com/o/spaces%2F-MFqFFf4143HS0_Wagnz%2Fuploads%2FXZKyw81SSaalJrO28KRu%2FFusion%20Docs%20Update%20as%20per%20V15%20-%202.png?alt=media\&token=615f7558-a8ae-42c6-856f-fdf027a21326)

* Click on **Start** and all the auto connected apps will appear besides **Active Connections**.
* Valorx Fusion supports multi-connections. Users can login to different environments and work on different Valorx Fusions Apps at the same time.

![](https://2472585788-files.gitbook.io/~/files/v0/b/gitbook-x-prod.appspot.com/o/spaces%2F-MFqFFf4143HS0_Wagnz%2Fuploads%2FJxJE9YYxrHg5DIAityZ3%2FFusion%20Docs%20Update%20as%20per%20V15%20-%203.png?alt=media\&token=7849eec1-7c4f-4c70-aa1f-75dabbe6dba5)


# Apps List

With connection(s) established, a list of Apps will be displayed. If you have multiple connections, the list of Apps will change by switching the **Active** **Connections** tab.

The Apps List will change dynamically for App Designer and Runtime User - allowing them access different functionalities.&#x20;

### App Designer View

An App Designer can run an app in **Runtime** mode, edit an app in **Design Studio** mode, and administrate the Apps.&#x20;

![](https://2472585788-files.gitbook.io/~/files/v0/b/gitbook-legacy-files/o/assets%2F-MFqFFf4143HS0_Wagnz%2F-MGH5_h4idwh_3cBkY3u%2F-MGHUGPm2g6e996xA0Ge%2Fimage.png?alt=media\&token=b1c611ec-80e4-4132-87c3-a0f5f3e4dfea)

#### Runtime User View

Runtime users can only run Valorx Fusion Apps that are assigned to them by the App Designers using Access Control.

![](https://2472585788-files.gitbook.io/~/files/v0/b/gitbook-legacy-files/o/assets%2F-MFqFFf4143HS0_Wagnz%2F-MGH5_h4idwh_3cBkY3u%2F-MGHT5xDFK1lNZ0fnwx9%2Fimage.png?alt=media\&token=7213fcc4-9915-496d-bdbd-de7054a14f53)

{% hint style="info" %}
Access Control is only honored in Production environment.&#x20;

Sandboxes are usually used for development and UAT. To streamline the process, runtime users can run any apps in sandboxes, as long as they have the Valorx Permission set assigned to them.
{% endhint %}


# Favorite Apps

By marking Apps as your favorite Apps, you can be in your favorite Valorx Fusion Apps in 3 clicks after opening Excel.

## Quickest way to open Valorx Fusion Apps

Marking the **Valorx** **Fusion** **Apps** that you use day-to-day as favorites is our recommended way to use them because its the fastest way to put you into your working mode. Apps saved to **Favorites** are easily accessible.

To do so, connect to your environment and open the Apps List. Turn the favorite toggle of an App to on, and voila, it's now in the Favorites List.

All you need to do now is click on the App you want to launch in the **Favorites** List, and we will auto connect you to the environment this App is sitting in, and open the App - all in one click. You don't even need to see the **Start** screen again (unless your App Designer is releasing another amazing App). Let us follow the below steps to add an app to **Favorite** list.

* Open an Excel and click on **Start**.
* Click on **Radio Button** against  the app.
* App is now added to the Favorite list now user can see the ribbon button for **Favorite** list.

{% hint style="info" %}
App Designers can mark an App as **Runtime** Favorite or **Design Studio** Favorite. It will launch the App in different mode based on your selection.
{% endhint %}

<div align="left"><img src="https://2472585788-files.gitbook.io/~/files/v0/b/gitbook-x-prod.appspot.com/o/spaces%2F-MFqFFf4143HS0_Wagnz%2Fuploads%2Fq5CXBPZkGrPG2aJ5NwlQ%2FFusion%20Docs%20Update%20as%20per%20V15%20-%204.png?alt=media&amp;token=cda4f92f-4458-4463-bd5d-86a4311a83b4" alt=""></div>

Now, the apps are marked as Favorites for both **Design Studio** and **Runtime**. User can easily access these apps from the ribbon buttons.

<div align="left"><img src="https://2472585788-files.gitbook.io/~/files/v0/b/gitbook-legacy-files/o/assets%2F-MFqFFf4143HS0_Wagnz%2F-MklcS9Zt9Emaz7XgCzP%2F-Mkp7MRSKjYfV5nMlkBt%2FFav%20List%201.png?alt=media&amp;token=37e725ff-6414-46be-9159-bec5fc8b0893" alt="" width="563"></div>

Click on **Favorites** to view the apps added to the list for both **Design Studio** and **Runtime**.

<div align="left"><img src="https://2472585788-files.gitbook.io/~/files/v0/b/gitbook-legacy-files/o/assets%2F-MFqFFf4143HS0_Wagnz%2F-MklcS9Zt9Emaz7XgCzP%2F-Mkp8GAC9nz7k-txijL-%2FFav%20List%202.png?alt=media&amp;token=c8481cad-b9db-45a2-9d81-cbb8fbb104d3" alt="" width="563"></div>

Click on **Edit Favorites** and a pop-up will open where user can edit the preferences or remove the app from Favorites list, and click on **OK** to save the changes.

<div align="left"><img src="https://2472585788-files.gitbook.io/~/files/v0/b/gitbook-legacy-files/o/assets%2F-MFqFFf4143HS0_Wagnz%2F-MkpOGq6tLUuAW0_QIdF%2F-Mkpi-Egfd6SIrolN06r%2FFav%20List%203.png?alt=media&amp;token=c6cb1242-2679-4e80-bd0e-036b7f82eb9e" alt="" width="375"></div>


# App Promotion and Provisioning

App Promotion and Provisioning are two different features of Valorx Fusion Design Studio through which users can promote the Apps and also provide access control to various Apps. Users with Mac and Google Sheets will now be able to manage the App Assignment with our Fusion Managed Package.&#x20;

* [#app-promotion](#app-promotion "mention")\
  Promote the Apps to Salesforce Org
* [#app-provisioning-in-design-studio](#app-provisioning-in-design-studio "mention")\
  Provide Access Control to Users and Profiles
* [#app-provisioning-in-salesforce](#app-provisioning-in-salesforce "mention")
* [#fusion-managed-package](#fusion-managed-package "mention")
  1. [#app-assignment](#app-assignment "mention")\
     Google Sheet and Mac users will manage the Access Control through App Assignment.
  2. [#valorx-fusion-dashboard](#valorx-fusion-dashboard "mention")\
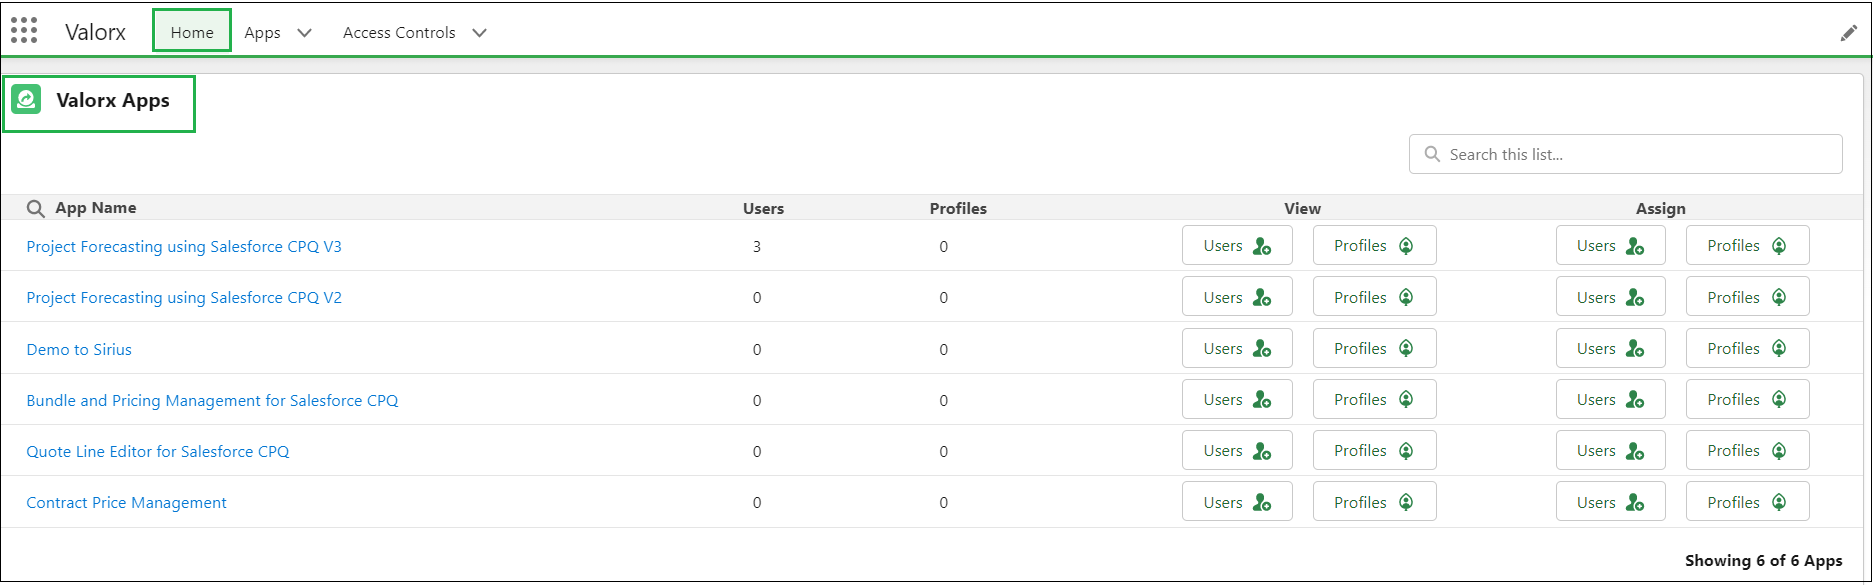
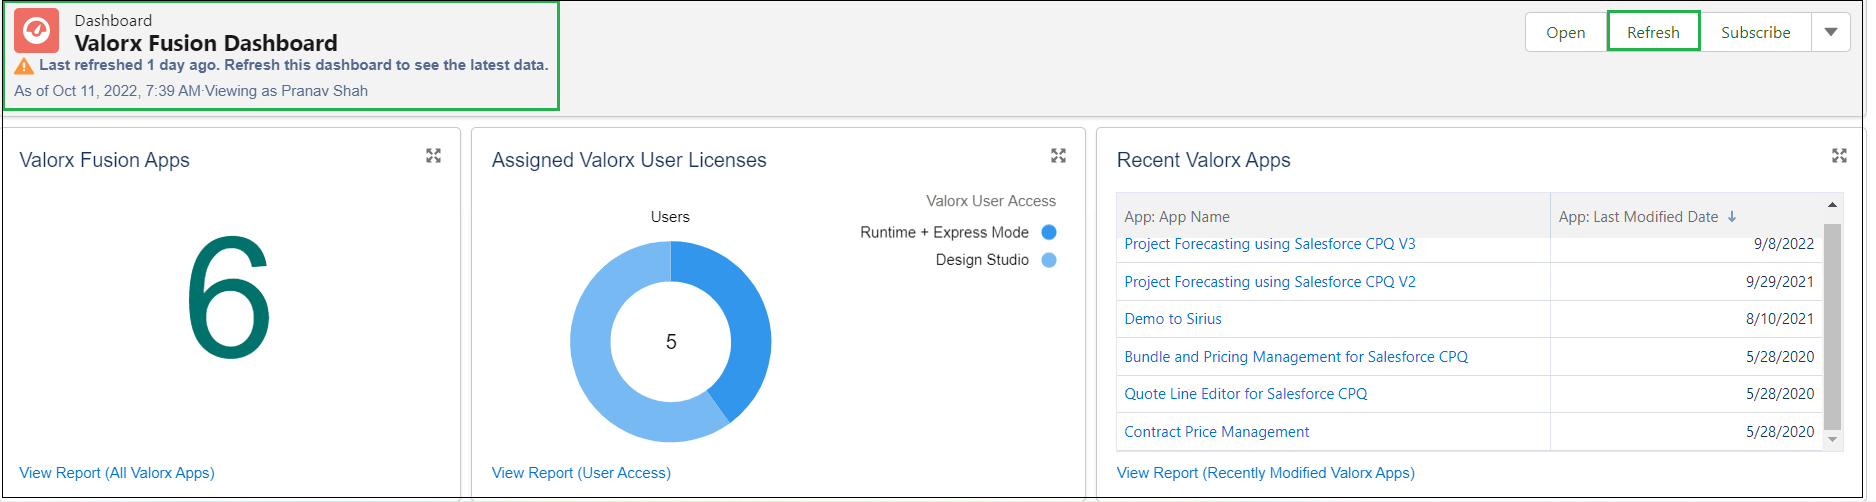
     Information and count of all the Fusion Apps.
  3. [#launch-valorx-app-from-the-lightning-record-page](#launch-valorx-app-from-the-lightning-record-page "mention")\
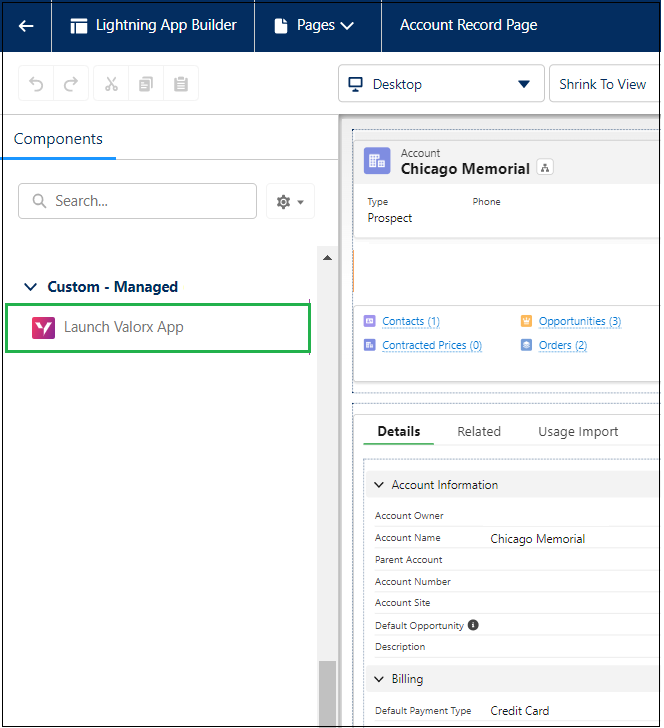
     Launch an App from a particular Record Page
  4. [#launch-valorx-app-from-anywhere](#launch-valorx-app-from-anywhere "mention")\
     Launch an App anywhere as per your requirement.

#### App Promotion

App promotion is a feature wherein **Design** **Studio** users can promote one or many Apps to one or many **Salesforce Orgs**. App promotion is available within **Valorx Design Studio** and user would need **Design Studio** user access and permission set to perform this action.

App Promotion is nothing but creating a copy of an App from one connection to another connection. Once an app is promoted changes can be made in both the connections. However, changes made in one connection will not reflect on another connection.

Users should have at least two active connections to promote the app. Users will receive the below validation message when they are connected to only one connection.

![](https://2472585788-files.gitbook.io/~/files/v0/b/gitbook-x-prod.appspot.com/o/spaces%2F-MFqFFf4143HS0_Wagnz%2Fuploads%2FGZulfAY50styjUXaSIPa%2FFusion%20Docs%20Update%20as%20per%20V15%20-%205.png?alt=media\&token=d66cace8-845b-482f-8d08-0952b04cb528)

On the **Start** window, find the button which says **Promote App(s)**. Make sure you are connected to your source and target **Salesforce Orgs.**

![](https://2472585788-files.gitbook.io/~/files/v0/b/gitbook-x-prod.appspot.com/o/spaces%2F-MFqFFf4143HS0_Wagnz%2Fuploads%2F4QsFCIRDeiPY4H6bRege%2FFusion%20Docs%20Update%20as%20per%20V15%20-%206.png?alt=media\&token=680f785f-0096-4709-b3fd-7e6c20e111fa)

On the **Promote App(s)** window, simply move apps from left (source org) to right (target org) and click on **Promote**.

![](https://2472585788-files.gitbook.io/~/files/v0/b/gitbook-x-prod.appspot.com/o/spaces%2F-MFqFFf4143HS0_Wagnz%2Fuploads%2FgzDHBWc9kDjR2I5bhBRl%2FFusion%20Docs%20Update%20as%20per%20V15%20-%207.png?alt=media\&token=83eb6387-e7ae-47a6-9a36-a19b62e7a2bf)

#### Backup App(s)

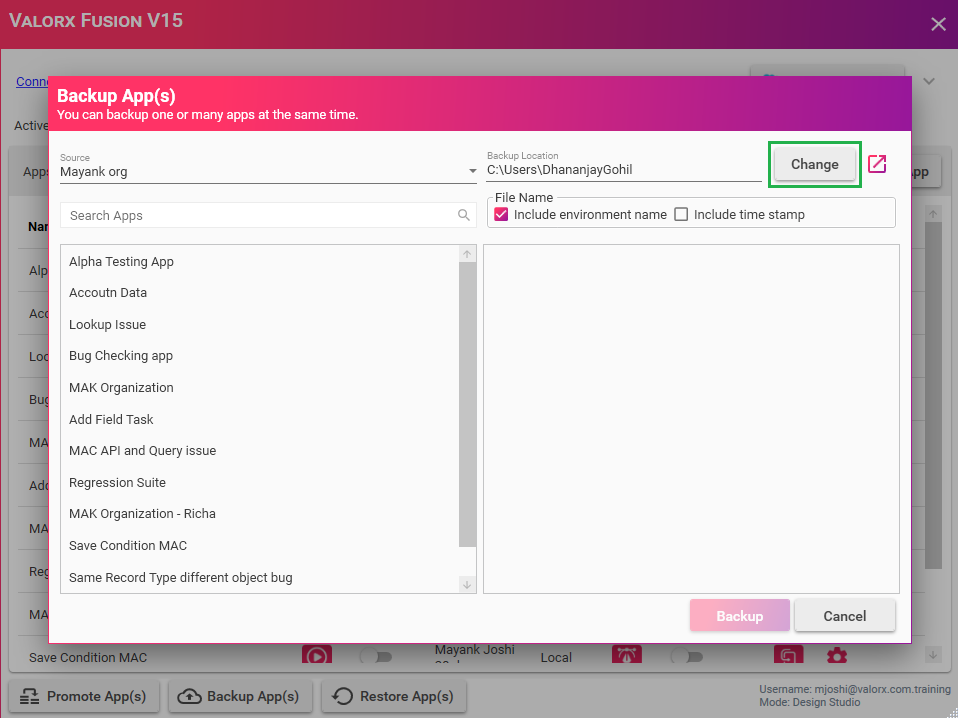
Backup App(s) will create a backup file for the apps which are marked as backup apps. Users can back up more than one app at one time. This will help users when the app is lost or deleted.

To create the backup of the apps users' needs to be on the connections page and on the bottom of the screen users can find the Backup App(s).&#x20;

Click Backup App(s) and a window will open which will have the information of all the apps for that org Id.

Click on the app which needs to backup and that particular app will show on the right hand side. Click Backup.

<figure><img src="https://2472585788-files.gitbook.io/~/files/v0/b/gitbook-x-prod.appspot.com/o/spaces%2F-MFqFFf4143HS0_Wagnz%2Fuploads%2FU72HiSs7snwxtXWuzBqS%2FFusion%20Docs%20Update%20as%20per%20V15%20-%208.png?alt=media&amp;token=0cc64323-e091-4671-bcc2-04c18e7d6791" alt=""><figcaption></figcaption></figure>

A window will open which will have the location of the file. Click Ok.

<figure><img src="https://2472585788-files.gitbook.io/~/files/v0/b/gitbook-x-prod.appspot.com/o/spaces%2F-MFqFFf4143HS0_Wagnz%2Fuploads%2FzIr4X5uX21nDmwKCPyi9%2FFusion%20Docs%20Update%20as%20per%20V15%20-%209.png?alt=media&amp;token=384b31ac-abec-4621-b752-73a0bf874dbe" alt=""><figcaption></figcaption></figure>

Users can always change the file location by just clicking on the Change besides the backup location.

<figure><img src="https://2472585788-files.gitbook.io/~/files/v0/b/gitbook-x-prod.appspot.com/o/spaces%2F-MFqFFf4143HS0_Wagnz%2Fuploads%2Fu40hjbI5wUUjAn4u4PbV%2FFusion%20Docs%20Update%20as%20per%20V15%20-%2010.png?alt=media&amp;token=671a112b-1ac1-4c2d-8a08-924970e74afb" alt=""><figcaption></figcaption></figure>

#### Restore App(s)

Restore Apps will store the deleted apps. This will restore the apps to the Org Id. Select Restore App(s) which will lead the users to the restore apps window. Select the location by clicking on Browse Backup location. Select the app which needs to be restored and click **Restore**.

<figure><img src="https://2472585788-files.gitbook.io/~/files/v0/b/gitbook-x-prod.appspot.com/o/spaces%2F-MFqFFf4143HS0_Wagnz%2Fuploads%2FCXIbmmheajImtDO0bkaf%2FFusion%20Docs%20Update%20as%20per%20V15%20-%2011.png?alt=media&amp;token=ccbeb80b-06cf-4693-8aee-40b1e811036b" alt=""><figcaption></figcaption></figure>

#### App Provisioning in Design Studio

App provisioning will allow company to control the access to various apps. It is also referred as **Access** **Control**. Apps can be assigned to users and profiles. App provisioning is available within **Valorx Design Studio** and user would need **Design Studio** user access and permission set to perform this action.

![](https://2472585788-files.gitbook.io/~/files/v0/b/gitbook-x-prod.appspot.com/o/spaces%2F-MFqFFf4143HS0_Wagnz%2Fuploads%2F0A9FMJ1ucah3xztwcTim%2FFusion%20Docs%20Update%20as%20per%20V15%20-%2012.png?alt=media\&token=2d0cdb5e-798f-417c-904a-5c456689c40a)

On the **Start** window, find the App for which you would like to provision access. Click on the **App Admin** icon against the app. This will open the App's Details window.

![](https://2472585788-files.gitbook.io/~/files/v0/b/gitbook-legacy-files/o/assets%2F-MFqFFf4143HS0_Wagnz%2F-MMNkITHNGPQgPuiI9qj%2F-MMNoyb0w9DJImtVs-zZ%2Fimage.png?alt=media\&token=d31b3790-c628-4fe8-82df-eabcf418fbb0)

#### App Provisioning in Salesforce

Users who are not using App Admin or Valorx Admin should only follow the below steps.

* Login to Salesforce, and go to Salesforce **App Launcher**, and search for **Valorx**.

<div align="left"><figure><img src="https://2472585788-files.gitbook.io/~/files/v0/b/gitbook-x-prod.appspot.com/o/spaces%2F-MFqFFf4143HS0_Wagnz%2Fuploads%2F8WCODX2MCNZwj4ntnoJX%2FApp%20Provisioning%204.png?alt=media&amp;token=c68e8f1d-1b42-4a7b-931f-5139180f1b94" alt="" width="411"><figcaption></figcaption></figure></div>

* &#x20;Click on Valorx now go to the “**Apps**” tab and switch to “**All**” list view.

<div align="left"><figure><img src="https://2472585788-files.gitbook.io/~/files/v0/b/gitbook-x-prod.appspot.com/o/spaces%2F-MFqFFf4143HS0_Wagnz%2Fuploads%2FcCsEa4m2TxgR7AKdSDio%2FApp%20Provisioning%205.png?alt=media&amp;token=f976239d-1ed8-4aab-890f-3626e6d0f814" alt="" width="563"><figcaption></figcaption></figure></div>

* Find the desired App record in the list and click on it. Click **Related** tab and, click on **New** on the **Access Controls** related list.

<div align="left"><img src="https://2472585788-files.gitbook.io/~/files/v0/b/gitbook-x-prod.appspot.com/o/spaces%2F-MFqFFf4143HS0_Wagnz%2Fuploads%2FZhmPazPdyvq0giNIpKG2%2FApp%20Provisioning%202.png?alt=media&amp;token=d5cdf597-aef2-4c82-a11f-183e1a43770d" alt=""></div>

* Search with a User **OR** a Profile that you want to assign this app. Repeat this step for all Users or Profiles that need to be assigned to this App. Once the assigning is done click **Save**.

<div align="left"><img src="https://2472585788-files.gitbook.io/~/files/v0/b/gitbook-x-prod.appspot.com/o/spaces%2F-MFqFFf4143HS0_Wagnz%2Fuploads%2FcQ4kOtlKcxz4O73nDCpm%2FApp%20Provisioning%203.png?alt=media&amp;token=b65354fd-ba9b-4ba2-b165-7d51f0c273cc" alt=""></div>

#### Fusion Managed Package

#### **App Assignment** &#x20;

Valorx App Assignment provides access control for Fusion Apps through the Valorx Home page in Salesforce. Users with Windows are used to control the access to various apps in Design Studio which is referred to as Access Control. Users with Mac and Google Sheets will now be able to manage the App Assignment with this new feature.

* Log in to Salesforce with your credentials.
* Go to Valorx from the Salesforce App Launcher.

<div align="left"><figure><img src="https://2472585788-files.gitbook.io/~/files/v0/b/gitbook-x-prod.appspot.com/o/spaces%2F-MFqFFf4143HS0_Wagnz%2Fuploads%2F9eh9YZzFMUeL9t7h1NY8%2FApp%20admin.png?alt=media&amp;token=b9d7a3d6-d73d-4695-b0d7-1e306d788dff" alt="" width="388"><figcaption></figcaption></figure></div>

* Click the Home Page of the Valorx App for Lightning Experience, you will find the top section of Valorx Apps. This section allows users to provide additional access control.
* Valorx Apps section contains the App Names, number of Users, and Profiles who have access to the app along with options to view the list of users or profiles and the option to add additional users and profiles.

<figure><img src="https://2472585788-files.gitbook.io/~/files/v0/b/gitbook-x-prod.appspot.com/o/spaces%2F-MFqFFf4143HS0_Wagnz%2Fuploads%2F1mlAOMvVAJXz7AjXl6IW%2FApp%20admin%201.png?alt=media&amp;token=f04eed68-f62a-4c60-8d54-762d6fe5988c" alt=""><figcaption></figcaption></figure>

* Click "Users" or "Profiles" under **Assign** to assign the users and profiles. A list of users or profiles will open now, check-in in the user or profile which you want to add and click Add User or Add Profile.

<figure><img src="https://2472585788-files.gitbook.io/~/files/v0/b/gitbook-x-prod.appspot.com/o/spaces%2F-MFqFFf4143HS0_Wagnz%2Fuploads%2FM3Gh3dZpfU9FMZLcppVO%2FApp%20admin%202.png?alt=media&amp;token=8ccc2313-3cad-4c9d-a1c6-39a9abf9a572" alt=""><figcaption></figcaption></figure>

* Click "Users" or "Profiles" under **View** to view the assigned users and profiles. A window will open which will have all the information related to users or profiles as per the selection made.

<figure><img src="https://2472585788-files.gitbook.io/~/files/v0/b/gitbook-x-prod.appspot.com/o/spaces%2F-MFqFFf4143HS0_Wagnz%2Fuploads%2F8rGQolLuXZpVAgMUiXYl%2FApp%20admin%203.png?alt=media&amp;token=d1f7362b-c9f5-4909-8f68-f63fc2baf9b8" alt=""><figcaption></figcaption></figure>

***Notes***:

* Admins can choose to remove User / Profiles using the Remove Users / Profiles option available respectively in View Users and Profiles.
* A search option is available to make it easy while assign apps to the users.
* **Back to App List** will take the user back to the Valorx Apps page.

#### Valorx Fusion Dashboard

Valorx Fusion Dashboard is a single view of all your Apps, App details and user licenses. Valorx Fusion Dashboard has been divided into three different sections to make it easy and it displays the total number of apps, licenses, and recently modified apps.

* **Total Valorx Fusion Apps**: This will show the number of Fusion Apps in the Salesforce Org.
* **Distribution of User License Type - Design + Runtime / Runtime Express**: It will show the number of users and their license type whether it is Design Studio, Runtime, or Runtime Express.
* **Recent Valorx Apps**: This will contain information related to the latest modified apps.

<figure><img src="https://2472585788-files.gitbook.io/~/files/v0/b/gitbook-x-prod.appspot.com/o/spaces%2F-MFqFFf4143HS0_Wagnz%2Fuploads%2FqykJnpWspaFJjfEtQJP4%2FApp%20admin%205.png?alt=media&amp;token=0a585e2f-e63d-4416-8fdd-54647461a3c6" alt=""><figcaption></figcaption></figure>

* Refresh your dashboard to see the latest changes to it. A warning will display if you do not refresh the dashboard in 24 hours.&#x20;

<figure><img src="https://2472585788-files.gitbook.io/~/files/v0/b/gitbook-x-prod.appspot.com/o/spaces%2F-MFqFFf4143HS0_Wagnz%2Fuploads%2F3a4l3dOA365ToxYSWB4n%2FApp%20admin%204.png?alt=media&amp;token=2d4887f8-dcd2-40e8-ae41-e23a83bfc5ee" alt=""><figcaption></figcaption></figure>

#### **Launch Valorx App from the Lightning Record page**

In addition to the Quick Action option available for Launching Valorx Apps from CRM we have provided an additional *click and point* option in the Lightning App Builder to Apps and Workflows directly in Valorx Fusion.\
\
This Lightning Web Component accesses the Record ID. Users will now be able to configure Valorx "Launch from CRM" buttons with minimum user inputs.

* Open Setup from right hand side and search for Lightning App Builder.

<div align="left"><figure><img src="https://2472585788-files.gitbook.io/~/files/v0/b/gitbook-x-prod.appspot.com/o/spaces%2F-MFqFFf4143HS0_Wagnz%2Fuploads%2FEUsMfDhHcEq9DqY6ZhRT%2FRecord%20page.png?alt=media&amp;token=eb4a5a39-342e-4e06-a4f2-34b36e9e99ba" alt="" width="563"><figcaption></figcaption></figure></div>

* Open a Record Page Layout in Lightning App Builder.

<figure><img src="https://2472585788-files.gitbook.io/~/files/v0/b/gitbook-x-prod.appspot.com/o/spaces%2F-MFqFFf4143HS0_Wagnz%2Fuploads%2FkQ1Mj8iF9vxI3mxZh8ys%2FRecord%20page%201.png?alt=media&amp;token=654e5797-e553-4d95-8a85-8461851dc249" alt=""><figcaption></figcaption></figure>

* On the left-hand side menu Users/Salesforce Administrators will find “Launch Valorx App” under the Custom Managed title.

<div align="left"><figure><img src="https://2472585788-files.gitbook.io/~/files/v0/b/gitbook-x-prod.appspot.com/o/spaces%2F-MFqFFf4143HS0_Wagnz%2Fuploads%2FztpIk9wOnSL7thzH4G8K%2FRecord%20page%202.png?alt=media&amp;token=1a41a9ee-3560-4f6d-8981-8b8f39c45b27" alt="" width="498"><figcaption></figcaption></figure></div>

* Now drag and drop “Launch Valorx App”.

<figure><img src="https://2472585788-files.gitbook.io/~/files/v0/b/gitbook-x-prod.appspot.com/o/spaces%2F-MFqFFf4143HS0_Wagnz%2Fuploads%2F0yySZTCmomysNsXBOE6K%2FRecord%20page%203.png?alt=media&amp;token=8fe2c0cd-29e6-4be7-8d16-6b30abfc84d1" alt=""><figcaption></figcaption></figure>

* You will get a list of properties you can configure for this Lightning Web Component.
* In the properties, provide an appropriate **Label** and select the **App** from the pick list.

<div align="left"><figure><img src="https://2472585788-files.gitbook.io/~/files/v0/b/gitbook-x-prod.appspot.com/o/spaces%2F-MFqFFf4143HS0_Wagnz%2Fuploads%2FD3kwqLiergaUFIt1s173%2FRecord%20page%204.png?alt=media&amp;token=c1c5c8ca-958c-4ef7-b872-9e13138d7550" alt="" width="287"><figcaption></figcaption></figure></div>

* Get the Workflow ID from **Fusion Design Studio** and paste that in the Workflow ID in the textbox.

<div align="left"><figure><img src="https://2472585788-files.gitbook.io/~/files/v0/b/gitbook-x-prod.appspot.com/o/spaces%2F-MFqFFf4143HS0_Wagnz%2Fuploads%2FiyeWJTXLOcovS2dEjB0N%2FRecord%20page%205.png?alt=media&amp;token=6546f7fc-fc62-4cd5-93a0-d990cefd8a47" alt="" width="563"><figcaption></figcaption></figure></div>

***Note***: Context Id is optional, and it will pick up the current record's context Id. Users can provide a **different context Id** when it does not match by checking in the checkbox "*Have a different Context ID*?".&#x20;

* Click **Save**.
* Go back to the page and click on the Lightning Web Component visible with the Label you have selected, this will Launch Valorx Fusion in Windows and download a macro-enabled file for the Mac OS.

<figure><img src="https://2472585788-files.gitbook.io/~/files/v0/b/gitbook-x-prod.appspot.com/o/spaces%2F-MFqFFf4143HS0_Wagnz%2Fuploads%2FUZQOkHvlqEIPR0I0UZLd%2FRecord%20page%206.png?alt=media&amp;token=eb33904c-7b0a-41a0-945f-c4f905d65f5d" alt=""><figcaption></figcaption></figure>

#### **Launch Valorx App - From Anywhere**

Launch Valorx App from anywhere will allow users to launch the app from the Home or App page in the Lightning experience.\
\
Users / Salesforce Administrators can choose *Edit Page* in Lightning App Builder from Settings visible on the top right or can go to Lightning App Builder to find the page from the list or can simply create another Home Page or App Page as per the requirement.

Once you are inside the Lightning App Builder you can follow the below mentioned steps to have a "Launch from CRM" Functionality:

* Drag and drop “Launch Valorx App from Anywhere”.

<figure><img src="https://2472585788-files.gitbook.io/~/files/v0/b/gitbook-x-prod.appspot.com/o/spaces%2F-MFqFFf4143HS0_Wagnz%2Fuploads%2FS9Hig831mxvuFZj0Gd34%2FLaunch%20App%20anywhere.png?alt=media&amp;token=c731d389-f010-40e0-ae59-72c2caac9d6c" alt=""><figcaption></figcaption></figure>

* You will get a list of properties you can configure for this Lightning Web Component
* In the properties, provide an appropriate **Label** and select the **App** from the pick list.

<figure><img src="https://2472585788-files.gitbook.io/~/files/v0/b/gitbook-x-prod.appspot.com/o/spaces%2F-MFqFFf4143HS0_Wagnz%2Fuploads%2FfdWoR834ZdIi7BQd2OKY%2FLaunch%20App%20anywhere%201.png?alt=media&amp;token=14554f93-4f2f-4a4c-854f-03144ade3cb5" alt=""><figcaption></figcaption></figure>

* Get the Workflow ID from Fusion Design Studio and paste that in the Workflow ID in the textbox.
* Also add the static Context ID (if required), which is to be used by the Valorx Fusion App at the time of fetching the workflow results

<figure><img src="https://2472585788-files.gitbook.io/~/files/v0/b/gitbook-x-prod.appspot.com/o/spaces%2F-MFqFFf4143HS0_Wagnz%2Fuploads%2FF3Pe9H12e3s162CT7oPP%2FLaunch%20App%20anywhere%202.png?alt=media&amp;token=c34ece31-0427-4e6a-949a-4b8842de4591" alt=""><figcaption></figcaption></figure>

* Click **Save**
* A button will be visible in the exact place that you have added in the layout. Go back to the page; On a click of the button, it will Launch Valorx Fusion in Windows and download a macro enabled file for the Mac OS.


# App Administration

App Designers can administrate **Valorx Fusion Apps** from the **Apps List** in **Start** screen through the following methods.

#### App Admin

The App Admin window is accessible by going to **Start**, and clicking on the **App Admin** button in the Apps List.

![](https://2472585788-files.gitbook.io/~/files/v0/b/gitbook-legacy-files/o/assets%2F-MFqFFf4143HS0_Wagnz%2F-MGJe6_BmPSMe_Lz57hS%2F-MGJf6mxn4jWln3_fX5k%2Fimage.png?alt=media\&token=8cf472ac-73cc-4e7a-a99d-119873d980dc)

In here, an App Designer can perform a few actions.

* Rename the App.

<div align="left"><img src="https://2472585788-files.gitbook.io/~/files/v0/b/gitbook-legacy-files/o/assets%2F-MFqFFf4143HS0_Wagnz%2F-MGJe6_BmPSMe_Lz57hS%2F-MGJg5lImQ-xRiw6kB9z%2Fimage.png?alt=media&amp;token=55fd8953-fd73-4b90-b37c-ceaa9b166dbb" alt=""></div>

<div align="left"><img src="https://2472585788-files.gitbook.io/~/files/v0/b/gitbook-legacy-files/o/assets%2F-MFqFFf4143HS0_Wagnz%2F-MGJe6_BmPSMe_Lz57hS%2F-MGJfwfT_nDAnkxRuuqn%2Fimage.png?alt=media&amp;token=04c957a2-f102-472e-b7f8-7dec5152183f" alt="" width="375"></div>

* Delete the App.

<div align="left"><img src="https://2472585788-files.gitbook.io/~/files/v0/b/gitbook-legacy-files/o/assets%2F-MFqFFf4143HS0_Wagnz%2F-MGJe6_BmPSMe_Lz57hS%2F-MGJg0u8U9BBaGdPVW0r%2Fimage.png?alt=media&amp;token=375ffa2e-b7e0-4d8e-adca-284137c0b5f6" alt=""></div>

* Add Users/Profile to the App through Access Control. This will give the added users or users with the added profile access to use the app. You can learn more in App Provisioning.

![](https://2472585788-files.gitbook.io/~/files/v0/b/gitbook-legacy-files/o/assets%2F-MFqFFf4143HS0_Wagnz%2F-MGJe6_BmPSMe_Lz57hS%2F-MGJfqmTR0X0reHWXNqL%2Fimage.png?alt=media\&token=20100b0f-40aa-4991-93c4-d4263dc5265f)

{% content-ref url="/pages/-MMNl9D64PQmU4V1mc2V" %}
[App Promotion and Provisioning](/valorx-fusion/getting-started/getting-started-with-valorx/app-promotion-and-provisioning)
{% endcontent-ref %}

* Submit a Valorx Fusion App to Valorx App Store

App Designers can build Apps for Valorx App Store that will be available to all Valorx Fusion customers. You can learn more by going to its dedicated section.

{% content-ref url="/pages/-MGBI3eQTvcYphFveI8y" %}
[App Store Submission](/valorx-fusion/app-store/app-store-submission)
{% endcontent-ref %}


# Valorx Administration

Valorx Admins can be used to provide the License to users. User will be assigned to either **Design Studio**, **Runtime Only**, **Runtime + Express Mode** access depending on the user requirement.

**Valorx Admin** screen will show the information about the package and **Organization Id**. It will also show number of **License(s)** assigned.

![](https://2472585788-files.gitbook.io/~/files/v0/b/gitbook-legacy-files/o/assets%2F-MFqFFf4143HS0_Wagnz%2F-Mkkz9n86h_PxMDbhoHs%2F-Mkl-LtdViaDPcov7Mpu%2FValorx%20Admin%202.PNG?alt=media\&token=24823ed4-42d4-4550-8e25-1b07c091b6de)

Follow the below steps to add a user and provide the License.

* Click on **Add User**.
* Search for the user by clicking on **Search** button.
* check-in against the user name which needs to be added.
* click on **Add User**.

![](https://2472585788-files.gitbook.io/~/files/v0/b/gitbook-legacy-files/o/assets%2F-MFqFFf4143HS0_Wagnz%2F-Mkf1k1k6q275In9cSYi%2F-MkfIqc3e1Q8IkPlVn5h%2FValorx%20Admin.png?alt=media\&token=89bc3400-2e4f-4185-9d2e-49ad7f7b6d54)

As the user is added now it is time to provide the License. Users will be provided with different level of access depending on the requirement. Access can be provided by just turning on the radio button, and click on **Save**. Below are the different access levels.&#x20;

**Design Studio**: This permission will provide the access to user to design and modify an app through Design Studio. User can also promote Apps, manage access control, and download Apps from the Valorx App Store.

**Runtime + Express Mode**: This access will allow end users to run the Valorx Apps. User will be able to use the Express Mode without the ability to save the App.

**Runtime Only**: This permission will allow the users to run the Valorx Apps. User assigned to this permission cannot make any changes to the app.

<div align="left"><img src="https://2472585788-files.gitbook.io/~/files/v0/b/gitbook-legacy-files/o/assets%2F-MFqFFf4143HS0_Wagnz%2F-MkfesfOf5XFzwvEt2Y_%2F-MkffEGETxujrOXp0qZ5%2FValorx%20Admin%201.png?alt=media&amp;token=cfa09e70-a736-4620-bbd6-d87b222ff110" alt="" width="563"></div>

**None**: This permission will not allow user to enter the app as there is no access provided. User will receive the below pop up to check and add the fields.

<div align="left"><img src="https://2472585788-files.gitbook.io/~/files/v0/b/gitbook-legacy-files/o/assets%2F-MFqFFf4143HS0_Wagnz%2F-Mkki3vCMwbfCKD1XyJV%2F-MkkimbKdqITC5gE5u9S%2FMicrosoftTeams-image%20(8).png?alt=media&amp;token=686e1805-3ee1-4399-b63f-d67f8ceceaee" alt="" width="563"></div>


# Building your first App

App has it all together.

We know you are very excited to build your first App. After the installation and creating a connection you are all ready to create your app. Any Valorx app is made from four basic building steps. Users can create a simple or complex app depending on the requirement. User can build an app very easily by following the below.

{% content-ref url="/pages/-MGBC-AZofufW4zTF\_nX" %}
[Data Modeling](/valorx-fusion/design-studio/data-modeling)
{% endcontent-ref %}

{% content-ref url="/pages/-MGBEdOKzn--OLf40qEN" %}
[Maps](/valorx-fusion/design-studio/maps)
{% endcontent-ref %}

{% content-ref url="/pages/-MGBEfiq8QbwVV28eJUE" %}
[Tasks](/valorx-fusion/design-studio/tasks)
{% endcontent-ref %}

{% content-ref url="/pages/-MGBEhaZWG0WoFXynrhd" %}
[Workflow and UX](/valorx-fusion/design-studio/workflow-and-ux)
{% endcontent-ref %}

It's always good to have understanding of above mentioned components of the app but to create the first app user just needs to know simply selection of required objects and fields and the rest of the things will be taken care of by Express Mode.


# Quick Start Guide

## Build an App in Minutes.

Welcome to Fusion! This Quick Start shows you how to build a simple **Opportunity Management App** using **Fusion Design Studio**. It’s a beginner-friendly, hands-on example designed to help you get familiar with the key Fusion components: data modeling, mapping, and workflows.

By the end of this guide, you’ll be able to:\
✅ Connect to Salesforce\
✅ Query Account and related Opportunity records\
✅ Display them on the Excel sheet\
✅ Edit and save records back to Salesforce

## Prerequisites

Make sure you have:

* [A working Salesforce connection](/valorx-fusion/getting-started/getting-started-with-valorx/connections-list)
* [Fusion installed and running in Excel](/valorx-fusion/getting-started/getting-started-with-valorx)
* Access to the **Account** and **Opportunity** objects

{% stepper %}
{% step %}

### Starting a New App

After successfully connecting Fusion to your Salesforce instance, begin by creating a new app. Click the **New App button** and choose the **New Template** option to begin with a clean configuration.

<figure><img src="https://2472585788-files.gitbook.io/~/files/v0/b/gitbook-x-prod.appspot.com/o/spaces%2F-MFqFFf4143HS0_Wagnz%2Fuploads%2F44ftf0WwEZN7iMsGUdsT%2FStart%20A%20New%20App.gif?alt=media&amp;token=20611b13-1aef-4c9d-8611-d6e156aa7655" alt=""><figcaption><p>Starting a new app</p></figcaption></figure>
{% endstep %}

{% step %}

### Data Modeling <a href="#data-modelling" id="data-modelling"></a>

Start the data modeling process by adding the **Account** object. Select the **fields** you want to include in your app. Then, add the **Opportunity** object and choose the relevant **fields** you'd like to display and work with.

<figure><img src="https://2472585788-files.gitbook.io/~/files/v0/b/gitbook-x-prod.appspot.com/o/spaces%2F-MFqFFf4143HS0_Wagnz%2Fuploads%2FmydjgEq9iIwPWc9jON6Q%2FData%20Modelling%20v2.gif?alt=media&amp;token=417cf2c3-a6bc-473e-aeb4-c658605d9277" alt=""><figcaption><p>Data Modelling</p></figcaption></figure>
{% endstep %}

{% step %}

### Mapping

Next, set up a **Grid Map** for the Opportunity object. This allows you to display a list of related opportunities in a grid format, showcasing Fusion’s mapping interface. After that, create a **Form Map** for the Account object. Use this map to display Account fields on the main sheet.

<figure><img src="https://2472585788-files.gitbook.io/~/files/v0/b/gitbook-x-prod.appspot.com/o/spaces%2F-MFqFFf4143HS0_Wagnz%2Fuploads%2FdkyQRvDhG5kltLhfASlV%2FMapping.gif?alt=media&amp;token=31852fc3-8f7f-4591-b5d4-8b35cc57ae0d" alt=""><figcaption><p>Mapping</p></figcaption></figure>
{% endstep %}

{% step %}

### Workflow

Begin by creating a workflow named **"Select Account."** In this workflow, add a **Query Task** to search for Account records using the **Search & Select** screen. Then, add another **Query Task** to retrieve Opportunity records related to the selected Account. Finally, include a **Display Task** to show both the Account form map and the Opportunity grid map on the main sheet.

<figure><img src="https://2472585788-files.gitbook.io/~/files/v0/b/gitbook-x-prod.appspot.com/o/spaces%2F-MFqFFf4143HS0_Wagnz%2Fuploads%2FXlr0t91izOVLDQ7hM03O%2FSelect%20Account%20Workflow.gif?alt=media&amp;token=a8c30373-fc4c-47a0-8da4-687a67801e4c" alt=""><figcaption><p>Select Account Workflow</p></figcaption></figure>

After setting up the “Select Account” workflow, create a second workflow for saving data. In this **Save Workflow**, add a **Save Task** and configure it to save the data from the Opportunity Grid Map.

<figure><img src="https://2472585788-files.gitbook.io/~/files/v0/b/gitbook-x-prod.appspot.com/o/spaces%2F-MFqFFf4143HS0_Wagnz%2Fuploads%2FeIPtxPwJtCrO4oFIAEqY%2FSAVE%20Workflow.gif?alt=media&amp;token=4236cca2-b887-4ab6-8254-f8237eae41db" alt=""><figcaption><p>SAVE Workflow</p></figcaption></figure>
{% endstep %}

{% step %}

### Save Your App

Once your app is complete, click the **Save** button in the Design Studio toolbar. This action compiles your app and stores it securely within the managed package in Salesforce. After saving, the app is ready for testing in runtime mode.

Alternatively, you can click the **Save and Run** button. This not only saves your app but also launches it immediately in runtime mode — making it a quick and convenient way to test your app’s behavior right after building it.

<figure><img src="https://2472585788-files.gitbook.io/~/files/v0/b/gitbook-x-prod.appspot.com/o/spaces%2F-MFqFFf4143HS0_Wagnz%2Fuploads%2FN0RqVYbwSEa8qyJiIZ6x%2FSave%20and%20Run.gif?alt=media&amp;token=9dfcb470-a3af-471c-b399-14c7bda8a215" alt=""><figcaption><p>Save the app</p></figcaption></figure>

{% endstep %}

{% step %}

### Runtime (Run and Test the App)

{% hint style="info" %}
**For Designers**\
This is the runtime user experience, allowing **Designers** to test and review the app they just built. Use it to validate the data flow, check how mappings appear, and ensure workflows function as expected before sharing the app with end users.

**For Standard Users**\
This is the environment where **Standard Users** interact with the app. They can search and select records, view mapped data, make updates, and save changes — all based on the app design and permissions set by the Designer.
{% endhint %}

To run the app, click the **"Select Account"** button. This will open the Search & Select screen, where you can choose an Account record. If the selected Account has related Opportunity records, they will appear in the grid on the main sheet based on your earlier mapping.

<figure><img src="https://2472585788-files.gitbook.io/~/files/v0/b/gitbook-x-prod.appspot.com/o/spaces%2F-MFqFFf4143HS0_Wagnz%2Fuploads%2FFL0JrFhyZtIHdjX8U85t%2FRuntime.gif?alt=media&amp;token=31cae134-d287-4200-8cbc-39f52219b572" alt=""><figcaption><p>Runtime Search and Select Screen</p></figcaption></figure>

You can now update the Opportunity data directly in the grid. Once you're done, click the **Save** button. Fusion will save records back to Salesforce and display a summary popup showing the status of each record update.

<figure><img src="https://2472585788-files.gitbook.io/~/files/v0/b/gitbook-x-prod.appspot.com/o/spaces%2F-MFqFFf4143HS0_Wagnz%2Fuploads%2FkdbbpUq5TUJaVefme6Qc%2FUpdate%20and%20Save.gif?alt=media&amp;token=16d0833c-ff1f-4a06-a438-86c7bf873fe7" alt=""><figcaption><p>Update and Save records</p></figcaption></figure>
{% endstep %}
{% endstepper %}

## 🎥 See It in Action

Want to see the full app in action?\
Watch the video below for a full demonstration of this process in action. From creating the app to saving records.

{% embed url="<https://files.gitbook.com/v0/b/gitbook-x-prod.appspot.com/o/spaces%2F-MFqFFf4143HS0_Wagnz%2Fuploads%2FBZfz0VdMoCeNTxKBSLNz%2FBuild%20Your%20First%20App%20-%20%20Opportunity%20Management%20App%20v2.mp4?alt=media&token=5e5cb8b1-8d95-49a1-8a4b-126dcdc92b33>" %}
**Opportunity Management App**
{% endembed %}

***

### Need Additional Help?

Still have questions or need assistance building your app?\
Contact us at <support@valorx.com> — we’re happy to help!


# Express Mode

Super Fast Way to create an App

It's super easy and quickest way to create your first App with **Express Mode** where you can **Preview** the app and Save it whenever you feel its **OK** to have it available as an app.

#### Quickest way to Preview and Create App

**Valorx Fusion Ribbon** tab has a dedicated section called **Quick start**<img src="https://2472585788-files.gitbook.io/~/files/v0/b/gitbook-legacy-files/o/assets%2F-MFqFFf4143HS0_Wagnz%2F-MGJgaaDjXHTc_Vlkj2u%2F-MGJjBcE9owWV9y0KEwp%2FIcon%2046.png?alt=media&amp;token=7a4aa804-dc6d-492b-babf-3a79c0e7b248" alt="" data-size="line"> where you can find **Express Mode** beside **Favorites** button.&#x20;

<div align="left"><img src="https://2472585788-files.gitbook.io/~/files/v0/b/gitbook-legacy-files/o/assets%2F-MFqFFf4143HS0_Wagnz%2F-MGIDobEt8goWgvFtKc0%2F-MGJCBqTFsXjxy6BPLTV%2FEX-1.png?alt=media&amp;token=d182e8ff-da7d-4b70-a0a1-e8eb10961967" alt="Quickstart section in ribbon"></div>

On clicking **Express Mode**, user will get following screen where they can search objects from the search bar which can be included in the app.

![Search objects from the Search bar](https://2472585788-files.gitbook.io/~/files/v0/b/gitbook-legacy-files/o/assets%2F-MFqFFf4143HS0_Wagnz%2F-MGIDobEt8goWgvFtKc0%2F-MGJD_zVXHZzedl_Lx-a%2FEX-2.png?alt=media\&token=8c54f296-70ba-4aff-ae39-61a626f6315c)

The moment user selects the Object it gets added to the **Objects** list, and it immediately opens up the **Field** selection window for the added Objects.

![Object's Fields selection screen](https://2472585788-files.gitbook.io/~/files/v0/b/gitbook-legacy-files/o/assets%2F-MFqFFf4143HS0_Wagnz%2F-MGIDobEt8goWgvFtKc0%2F-MGJEbQ3czJbXVzADRM8%2FEX-3.png?alt=media\&token=5a3015be-9ccd-47c5-ad5f-4a32ed1b380e)

User can quickly search and select fields to be included for the selected object and at this point user can simply hit the **Preview** button, and **Express Mode** will create all required building blocks of an app and it will also run the preview of an app.

![Previewed app from Express Mode](https://2472585788-files.gitbook.io/~/files/v0/b/gitbook-legacy-files/o/assets%2F-MFqFFf4143HS0_Wagnz%2F-MGIDobEt8goWgvFtKc0%2F-MGJIMY8yas7in_Eozm5%2FEX-4.png?alt=media\&token=6b34eec3-01e1-4c50-a1b9-d8b1d18a9029)

#### Express Mode with multiple objects

Lets take a look at an **Express Mode** app with multiple objects. After selecting first object and fields instead of Preview we can add more objects by searching from search bar or to get related object based on object relationships. Click<img src="https://2472585788-files.gitbook.io/~/files/v0/b/gitbook-legacy-files/o/assets%2F-MFqFFf4143HS0_Wagnz%2F-MGNvBDMcE6p_Yc0QoXh%2F-MGO1-lFdcsNZrxJ4A8N%2FEX-8.png?alt=media&amp;token=946f1eaf-e242-473b-b0d5-0cd74e07fad0" alt="" data-size="original">(Relationships) to open Relationship Explorer of an object.

<div align="left"><img src="https://2472585788-files.gitbook.io/~/files/v0/b/gitbook-legacy-files/o/assets%2F-MFqFFf4143HS0_Wagnz%2F-MGNvBDMcE6p_Yc0QoXh%2F-MGO-tYFWK9YRP4eb5cU%2FEX-7.png?alt=media&amp;token=a6c6299f-2e7c-41a5-ab39-1f06cef0ec98" alt="" width="188"></div>

<div align="left"><img src="https://2472585788-files.gitbook.io/~/files/v0/b/gitbook-legacy-files/o/assets%2F-MFqFFf4143HS0_Wagnz%2F-MGNvBDMcE6p_Yc0QoXh%2F-MGO2obqG80jZVezU5Vv%2FEX-9.png?alt=media&amp;token=ab836e59-8002-412c-86f2-c286f3e8aa70" alt="Relationship Explorer" width="563"></div>

Now we can search and explore relationships and once we click<img src="https://2472585788-files.gitbook.io/~/files/v0/b/gitbook-legacy-files/o/assets%2F-MFqFFf4143HS0_Wagnz%2F-MGNvBDMcE6p_Yc0QoXh%2F-MGO3_azOQPcmTzm-FVK%2Fimage.png?alt=media&amp;token=ecdde28c-f169-440c-ad2f-1501679c40cc" alt="" data-size="original"> related object gets added with required fields and relevant filters to establish the relationship. To add more related objects we can either search in the existing relationships or we can <img src="https://2472585788-files.gitbook.io/~/files/v0/b/gitbook-legacy-files/o/assets%2F-MFqFFf4143HS0_Wagnz%2F-MGNvBDMcE6p_Yc0QoXh%2F-MGO5Xztehgribyk_YxJ%2Fimage.png?alt=media&amp;token=40867e3c-7c13-4ed4-8975-f2b7463de6d9" alt="" data-size="original"> to add related object and further explore newly added object's relationships to Nth level. You may recall that in **Express Mode** a user only needs to know selection of required objects and fields only and the rest of the components will be created by **Express Mode**.

![](https://2472585788-files.gitbook.io/~/files/v0/b/gitbook-legacy-files/o/assets%2F-MFqFFf4143HS0_Wagnz%2F-MGNvBDMcE6p_Yc0QoXh%2F-MGOI9Lcjt3seooa5D1Z%2FEX-10.png?alt=media\&token=90b311a7-fd44-4270-83b8-db370ce8a497)

In the above screenshot we can see two objects are selected and on the right hand side its basic workflow is also created. In the selected object cards we can see some details like where exactly the data will be rendered and whether the data is filtered or not by number of filters created. We can configure object's fields, Query and Map by expanding the card to fine tune our app.&#x20;

<div align="left"><img src="https://2472585788-files.gitbook.io/~/files/v0/b/gitbook-legacy-files/o/assets%2F-MFqFFf4143HS0_Wagnz%2F-MGNvBDMcE6p_Yc0QoXh%2F-MGOM24uE5lTcydnn6b0%2FEX-11.png?alt=media&amp;token=2a21a059-9a14-4e9e-9a89-ec0891b0c18a" alt="" width="563"></div>

On selecting already added object's card it gets expanded to give more detailed options to fine tune basic building blocks. Here in above snapshot Query Mode is updated to User Selection and Map's location and its Layout type is updated from Grid to Form as we want a single record to be displayed. For the second object we have updated Map's location and its Layout type is Grid only to show multiple records related to first object. And here we go for **Preview** to get following output.

![Previewed app with multiple objects in Express Mode](https://2472585788-files.gitbook.io/~/files/v0/b/gitbook-legacy-files/o/assets%2F-MFqFFf4143HS0_Wagnz%2F-MGNvBDMcE6p_Yc0QoXh%2F-MGOO5MndQ1_xusDdKvG%2FEX-12.png?alt=media\&token=55f063b2-1eaa-4385-8958-078cd008cc70)


# Express Actions

Have a feel of a full blown app running in preview mode. Customize and play with it as many times as you want and hit the Save as an App button to have it in your App List.

When an app is previewed from Express Mode, Valorx Fusion ribbon tab will have a section called **Express Actions** with different options.

<div align="left"><img src="https://2472585788-files.gitbook.io/~/files/v0/b/gitbook-legacy-files/o/assets%2F-MFqFFf4143HS0_Wagnz%2F-MGIDobEt8goWgvFtKc0%2F-MGJKAybgiPYus_0c2bv%2FEX-5.png?alt=media&amp;token=c9a667c5-48b3-491e-b98c-0240945364ac" alt="Express Actions sectoin in ribbon"></div>

In this section user can re-render data with Display Data button. User can make changes to rendered data in Excel and with Save Data button he can save changes back to CRM. User can further customize the app or he can simply click the button named **Save as an App** and provide a name and a File type to the app and the app becomes available to the App list.

<div align="left"><img src="https://2472585788-files.gitbook.io/~/files/v0/b/gitbook-legacy-files/o/assets%2F-MFqFFf4143HS0_Wagnz%2F-MGIDobEt8goWgvFtKc0%2F-MGJNZWIkh7HHdX7udsI%2FEX-6.png?alt=media&amp;token=41a6c670-b7ca-41b3-9841-38479eb7be51" alt="Save as an App screen." width="375"></div>

Once the app is saved and available to the App List user can further customize it by opening it in Design Studio.

{% content-ref url="/pages/-MGBDf8SVa0ERLD9vXqk" %}
[Design Studio](/valorx-fusion/design-studio/the-power-of-design-studio)
{% endcontent-ref %}


# Getting Started

Discover what Valorx Fusion Express is and how it enhances your Salesforce experience.

## What is Fusion Express?

Fusion Express integrates your Salesforce data with spreadsheets like Microsoft Excel and Google Sheets. This tool enables customers to maintain their familiar spreadsheet workflows while leveraging the enhanced functionality provided by the CRM all in the **fastest** manner possible all in just a few seconds.

It's a productivity tool designed for **Salesforce** end-users, optimizing operations across all user roles. It **ensures Salesforce security** and controls by not saving data locally. Developers and admins also appreciate its capabilities.

Whether you're working in Mac Workbook, Windows Excel, or Google Sheets, Fusion Express streamlines the process, allowing you to focus on your tasks without the hassle of manual data entry.

<figure><img src="https://2472585788-files.gitbook.io/~/files/v0/b/gitbook-x-prod.appspot.com/o/spaces%2F-MFqFFf4143HS0_Wagnz%2Fuploads%2F20ct4SjyN52Iq52AzbfT%2FWelcome%20Page.png?alt=media&amp;token=df3aa84a-5f2c-41fb-8844-def3ca529bd9" alt=""><figcaption><p>Fusion Express</p></figcaption></figure>

***

## How to Get Started

Below is a step-by-step installation guide for the Sidebar Add-in on different platforms.

{% tabs %}
{% tab title="Excel" %}

### Installing Valorx Sidebar Add-In for Excel

<figure><img src="https://2472585788-files.gitbook.io/~/files/v0/b/gitbook-x-prod.appspot.com/o/spaces%2F-MFqFFf4143HS0_Wagnz%2Fuploads%2F9mxjY4eKHqAy3wycBACj%2FExcel%20and%20Mac.png?alt=media&amp;token=482a2767-9880-47f8-bd6f-901c7c276343" alt=""><figcaption><p>Business Apps – Microsoft AppSource</p></figcaption></figure>

To get Valorx Sidebar Add-In running on your computer, please follow the steps below:

1. **Open the Installation Link:**
   * Click [here](https://appsource.microsoft.com/en-us/product/office/WA200001612?tab=Overview) to get the latest Valorx Sidebar Add-In app.
2. **Sign In (if required):**
   * **Sign in** with your Microsoft account if prompted.
3. **Get the App:**
   * Click the "**Get it now**" button on the app’s detail page.
4. **Installation Process:**
   * Follow any additional prompts to complete the installation. This may include agreeing to terms and conditions and choosing where to add the app (e.g., Excel, Teams, Dynamics 365).
5. Open the App in Excel:
   * Once the installation is completed, open Microsoft Excel, and you should see **Valorx** **Fusion** **Ribbon** tab. This means you have successfully installed Valorx on your computer.
   * Select **Valorx Fusion** and click on **Start**.

<figure><img src="https://2472585788-files.gitbook.io/~/files/v0/b/gitbook-x-prod.appspot.com/o/spaces%2F-MFqFFf4143HS0_Wagnz%2Fuploads%2FLlMWuRm6RiZr9rJJzJMR%2F1.%20Mac%20-%20Start%20FE.gif?alt=media&amp;token=e18e8ed5-9643-4ac0-b7d1-d7fbffa1c58b" alt=""><figcaption><p>Valorx Sidebar Add-In for Excel</p></figcaption></figure>

You may now explore Valorx Sidebar Add-In and its enhancements to your Salesforce experience.
{% endtab %}

{% tab title="Google Sheets" %}

### Installing Valorx Sidebar Add-In for Google Sheets

<figure><img src="https://2472585788-files.gitbook.io/~/files/v0/b/gitbook-x-prod.appspot.com/o/spaces%2F-MFqFFf4143HS0_Wagnz%2Fuploads%2FYDPxSdHlL9i96X2s9any%2FGoogle%20Sheet.png?alt=media&amp;token=5376953b-4f5e-4181-b348-5506e5fbd44e" alt=""><figcaption><p>Valorx for Salesforce - Google Workspace Marketplace</p></figcaption></figure>

To get Valorx Sidebar Add-In running on your **Google Sheets**, please follow the steps below:

1. **Open the Installation Link:**
   * Click [here](https://workspace.google.com/marketplace/app/valorx_for_salesforce/823192635690) to get the latest Valorx Sidebar Add-In app.
2. **Install the App:**
   * Click the "**Install**" button on the app’s detail page.
3. **Sign In:**
   * Sign in with your Google account if prompted.
4. **Consent and Permissions:**
   * Review the permissions the app requires and click "**Continue**" or "**Accept**" to proceed.
5. **Launch the Google Sheets App:**
   * After installation, open Google Sheets. You should find **Valorx For Salesforce** listed under extensions. This confirms Valorx Fusion has been successfully installed on your google workspace environment.
   * Select "**Valorx For Salesforce**" and click "**Start**" to begin.

<figure><img src="https://2472585788-files.gitbook.io/~/files/v0/b/gitbook-x-prod.appspot.com/o/spaces%2F-MFqFFf4143HS0_Wagnz%2Fuploads%2FwAyW8RY0R6fxtiGhr6WD%2F1.%20Gsheet%20-%20Start%20FE.gif?alt=media&amp;token=5afa6b3a-3d19-44e2-b743-46ac518a7356" alt=""><figcaption></figcaption></figure>

6. You may now explore Valorx Sidebar Add-In and its enhancements to your Salesforce experience.

<figure><img src="https://2472585788-files.gitbook.io/~/files/v0/b/gitbook-x-prod.appspot.com/o/spaces%2F-MFqFFf4143HS0_Wagnz%2Fuploads%2FGrXosn1S5MUVHpd3K7kJ%2Fimage.png?alt=media&amp;token=7a25f32d-eab4-4d19-b328-29b30459d45d" alt=""><figcaption></figcaption></figure>
{% endtab %}
{% endtabs %}

***

## How Express Works?

1. **Install** the Valorx for Salesforce Sidebar Add-In on any of your preferred browsers.
2. After installation, **launch the Valorx for Salesforce Add-In**. You'll find Fusion Express conveniently located in the sidebar just above the Fusion App.
3. **Log in** using your Salesforce by creating **a connection** in your sidebar add-in. It will prompt you to provide your Salesforce credential.
4. **Connect** your Salesforce Org to Fusion Express with a **single click**. You can easily add multiple Orgs.
5. Once connected, **access Salesforce** Objects, select fields, and view records in a Spreadsheet within blink of an eye.
6. **Process Salesforce records** directly in Fusion Express and save it back to Salesforce with a single click.


# Unlock the Full Potential of Express

Welcome to Fusion Express!

his step-by-step guide will walk you through the process of using Fusion Express to seamlessly connect Salesforce data with your preferred spreadsheets. Follow these instructions to quickly fetch, save, and manage Salesforce records, enhancing your productivity and ensuring secure, real-time data synchronization.

## Home Page

{% tabs %}
{% tab title="Excel" %}
Once the installation is complete, open a blank Excel sheet, and you should see the **Valorx Fusion Ribbon** tab. This indicates that Valorx Fusion has been **successfully installed**.

1. Click on the Valorx Fusion Ribbon tab, then click on "**Start**" to begin using **Valorx Fusion Express**.

<figure><img src="https://2472585788-files.gitbook.io/~/files/v0/b/gitbook-x-prod.appspot.com/o/spaces%2F-MFqFFf4143HS0_Wagnz%2Fuploads%2FLlMWuRm6RiZr9rJJzJMR%2F1.%20Mac%20-%20Start%20FE.gif?alt=media&amp;token=e18e8ed5-9643-4ac0-b7d1-d7fbffa1c58b" alt=""><figcaption><p>Launch Valorx</p></figcaption></figure>

2. Then you'll see the Valorx Fusion sidebar appear on the right side of the spreadsheet.

<figure><img src="https://2472585788-files.gitbook.io/~/files/v0/b/gitbook-x-prod.appspot.com/o/spaces%2F-MFqFFf4143HS0_Wagnz%2Fuploads%2FN84ziuz7hMDaCcKcWkmF%2FWelcome%20Page.png?alt=media&amp;token=98f130b2-9472-4b5d-aa75-134de437b6d8" alt=""><figcaption><p>Valorx Fusion</p></figcaption></figure>
{% endtab %}

{% tab title="Google Sheets" %}
Once the installation is complete, **open a blank Google Sheets**. You should find **Valorx For Salesforce** listed under extensions. This confirms Valorx Fusion has been successfully installed on your google workspace environment.&#x20;

1. Select "**Valorx For Salesforce**" and click "**Start**" to begin.

<figure><img src="https://2472585788-files.gitbook.io/~/files/v0/b/gitbook-x-prod.appspot.com/o/spaces%2F-MFqFFf4143HS0_Wagnz%2Fuploads%2FwAyW8RY0R6fxtiGhr6WD%2F1.%20Gsheet%20-%20Start%20FE.gif?alt=media&amp;token=5afa6b3a-3d19-44e2-b743-46ac518a7356" alt=""><figcaption><p>Launch Valorx</p></figcaption></figure>

2. Then you'll see the Valorx Fusion sidebar appear on the right side of the spreadsheet.

<figure><img src="https://2472585788-files.gitbook.io/~/files/v0/b/gitbook-x-prod.appspot.com/o/spaces%2F-MFqFFf4143HS0_Wagnz%2Fuploads%2FGrXosn1S5MUVHpd3K7kJ%2Fimage.png?alt=media&amp;token=7a25f32d-eab4-4d19-b328-29b30459d45d" alt=""><figcaption><p>Valorx Fusion</p></figcaption></figure>
{% endtab %}
{% endtabs %}

## New Connection

{% tabs %}
{% tab title="Excel" %}
After successfully installing **Fusion Express**, user should proceed to create a **New Connection**. This screen enables you to connect to existing connections or manage your connections.

1. Click on the "**vertical ellipsis menu**" to start a new connection.<br>

   <div align="left"><figure><img src="https://2472585788-files.gitbook.io/~/files/v0/b/gitbook-x-prod.appspot.com/o/spaces%2F-MFqFFf4143HS0_Wagnz%2Fuploads%2F88IDkZpMBlVj8t6zN1Di%2F2.%20Mac%20-%20Start%20a%20new%20connection.gif?alt=media&amp;token=4fac7712-1d19-4f4a-aae2-7c8206fefe12" alt="" width="300"><figcaption><p>Start a new connection</p></figcaption></figure></div>

2. The Connections window will open. Click on "**New Connection**" button.<br>

   <div align="left"><figure><img src="https://2472585788-files.gitbook.io/~/files/v0/b/gitbook-x-prod.appspot.com/o/spaces%2F-MFqFFf4143HS0_Wagnz%2Fuploads%2F59382LKBe3krVPJOuG75%2F3.%20Mac%20-%20Create%20a%20new%20connection.gif?alt=media&amp;token=4e886f93-4d58-4284-b68a-99f0a596b56a" alt="" width="300"><figcaption><p>Create a new connection</p></figcaption></figure></div>

3. A New **Connection window** will appear, offering four login options. Select your **preferred method** to create a new connection:
   * **Login:** Use Salesforce login credentials to connect to your Salesforce Org.
   * **Sandbox:** Connect to a Salesforce Sandbox Org using sandbox login credentials.
   * **Custom Domain:** Enter custom domain details to create a connection.
   * **Community:** Validate the Community URL when adding a new connection from the start screen.

4. Enter the **name** of the connection in the "**Connection Name**" field.

5. Then click "**Add**" and enter your **Salesforce login credentials**.

<figure><img src="https://2472585788-files.gitbook.io/~/files/v0/b/gitbook-x-prod.appspot.com/o/spaces%2F-MFqFFf4143HS0_Wagnz%2Fuploads%2FmlAfi7XfsJjfOuj99Rab%2F4.%20Mac%20-%20Create%20a%20new%20connection%20login.gif?alt=media&amp;token=5e8165f3-731f-4d67-b485-fc4802dfdb0a" alt=""><figcaption><p>Add Connection Name</p></figcaption></figure>

6. You have successfully created a new connection!

<figure><img src="https://2472585788-files.gitbook.io/~/files/v0/b/gitbook-x-prod.appspot.com/o/spaces%2F-MFqFFf4143HS0_Wagnz%2Fuploads%2FCltf2WXLDuYvh4LR7ASl%2FScreenshot%202024-10-02%20at%205.29.15%E2%80%AFPM.png?alt=media&amp;token=289fe2a9-c383-4300-893d-4ae28b0f3c9a" alt=""><figcaption><p>New connection is successfully created.</p></figcaption></figure>
{% endtab %}

{% tab title="Google Sheet" %}
After successfully installing **Fusion Express**, users should proceed to create a **New Connection**. This screen enables you to connect to existing connections or manage your connections.

1. Click on the "**vertical ellipsis menu**" to start a new connection.<br>

   <div align="left"><figure><img src="https://2472585788-files.gitbook.io/~/files/v0/b/gitbook-x-prod.appspot.com/o/spaces%2F-MFqFFf4143HS0_Wagnz%2Fuploads%2FcnbqpOqKDLk6oy1IbHOc%2F2.%20Gsheet%20-%20Start%20a%20new%20connection.gif?alt=media&amp;token=e9184667-9433-4021-b0d5-fd6d45ddf667" alt="" width="225"><figcaption><p>Start a nec Connection</p></figcaption></figure></div>

2. The Connections window will open. Click on "**New Connection**" button.<br>

   <div align="left"><figure><img src="https://2472585788-files.gitbook.io/~/files/v0/b/gitbook-x-prod.appspot.com/o/spaces%2F-MFqFFf4143HS0_Wagnz%2Fuploads%2F2ZniZ4TMZCGqblrterro%2F3.%20Create%20a%20new%20connection.gif?alt=media&amp;token=9dc2402e-b445-4e9c-b283-6dfc11146399" alt="" width="225"><figcaption><p>Create a new connection<br></p></figcaption></figure></div>

3. A New **Connection window** will appear, offering four login options. Select your **preferred method** to create a new connection:
   * **Login:** Use Salesforce login credentials to connect to your Salesforce Org.
   * **Sandbox:** Connect to a Salesforce Sandbox Org using sandbox login credentials.
   * **Custom Domain:** Enter custom domain details to create a connection.
   * **Community:** Validate the Community URL when adding a new connection from the start screen.

4. Enter the **name** of the connection in the "**Connection Name**" field.

5. Then click "**Add**" and enter your **Salesforce login credentials**.

<figure><img src="https://2472585788-files.gitbook.io/~/files/v0/b/gitbook-x-prod.appspot.com/o/spaces%2F-MFqFFf4143HS0_Wagnz%2Fuploads%2Fdk3DjXSrWmzxZcHmQzqI%2F4.%20GS%20-%20Create%20a%20new%20connection.gif?alt=media&amp;token=fafc4168-d64b-4fb0-a3a4-5425b97fee7c" alt=""><figcaption><p>Add a New Connection</p></figcaption></figure>

6. A new connection have successfully created! User's name will now be displayed on the sidebar.

<figure><img src="https://2472585788-files.gitbook.io/~/files/v0/b/gitbook-x-prod.appspot.com/o/spaces%2F-MFqFFf4143HS0_Wagnz%2Fuploads%2FsUZwNJJGjRRCRp85j0j4%2FUntitled%20spreadsheet%20-%20Google%20Sheets%20-%20Google%20Chrome%201_10_2024%206_11_49%20PM.png?alt=media&amp;token=0d85898b-3f29-4c9d-b009-dd78c2b4a66e" alt=""><figcaption><p>New connection is successfully created.</p></figcaption></figure>
{% endtab %}
{% endtabs %}

## Fetch Salesforce Data

{% tabs %}
{% tab title="Excel" %}

1. To create a **new grid** using Salesforce data, click on the "**Select**" button in **Express Mode**.<br>

   <div align="left"><figure><img src="https://2472585788-files.gitbook.io/~/files/v0/b/gitbook-x-prod.appspot.com/o/spaces%2F-MFqFFf4143HS0_Wagnz%2Fuploads%2F1DJ3KC0AVFOwiWJiKHZ7%2F5.%20Mac%20-%20Fetch%20data.gif?alt=media&amp;token=e0744033-ab5c-4d8a-844c-e5c7c6559376" alt="" width="300"><figcaption><p>Express Mode</p></figcaption></figure></div>

2. Users will be directed to the following screen, where they can **create a new grid** using Salesforce data.&#x20;

<div><figure><img src="https://2472585788-files.gitbook.io/~/files/v0/b/gitbook-x-prod.appspot.com/o/spaces%2F-MFqFFf4143HS0_Wagnz%2Fuploads%2FcKIbBk0hIWnlp6d1HROi%2F6.%20Mac%20-%20This%20File.png?alt=media&amp;token=a09f898b-3595-41f4-80d2-66fc64cab38e" alt="" width="200"><figcaption><p>This File</p></figcaption></figure> <figure><img src="https://2472585788-files.gitbook.io/~/files/v0/b/gitbook-x-prod.appspot.com/o/spaces%2F-MFqFFf4143HS0_Wagnz%2Fuploads%2FVldZCjc3EQm5AguSNeix%2F7.%20Mac-%20Global.png?alt=media&amp;token=599e532d-eab3-423b-af2e-46612f07e5fe" alt="" width="200"><figcaption><p>Global</p></figcaption></figure></div>

3. Below that, users can see the following options:

   * **This File:** Custom grids created and rendered by the user on the current sheet.
   * **Global Grids:** Shared grids within the organization. Admins of Global Grids have editing, reading, and writing permissions, while other users can only read.

   <div data-gb-custom-block data-tag="hint" data-style="info" class="hint hint-info"><p>If you haven’t created any grids yet, the <strong>This File</strong> section won’t be visible. You’ll only see the <strong>Global</strong> section until you create your first grid.</p></div>

4. Click on "**Create Grid**" to start **creating a grid**.&#x20;

   <div align="left"><figure><img src="https://2472585788-files.gitbook.io/~/files/v0/b/gitbook-x-prod.appspot.com/o/spaces%2F-MFqFFf4143HS0_Wagnz%2Fuploads%2FV0LIhR0TIZsjXDJjy4CH%2F8.%20Create%20a%20new%20grid.gif?alt=media&amp;token=be817696-842f-4643-bfcc-e579ca458f26" alt="" width="300"><figcaption><p>Create a new grid</p></figcaption></figure></div>

5. After clicking **Create Grid**, users will be directed to the **Select Object** screen. Here, they can choose objects to add to the sheet or use the search bar to locate specific objects.<br>

   <div align="left"><figure><img src="https://2472585788-files.gitbook.io/~/files/v0/b/gitbook-x-prod.appspot.com/o/spaces%2F-MFqFFf4143HS0_Wagnz%2Fuploads%2FvFRaA9nS9qBrPqUTitx5%2F9.%20Mac%20-%20Select%20Object.gif?alt=media&amp;token=46430602-183e-4a02-a762-72c2556681b2" alt="" width="300"><figcaption><p>Choose object</p></figcaption></figure></div>

6. After selecting an object, users are directed to another screen to **set up the object grid**, where the pre-added object fields are displayed. To add more fields, users can click the **+ Add** button to search for and include specific fields in the grid. This action will automatically open the **Field Selection** screen for the selected object.<br>

   <div align="left"><figure><img src="https://2472585788-files.gitbook.io/~/files/v0/b/gitbook-x-prod.appspot.com/o/spaces%2F-MFqFFf4143HS0_Wagnz%2Fuploads%2FCKLEMVX8fTJqekSgwNlp%2F10.%20Mac%20-%20Adding%20object%20fields.gif?alt=media&amp;token=ee81ebef-43ca-42b4-9100-64370f8295b3" alt="" width="300"><figcaption><p>Adding object's field</p></figcaption></figure></div>

7. In this screen, users can also rearrange the fields and remove any object fields they no longer want to include in the grid.<br>

   <div align="left"><figure><img src="https://2472585788-files.gitbook.io/~/files/v0/b/gitbook-x-prod.appspot.com/o/spaces%2F-MFqFFf4143HS0_Wagnz%2Fuploads%2FZmAFG2P3RFhwBYqo6y8S%2F11.%20Rearrange%20and%20remove%20fields.gif?alt=media&amp;token=e51d5a2c-0520-4546-bf6e-a92b75c598db" alt="" width="300"><figcaption><p>Rearrange and remove fields</p></figcaption></figure></div>

8. Here are a few actions users can take:
   * **Rename grid**: To rename the grid, click on the grid name field at the top of the screen, enter the desired name, and press **Enter**. Renaming the grid makes it easier for users to identify and organize their grids.

     <div align="left"><figure><img src="https://2472585788-files.gitbook.io/~/files/v0/b/gitbook-x-prod.appspot.com/o/spaces%2F-MFqFFf4143HS0_Wagnz%2Fuploads%2F1LM7yJspnW2EzBBkAofX%2F12.%20Rename%20the%20grid.gif?alt=media&amp;token=4ee48667-9c42-4aad-b94f-f58ae7322599" alt="" width="300"><figcaption><p>Rename grid</p></figcaption></figure></div>

   * **Add new grid**: To create a new grid, click on the  '**+'** button. This action will bring user back to the Object selection screen.

     <div align="left"><figure><img src="https://2472585788-files.gitbook.io/~/files/v0/b/gitbook-x-prod.appspot.com/o/spaces%2F-MFqFFf4143HS0_Wagnz%2Fuploads%2FbROQpqpuujUtV2hmGxJG%2F13.%20Mac%20-%20Add%20new%20grid.gif?alt=media&amp;token=58f544c5-5038-4fc7-a204-91dde7ce1006" alt="" width="300"><figcaption><p>Adding new grid</p></figcaption></figure></div>

   * **Global grid**: To make the grid accessible to all users, toggle the **Global Grid** option. This ensures that the grid appears in the **Global** section for users with the necessary permissions.

     <div align="left"><figure><img src="https://2472585788-files.gitbook.io/~/files/v0/b/gitbook-x-prod.appspot.com/o/spaces%2F-MFqFFf4143HS0_Wagnz%2Fuploads%2FX55bncIond4vM92cXTTV%2F14.%20Mac%20-%20Global%20grid.gif?alt=media&amp;token=045b8200-800c-49a2-81ec-d2ede26ca0de" alt="" width="300"><figcaption><p>Set the grid to global</p></figcaption></figure></div>

   * **Sort records**: Click on the **Sort** button to arrange records in ascending or descending order based on specific fields. Sorting helps users analyze data more effectively.

     <div align="left"><figure><img src="https://2472585788-files.gitbook.io/~/files/v0/b/gitbook-x-prod.appspot.com/o/spaces%2F-MFqFFf4143HS0_Wagnz%2Fuploads%2FBBwTzjrum1GdbICLMP15%2F15.%20Mac%20-%20Sorting%20records.gif?alt=media&amp;token=7d90e11b-3dd4-4fc0-8762-3ab795b638d5" alt="" width="300"><figcaption><p>Sorting the records</p></figcaption></figure></div>

   * **Apply filters**: Click on the **Filters** button to set conditions for displaying specific records. Users can define the fields, operators, and values for each filter to refine the data shown in the grid.

     <figure><img src="https://2472585788-files.gitbook.io/~/files/v0/b/gitbook-x-prod.appspot.com/o/spaces%2F-MFqFFf4143HS0_Wagnz%2Fuploads%2F4oI0ZMB9e3ICyxjj4PM8%2F16.%20Mac%20-%20Apply%20filter.gif?alt=media&amp;token=a6f1952b-704c-4378-9274-f2f8dc217a85" alt=""><figcaption><p>Apply filter to the records</p></figcaption></figure>

{% endtab %}

{% tab title="Google Sheets" %}

1. To create a **new grid** using Salesforce data, click on the "**Select**" button in **Express Mode**.<br>

   <div align="left"><figure><img src="https://2472585788-files.gitbook.io/~/files/v0/b/gitbook-x-prod.appspot.com/o/spaces%2F-MFqFFf4143HS0_Wagnz%2Fuploads%2FYXUNKefPxdADCLGGZpLb%2F5.%20GS%20-%20Fetch%20Data.gif?alt=media&amp;token=5d7260fe-9fed-4f42-8e09-d44272bc7f19" alt="" width="225"><figcaption><p>Express Mode</p></figcaption></figure></div>

2. Users will be directed to the following screen, where they can **create a new grid** using Salesforce data

<div><figure><img src="https://2472585788-files.gitbook.io/~/files/v0/b/gitbook-x-prod.appspot.com/o/spaces%2F-MFqFFf4143HS0_Wagnz%2Fuploads%2FRigNqkMy98U545KdlPqw%2F6.%20GS%20-%20This%20File.png?alt=media&amp;token=4f73fb47-b984-4615-b8b0-62eb3e11aac7" alt="" width="225"><figcaption><p>This File</p></figcaption></figure> <figure><img src="https://2472585788-files.gitbook.io/~/files/v0/b/gitbook-x-prod.appspot.com/o/spaces%2F-MFqFFf4143HS0_Wagnz%2Fuploads%2FLMCw8my4ciwosMeRHtFr%2F7.%20GS%20-%20Global.png?alt=media&amp;token=b87cbf41-c687-4036-9e9f-2e1d5fbcacf7" alt="" width="225"><figcaption><p>Global</p></figcaption></figure></div>

3. Below that, users can see the following options:

   * **This File:** Custom grids created and rendered by the user on the current sheet.
   * **Global Grids:** Shared grids within the organization. Admins of Global Grids have editing, reading, and writing permissions, while other users can only read.

   <div data-gb-custom-block data-tag="hint" data-style="info" class="hint hint-info"><p>If you haven’t created any grids yet, the <strong>This File</strong> section won’t be visible. You’ll only see the <strong>Global</strong> section until you create your first grid.</p></div>

4. Click on "**Create Grid**" to start **creating a grid**. <br>

   <div align="left"><figure><img src="https://2472585788-files.gitbook.io/~/files/v0/b/gitbook-x-prod.appspot.com/o/spaces%2F-MFqFFf4143HS0_Wagnz%2Fuploads%2FPp3vPwXywQPQa3MDMKai%2F8.%20GS%20-%20Create%20Grid%20Button.gif?alt=media&amp;token=59dd5322-a9d6-44a5-bb46-a0fe336c5e12" alt="" width="225"><figcaption><p>Create a new grid</p></figcaption></figure></div>

5. After clicking **Create Grid**, users will be directed to the **Select Object** screen. Here, they can choose objects to add to the sheet or use the search bar to locate specific objects.<br>

   <div align="left"><figure><img src="https://2472585788-files.gitbook.io/~/files/v0/b/gitbook-x-prod.appspot.com/o/spaces%2F-MFqFFf4143HS0_Wagnz%2Fuploads%2FS9LytYO62JSg862lxqaU%2F9.%20Adding%20an%20object.gif?alt=media&amp;token=0ac4c3a4-ffe4-4462-881b-8510841727cb" alt="" width="225"><figcaption><p>Choose object</p></figcaption></figure></div>

6. After selecting an object, users are directed to another screen to **set up the object grid**, where the pre-added object fields are displayed. To add more fields, users can click the **+ Add** button to search for and include specific fields in the grid. This action will automatically open the **Field Selection** screen for the selected object.<br>

   <div align="left"><figure><img src="https://2472585788-files.gitbook.io/~/files/v0/b/gitbook-x-prod.appspot.com/o/spaces%2F-MFqFFf4143HS0_Wagnz%2Fuploads%2FrV3xir7hiwxFn0tJzj33%2F14.%20Adding%20Object%20Fields.gif?alt=media&amp;token=41540c0a-123b-47e7-8936-5cd9f98b350f" alt="" width="225"><figcaption><p>Adding object's field</p></figcaption></figure></div>

7. In this screen, users can also rearrange the fields and remove any object fields they no longer want to include in the grid.<br>

   <div align="left"><figure><img src="https://2472585788-files.gitbook.io/~/files/v0/b/gitbook-x-prod.appspot.com/o/spaces%2F-MFqFFf4143HS0_Wagnz%2Fuploads%2F0UMbkRx2HVvesadqIqd5%2F15.%20Rearrange%20and%20remove%20Object%20Fields.gif?alt=media&amp;token=4aad58fc-cde8-46f2-b0b0-65ec4b40390a" alt="" width="225"><figcaption><p>Rearrange and remove fields</p></figcaption></figure></div>

8. Here are a few actions users can take:
   * **Rename grid**: To rename the grid, click on the grid name field at the top of the screen, enter the desired name, and press **Enter**. Renaming the grid makes it easier for users to identify and organize their grids.<br>

     <div align="left"><figure><img src="https://2472585788-files.gitbook.io/~/files/v0/b/gitbook-x-prod.appspot.com/o/spaces%2F-MFqFFf4143HS0_Wagnz%2Fuploads%2FyaJ1BFzdQtRv0lytgK2G%2F10.%20Rename%20the%20Grid.gif?alt=media&amp;token=5ebbf60f-f5d7-402c-ae9f-afab5f3a95a6" alt="" width="225"><figcaption><p>Rename grid</p></figcaption></figure></div>

   * **Add new grid**: To create a new grid, click on the  '**+'** button. This action will bring user back to the Object selection screen.<br>

     <div align="left"><figure><img src="https://2472585788-files.gitbook.io/~/files/v0/b/gitbook-x-prod.appspot.com/o/spaces%2F-MFqFFf4143HS0_Wagnz%2Fuploads%2FAXzGwdxGHjCIRgMv4IsY%2F11.%20Add%20new%20Grid.gif?alt=media&amp;token=80e91a6b-0601-4ca0-92d4-e593134f6732" alt="" width="225"><figcaption><p>Adding new grid</p></figcaption></figure></div>

   * **Global grid**: To make the grid accessible to all users, toggle the **Global Grid** option. This ensures that the grid appears in the **Global** section for users with the necessary permissions.<br>

     <div align="left"><figure><img src="https://2472585788-files.gitbook.io/~/files/v0/b/gitbook-x-prod.appspot.com/o/spaces%2F-MFqFFf4143HS0_Wagnz%2Fuploads%2Fhefwgp2K4TmTYHLwIOaY%2F12.%20Global%20Grid.gif?alt=media&amp;token=ed82aac9-9837-4ad5-975d-67c8130f6c20" alt="" width="225"><figcaption><p>Set the grid to global</p></figcaption></figure></div>

   * **Sort records**: Click on the **Sort** button to arrange records in ascending or descending order based on specific fields. Sorting helps users analyze data more effectively.<br>

     <div align="left"><figure><img src="https://2472585788-files.gitbook.io/~/files/v0/b/gitbook-x-prod.appspot.com/o/spaces%2F-MFqFFf4143HS0_Wagnz%2Fuploads%2FwKp7S07nkDWPXhrs2wVK%2F13.%20Sort.gif?alt=media&amp;token=3ef28d11-7f38-43d0-a6e6-26780916d7bf" alt="" width="225"><figcaption><p>Sorting the records</p></figcaption></figure></div>

   * **Apply filters**: Click on the **Filters** button to set conditions for displaying specific records. Users can define the fields, operators, and values for each filter to refine the data shown in the grid.

     <div align="left"><figure><img src="https://2472585788-files.gitbook.io/~/files/v0/b/gitbook-x-prod.appspot.com/o/spaces%2F-MFqFFf4143HS0_Wagnz%2Fuploads%2FpJnjKZyMX2yDlachoE8Q%2F16.%20Filter%20records.gif?alt=media&amp;token=f424e042-54be-4e4d-88b3-467c7c4ef928" alt=""><figcaption><p>Apply filter to the record<br></p></figcaption></figure></div>

{% endtab %}
{% endtabs %}

## Rendering Data

{% tabs %}
{% tab title="Excel" %}

1. **Choosing the Sheet**
   * **New Sheet:** Click on "**New Sheet**" to render the data on a fresh spreadsheet. This will create a new tab in the spreadsheet where the data will be displayed.
   * **Existing Sheet:** Click on "**Existing Sheet**" to render the data within the same spreadsheet. This option will update the current sheet with the new data. User can create multiple object grid and multiple grid in the same spreadsheet.<br>

     <div align="left"><figure><img src="https://2472585788-files.gitbook.io/~/files/v0/b/gitbook-x-prod.appspot.com/o/spaces%2F-MFqFFf4143HS0_Wagnz%2Fuploads%2F8hzo5kKPZtnoASLCi2qR%2F17.%20Sheet%20location.gif?alt=media&amp;token=0cbf95a1-cbe1-410f-a86b-c38db9d26464" alt="" width="300"><figcaption><p>Sheet location</p></figcaption></figure></div>

#### **Rendering Data to a New Sheet:**

1. Choose the "**New Sheet**" option to create a fresh sheet for your data.
2. Simply click the "**Run**" button to render your data on the newly created sheet.

<figure><img src="https://2472585788-files.gitbook.io/~/files/v0/b/gitbook-x-prod.appspot.com/o/spaces%2F-MFqFFf4143HS0_Wagnz%2Fuploads%2FmJQEp2qY2dorpaVMb4py%2F18.%20Render%20on%20new%20sheet.gif?alt=media&amp;token=9ad35470-bf9e-41c1-845e-9f390dcec280" alt=""><figcaption><p>New Sheet Save and Run</p></figcaption></figure>

* The default grid name will match the object name, but users can rename the sheet by clicking on it if needed.
* Sheet names must be unique, include spaces and special characters, and cannot be duplicated.
* If a sheet is renamed in Excel, the new name will automatically update in the Sidebar's Sheet Location.

**Rendering Data to an Existing Sheet (Multiple Object Grid)**

1. Choose the "**Existing Sheet**" option to render data onto a sheet that already exists within your spreadsheet.
2. Use the "**Select Sheet**" dropdown to pick the specific sheet where you want the data to be rendered.
3. Enter the desired cell location in the "**Cell Reference**" field or click the " ![](https://2472585788-files.gitbook.io/~/files/v0/b/gitbook-x-prod.appspot.com/o/spaces%2F-MFqFFf4143HS0_Wagnz%2Fuploads%2FclDQJC9VnTX1bUxf96FT%2FFind%20Button.png?alt=media\&token=25abcadb-e5c4-48cf-bc4c-496aadd7cf45) " button to grab the current cell location on the selected sheet.
4. After selecting the sheet and specifying the cell location, click "**Save and Run**" to complete the data rendering process.&#x20;

<figure><img src="https://2472585788-files.gitbook.io/~/files/v0/b/gitbook-x-prod.appspot.com/o/spaces%2F-MFqFFf4143HS0_Wagnz%2Fuploads%2FC7WQOummniCHQj7RbbLh%2F19.%20Render%20on%20existing%20sheet.gif?alt=media&amp;token=7ddfcafd-617b-48cd-aaaa-578ee5d7f284" alt=""><figcaption><p>Multiple Object Grids in the same sheet</p></figcaption></figure>

* Users can plot multiple object grids onto an existing sheet within the spreadsheet, and the same object grid can be plotted **multiple times** on the same spreadsheet.
* Users can then navigate to the desired sheet location or select another sheet from the dropdown menu.
  {% endtab %}

{% tab title="Google Sheets" %}

#### **Choosing the Sheet**

When rendering data, you can choose between two options: **New Sheet** or **Existing Sheet**.&#x20;

* **New Sheet:** Click on "**New Sheet**" to render the data on a fresh spreadsheet. This will create a new tab in the spreadsheet where the data will be displayed.
* **Existing Sheet:** Click on "**Existing Sheet**" to render the data within the same spreadsheet. This option will update the current sheet with the new data. User can create multiple object grid and multiple grid in the same spreadsheet. <br>

  <div align="left"><figure><img src="https://2472585788-files.gitbook.io/~/files/v0/b/gitbook-x-prod.appspot.com/o/spaces%2F-MFqFFf4143HS0_Wagnz%2Fuploads%2FQPRb3jIZbnFnlLyY3Og7%2F17.%20Sheet%20Location.gif?alt=media&amp;token=33ef67f2-9f84-4d43-95a4-8baea7976aa3" alt="" width="222"><figcaption><p>Sheet location</p></figcaption></figure></div>

#### **Rendering Data to a New Sheet:**

1. Choose the "**New Sheet**" option to create a fresh sheet for your data.
2. Simply click the "**Run**" button to render your data on the newly created sheet.&#x20;

<div align="left"><figure><img src="https://2472585788-files.gitbook.io/~/files/v0/b/gitbook-x-prod.appspot.com/o/spaces%2F-MFqFFf4143HS0_Wagnz%2Fuploads%2FaBsg6wvwXNBVgXHxlY8A%2F18.%20Render%20New%20Sheet.gif?alt=media&amp;token=81334f5a-e2da-4459-bb19-683186fedb6f" alt=""><figcaption><p>Rendering object grid on new sheet</p></figcaption></figure></div>

* The default grid name will match the object name, but users can rename the sheet by clicking on it if needed.
* Sheet names must be unique, include spaces and special characters, and cannot be duplicated.
* If a sheet is renamed in Excel, the new name will automatically update in the Sidebar's Sheet Location.&#x20;

#### **Rendering Data to an Existing Sheet (Multiple Object Grid):**

1. Choose the "**Existing Sheet**" option to render data onto a sheet that already exists within your workbook.
2. Use the "**Select Sheet**" dropdown to pick the specific sheet where you want the data to be rendered.
3. Enter the desired cell location in the "**Cell Reference**" field or click the " ![](https://2472585788-files.gitbook.io/~/files/v0/b/gitbook-x-prod.appspot.com/o/spaces%2F-MFqFFf4143HS0_Wagnz%2Fuploads%2FclDQJC9VnTX1bUxf96FT%2FFind%20Button.png?alt=media\&token=25abcadb-e5c4-48cf-bc4c-496aadd7cf45) " button to grab the current cell location on the selected sheet.
4. After selecting the sheet and specifying the cell location, click "**Save and Run**" to complete the data rendering process.

<figure><img src="https://2472585788-files.gitbook.io/~/files/v0/b/gitbook-x-prod.appspot.com/o/spaces%2F-MFqFFf4143HS0_Wagnz%2Fuploads%2FedKenRwq9OcqAtR6g06W%2F19.%20Render%20Existing%20Sheet.gif?alt=media&amp;token=6fbbd277-0611-4e23-8589-141907dfd03b" alt=""><figcaption><p>Rendering object grid on existing sheet</p></figcaption></figure>

* Users can plot multiple object grid onto an existing sheet within the spreadsheet, and the same object grid can be plotted **multiple times** on the same spreadsheet.
* Users can then navigate to the desired sheet location or select another sheet from the dropdown menu.
  {% endtab %}
  {% endtabs %}

## Enhance Grid

{% tabs %}
{% tab title="Excel" %}
Users can click the "**Enhance Grid**" button to automatically **improve the grid with default options**.&#x20;

If the content is shorter than the default column width, it remains unchanged. If the content is longer, the column adjusts to the default width, with text wrapping applied to ensure all content fits neatly within the column.

<figure><img src="https://2472585788-files.gitbook.io/~/files/v0/b/gitbook-x-prod.appspot.com/o/spaces%2F-MFqFFf4143HS0_Wagnz%2Fuploads%2FdOdGx31BxjZy9ia7CwCK%2F20.%20Enhanced%20Grid.gif?alt=media&amp;token=353e1ebc-78f2-4a8a-ab09-7366d7360d95" alt=""><figcaption><p>Enhance Grid</p></figcaption></figure>

{% hint style="info" %}
Please notes that the enhancement is only applied to the selected grid. In this case, the second grid is chose that's why it applies to the second grid.
{% endhint %}

### **Custom Enhance Grid**

Custom Enhance Grid is an optional feature that allows users to fine-tune their grid experience by adjusting column widths, applying color bars, wrapping text, and more.&#x20;

<figure><img src="https://2472585788-files.gitbook.io/~/files/v0/b/gitbook-x-prod.appspot.com/o/spaces%2F-MFqFFf4143HS0_Wagnz%2Fuploads%2FH07JeosmTeIQEQTnG1T3%2F21.%20Custom%20Enhanced%20Grid.gif?alt=media&amp;token=7c674cdb-9a8f-4de1-b791-645aa3a5913d" alt=""><figcaption><p>Custom Enhance Grid</p></figcaption></figure>

Here’s a quick overview of each option:

* **All Borders:** Customize the border style to suit your needs.
* **Smart Fit:** Automatically adjusts column widths according to data type when enabled.
* **Wrap Text:** Enables word wrap on text descriptions.
* **Colorbar:** Applies color bars to columns with picklist data types.
* **Grid Lines:** Toggle grid lines on or off within the spreadsheet.
* **Column Header:** Sets a default color for the column headers.
  {% endtab %}

{% tab title="Google Sheets" %}
Users can click the "**Enhance Grid**" button to automatically **improve the grid with default options**.&#x20;

If the content is shorter than the default column width, it remains unchanged. If the content is longer, the column adjusts to the default width, with text wrapping applied to ensure all content fits neatly within the column.

<figure><img src="https://2472585788-files.gitbook.io/~/files/v0/b/gitbook-x-prod.appspot.com/o/spaces%2F-MFqFFf4143HS0_Wagnz%2Fuploads%2F7lGPm58iVFo2HTpKUE0z%2F20.%20Enhanced%20Grid.gif?alt=media&amp;token=8df24b74-aedd-448c-abc3-eb1992211dcf" alt=""><figcaption><p>Enhance Grid</p></figcaption></figure>

{% hint style="info" %}
Please notes that the enhancement is only applied to the selected grid. In this case, the second grid is chose that's why it applies to the second grid.
{% endhint %}

### **Custom Enhance Grid**

Custom Enhance Grid is an optional feature that allows users to fine-tune their grid experience by adjusting column widths, applying color bars, wrapping text, and more.&#x20;

<figure><img src="https://2472585788-files.gitbook.io/~/files/v0/b/gitbook-x-prod.appspot.com/o/spaces%2F-MFqFFf4143HS0_Wagnz%2Fuploads%2FGWxrFlq3PnRvolA6ZkBV%2F21.%20Custom%20Enhanced%20Grid.gif?alt=media&amp;token=521fd2d6-25f0-4b9f-b45f-0efcace3bcb1" alt=""><figcaption><p>Custom Enhance Grid</p></figcaption></figure>

Here’s a quick overview of each option:

* **All Borders:** Customize the border style to suit your needs.
* **Smart Fit:** Automatically adjusts column widths according to data type when enabled.
* **Wrap Text:** Enables word wrap on text descriptions.
* **Colorbar:** Applies color bars to columns with picklist data types.
* **Grid Lines:** Toggle grid lines on or off within the spreadsheet.
* **Column Header:** Sets a default color for the column headers.
  {% endtab %}
  {% endtabs %}

## Save and Refresh Grid

{% tabs %}
{% tab title="Excel" %}
Save Changes Data

Users can **edit the records on the spreadsheet** and use the "**Save**" button to **save changes back to Salesforce in real-time**.

<figure><img src="https://2472585788-files.gitbook.io/~/files/v0/b/gitbook-x-prod.appspot.com/o/spaces%2F-MFqFFf4143HS0_Wagnz%2Fuploads%2FhCSeQfUPPOm7ToRqlHvV%2F22.%20Save%20Changes.gif?alt=media&amp;token=5b029b1a-da96-459c-b071-fad9780f2248" alt=""><figcaption><p>Save changes data to Salesforce</p></figcaption></figure>

### Refresh Grid

Users can refresh all grids on the current sheet using the **All Grids** button or refresh specific grids using the **Custom Refresh** button, where they can select which grids to update. This ensures that the data is refreshed and displays the most up-to-date information.

<figure><img src="https://2472585788-files.gitbook.io/~/files/v0/b/gitbook-x-prod.appspot.com/o/spaces%2F-MFqFFf4143HS0_Wagnz%2Fuploads%2FkOI9aEphHZ7Btgck8e0C%2F23.%20Refresh%20Grid.gif?alt=media&amp;token=f4bb5ee2-3abd-4a55-bf53-aa371551d4a5" alt=""><figcaption><p>Refresh grids</p></figcaption></figure>

### Toolbox

The **Toolbox** section provides various tools to help users manage and customize grid data efficiently. Here’s a breakdown of each tool and its functionality:

1. **Lookup**\
   The **Lookup** feature allows users to quickly search for and link related Salesforce records. It can be used to find and associate records with the current grid, making it easier to pull in additional information from related objects, such as Accounts or Contacts, without leaving the grid view.
2. **Insert Row**
   * Clicking the **Insert Row** button will add a single row to the grid.
   * Use the dropdown menu next to the button to quickly add multiple rows, ranging from 2 to 10 rows.
   * You can also choose the **Custom Rows** option, which allows you to specify the number of rows to insert by entering the value and clicking **Add**.
3. **Delete Row**\
   The **Delete Row** button allows you to remove the selected row(s) from the grid.
4. **Clear Row**
   * The **Clear Row** button clears all records from the grid but does not delete any data from Salesforce.
   * You can restore the cleared records by clicking the **Refresh** button, which reloads the data from Salesforce.
5. **Enhance Grid**\
   The **Enhance Grid** option lets users apply advanced formatting, sorting, and grouping to the grid. This feature allows for better data visualization and organization, making it easier to analyze and work with large datasets.

   Refer to the [**Enhance Grid Section**](#enhance-grid) for more details.
6. **Mass Modifier**\
   The **Mass Modifier** feature allows users to bulk edit multiple records within a single-object grid efficiently. By selecting a field, users can **modify data across multiple records simultaneously**, streamlining processes that involve repetitive data updates.
   {% endtab %}

{% tab title="Google Sheets" %}

### Save Changes Data

Users can **edit the records on the spreadsheet** and use the "**Save**" button to **save changes back to Salesforce in real-time**.

<figure><img src="https://2472585788-files.gitbook.io/~/files/v0/b/gitbook-x-prod.appspot.com/o/spaces%2F-MFqFFf4143HS0_Wagnz%2Fuploads%2FLdmWX2irKQTviYDkzTud%2F22.%20Save%20Changes.gif?alt=media&amp;token=6b4bce1c-a06e-4549-9d8d-35ec2a046703" alt=""><figcaption><p>Save changes data to Salesforce</p></figcaption></figure>

### Refresh Grid

Users can refresh all grids on the current sheet using the **All Grids** button or refresh specific grids using the **Custom Refresh** button, where they can select which grids to update. This ensures that the data is refreshed and displays the most up-to-date information.

<figure><img src="https://2472585788-files.gitbook.io/~/files/v0/b/gitbook-x-prod.appspot.com/o/spaces%2F-MFqFFf4143HS0_Wagnz%2Fuploads%2FGZoLDeK3gUJcPcS2TRu2%2F23.%20Refresh%20Grid.gif?alt=media&amp;token=c164f813-6ede-458d-8276-b542df67e90d" alt=""><figcaption><p>Refresh grids</p></figcaption></figure>

### Toolbox

The **Toolbox** section provides various tools to help users manage and customize grid data efficiently. Here’s a breakdown of each tool and its functionality:

1. **Lookup**\
   The **Lookup** feature allows users to quickly search for and link related Salesforce records. It can be used to find and associate records with the current grid, making it easier to pull in additional information from related objects, such as Accounts or Contacts, without leaving the grid view.
2. **Insert Row**
   * Clicking the **Insert Row** button will add a single row to the grid.
   * Use the dropdown menu next to the button to quickly add multiple rows, ranging from 2 to 10 rows.
   * You can also choose the **Custom Rows** option, which allows you to specify the number of rows to insert by entering the value and clicking **Add**.
3. **Delete Row**\
   The **Delete Row** button allows you to remove the selected row(s) from the grid.
4. **Clear Row**
   * The **Clear Row** button clears all records from the grid but does not delete any data from Salesforce.
   * You can restore the cleared records by clicking the **Refresh** button, which reloads the data from Salesforce.
5. **Enhance Grid**\
   The **Enhance Grid** option lets users apply advanced formatting, sorting, and grouping to the grid. This feature allows for better data visualization and organization, making it easier to analyze and work with large datasets.

   Refer to the [**Enhance Grid Section**](#enhance-grid) for more details.
   {% endtab %}
   {% endtabs %}

## My Account

In the Salesforce Connections page, at the bottom, you'll find a "**My Account**" button. Clicking on it opens the Valorx sign in page, where you can log in with your Salesforce or Valorx account. Here, you can access **General**, **Subscriptions**, **Licenses**, **Environments**, and **Team Members** details.

<div align="left"><figure><img src="https://2472585788-files.gitbook.io/~/files/v0/b/gitbook-x-prod.appspot.com/o/spaces%2F-MFqFFf4143HS0_Wagnz%2Fuploads%2F3UsLrG8IpqlQzX75MqN0%2FMy%20Account%20Click.png?alt=media&amp;token=883547e5-eb03-49d3-a476-0df5d190718e" alt="" width="227"><figcaption><p>My Account</p></figcaption></figure></div>

#### General

In the **General** section, the user's general information is displayed, including company name, name, email, and address. Only the **Admin** can edit this information, except for the Name and Email fields, which cannot be edited. Other users can edit the remaining fields.

<figure><img src="https://2472585788-files.gitbook.io/~/files/v0/b/gitbook-x-prod.appspot.com/o/spaces%2F-MFqFFf4143HS0_Wagnz%2Fuploads%2FJdiHOoxxxBhInXKRVmN2%2FMy%20Account%201.%20General%20Information.png?alt=media&amp;token=5eedb364-bf95-4a98-8684-60bd401811d7" alt=""><figcaption><p>General Information</p></figcaption></figure>

#### Subscriptions

The Subscriptions section displays all the **products available for subscription**, along with the different benefits each subscription offers. Click "**Buy Now**" to subscribe to our product.

<figure><img src="https://2472585788-files.gitbook.io/~/files/v0/b/gitbook-x-prod.appspot.com/o/spaces%2F-MFqFFf4143HS0_Wagnz%2Fuploads%2FP1X9xmOXna55zZ24Z5L3%2FMy%20Account%202.%20Subscriptions.png?alt=media&amp;token=59c34943-a263-4d78-b937-527192e8489b" alt=""><figcaption><p>Subscriptions page</p></figcaption></figure>

#### Licenses

The Licenses section displays all licensed users, including their names, emails, and roles. The Admin can **edit a user's role** by clicking on the pencil icon.

<figure><img src="https://2472585788-files.gitbook.io/~/files/v0/b/gitbook-x-prod.appspot.com/o/spaces%2F-MFqFFf4143HS0_Wagnz%2Fuploads%2FufMnlmfCmt1cxIEb3PvF%2FMy%20Account%203.Licenses.png?alt=media&amp;token=25b2ecd8-b11d-4237-9a43-0a7ab298d356" alt=""><figcaption><p>Licenses page</p></figcaption></figure>

#### Environments

The Environments section displays the environments created by the user along with their environment IDs. The Admin can also update the CRM type and environment type for each environment.

<figure><img src="https://2472585788-files.gitbook.io/~/files/v0/b/gitbook-x-prod.appspot.com/o/spaces%2F-MFqFFf4143HS0_Wagnz%2Fuploads%2FkVow8PvNp6ujUnfEIqFU%2FMy%20Account%204.Environments.png?alt=media&amp;token=bbf04cc0-9a2d-4252-9b17-a620975e78b1" alt=""><figcaption><p>Environment page</p></figcaption></figure>

#### Team Members

In the Team Members section, team member names, emails, and access levels are displayed. The Admin can edit a user's access level to either **Standard** or **Admin**, or delete the user.

<figure><img src="https://2472585788-files.gitbook.io/~/files/v0/b/gitbook-x-prod.appspot.com/o/spaces%2F-MFqFFf4143HS0_Wagnz%2Fuploads%2FwbMfh1cHLjYkVzzUz2cc%2FMy%20Account%205.Team%20Members.png?alt=media&amp;token=1d4c5353-ba8d-47f8-81f0-ae4624083326" alt=""><figcaption><p>Team Member page</p></figcaption></figure>


# The power of Design Studio

Design Studio serves as a comprehensive platform tailored for App Designers, empowering them with the necessary tools to model, configure, and modify Valorx Fusion Apps. The primary purpose of this platform is to streamline the app development process and facilitate efficient customization.

To gain a deeper understanding of Design Studio's functionalities, we will guide you through its core features and capabilities step by step.

**New Valorx Fusion Apps:** Within Design Studio, App Designers are equipped with the ability to craft brand new Valorx Fusion Apps that cater to the unique requirements of users within your team. These apps are specifically designed to enhance productivity, streamline workflows, and address specific business needs.

**Three Ways to Create a Valorx Fusion App:** App Designers have the flexibility of employing three distinct methods to create Valorx Fusion Apps:

1. **Template-Based Creation:** Utilizing predefined templates, designers can quickly set up functional and visually appealing apps. These templates are built to accommodate a variety of use cases, saving time and effort in the app creation process.
2. **Custom Development:** For more tailored and specialized applications, App Designers have the option to build apps from scratch. This method allows for complete control over the app's features, design, and functionality to ensure a perfect fit for your team's unique requirements.
3. **Modification of Existing Apps:** Design Studio also permits the modification and enhancement of pre-existing Valorx Fusion Apps. App Designers can fine-tune these apps, adjusting features or adding new elements to suit evolving needs, thereby maximizing their utility.

There are two ways to create an app:

1. **Design Studio Mode**: In this mode, you have access to various features such as Data Modeling, Maps, Task, and Workflow, all available under the "App" section.
2. **Express Mode**: This is the fastest method to create an app. For more detailed information about [**Express Mode**](/valorx-fusion/getting-started/building-your-first-app/express-mode), please refer to the dedicated section.

### New App with an Existing Template

If your team is currently utilizing an Excel template and desires to transform it into a Valorx Fusion App, you can easily achieve this by following these steps:

1. Connect your environment to Valorx Fusion.
2. Once connected, access the Apps List.
3. Click on the "New App" option to initiate the process of creating a new app.

![](https://2472585788-files.gitbook.io/~/files/v0/b/gitbook-legacy-files/o/assets%2F-MFqFFf4143HS0_Wagnz%2F-MGLVycI8B-uUpEieCas%2F-MGLYeOfI0iIKUquheu9%2Fimage.png?alt=media\&token=6ed8b195-910b-47a8-8395-7de20a21b1a6)

4. Select "Existing Template" as the App Type.
5. Use the "Browse File" option to choose the desired Excel template.
6. This process will transform your Excel template into a functional Valorx Fusion App.
7. Now, you can begin the integration process with your CRM and utilize the app to streamline your workflows effectively.

<div align="left"><img src="https://2472585788-files.gitbook.io/~/files/v0/b/gitbook-legacy-files/o/assets%2F-MFqFFf4143HS0_Wagnz%2F-MGLVycI8B-uUpEieCas%2F-MGLYmcx7etw7f-5j3qc%2Fimage.png?alt=media&amp;token=ed1f9083-eab8-47b6-bdc9-f315e952532f" alt="" width="563"></div>

{% hint style="info" %}
The App Name will be default to the selected template's name, but you can always overwrite it.
{% endhint %}

### New App with a New Template

We absolutely recommend you to start an App using Express Mode if you know exactly what objects/entities and fields you want to integrate with. However, we do provide a way to start building an App from scratch using a blank template.

1. Connect your environment to Valorx Fusion.
2. Access the Apps List.
3. Click on "New App" to initiate the creation process.

![](https://2472585788-files.gitbook.io/~/files/v0/b/gitbook-legacy-files/o/assets%2F-MFqFFf4143HS0_Wagnz%2F-MGLVycI8B-uUpEieCas%2F-MGLYhybn7DpyRLy2xgl%2Fimage.png?alt=media\&token=6c35f47c-d916-4c4d-8154-2f0775d7907a)

4. Choose New Template under App Type and give your App a descriptive name.&#x20;
5. Click on **Create**, and you are on your way to awesomeness.&#x20;

<div align="left"><img src="https://2472585788-files.gitbook.io/~/files/v0/b/gitbook-legacy-files/o/assets%2F-MFqFFf4143HS0_Wagnz%2F-MGLVycI8B-uUpEieCas%2F-MGLYr0hVOdmU08YzDCI%2Fimage.png?alt=media&amp;token=d8a97378-f8b5-4754-af71-3d984caf5d79" alt="" width="563"></div>

{% hint style="info" %}
Valorx Fusion supports XLSX, XLSM, and XLSB Excel formats out-of-the-box. If you are not sure, always pick XLSX.
{% endhint %}


# Manage Your Valorx Account

"My Account" is a user account that provides customers with access to various features and functionalities related to their account information. My Account allows users to add or delete billing addresses, view, or modify their subscription details, and access general information related to their accounts.

Users need to log in to their account using their username and password. Once logged in, they can access the "My Account" section and perform the necessary actions to manage their account information.

The ability to add or delete billing addresses allows users to keep their information up to date. The subscription details allow users to view their subscription status and make any necessary changes or updates, such as upgrading or downgrading their subscription plan.

The general information section provides users with access to various account-related information.

Overall, "My Account" provides users with a convenient and user-friendly way to manage their account information and make any necessary updates or changes. By allowing users to perform these actions on their own.

Once, Users [**Sign In**](/valorx-fusion/design-studio/the-power-of-design-studio/manage-your-valorx-account/sign-up-to-valorx-account) to Valorx below are the sections available on My Account page.

[**General Information**](/valorx-fusion/design-studio/the-power-of-design-studio/manage-your-valorx-account/general-information)

[**Active Subscription**](/valorx-fusion/design-studio/the-power-of-design-studio/manage-your-valorx-account/active-subscription)

[**Environments**](/valorx-fusion/design-studio/the-power-of-design-studio/manage-your-valorx-account/environments)

[**Users**](/valorx-fusion/design-studio/the-power-of-design-studio/manage-your-valorx-account/users)

[**Billing Address**](/valorx-fusion/design-studio/the-power-of-design-studio/manage-your-valorx-account/billing-address)


# Sign Up to Valorx Account

As a first-time user or a new user, signing up for a Valorx account is crucial as it grants you access to manage your Fusion environments and users effectively. Valorx provides a platform where you can handle various aspects related to Fusion environments, such as configuration settings, user permissions, and system administration.

The process of signing up for a Valorx account is designed to be simple and user-friendly. To begin the signup process, you will need to locate the "**Sign In**" option on the [**Valorx website**](https://valorx.com/).

<figure><img src="https://2472585788-files.gitbook.io/~/files/v0/b/gitbook-x-prod.appspot.com/o/spaces%2F-MFqFFf4143HS0_Wagnz%2Fuploads%2F0OZNQmrTJ4jHwgbKHYPE%2FFusion%20Docs%20Update%20as%20per%20V15%20-%2013.png?alt=media&amp;token=b8bcdee0-44bb-4904-8ff2-896e058ce840" alt=""><figcaption></figcaption></figure>

Now, you will see a hyperlink labeled "New User? Sign Up [**here**](https://valorx.com/sign-up/)." By clicking on this hyperlink, you will be directed to the signup page. The hyperlink serves as a direct link that simplifies the signup process and helps new users easily find the appropriate page to create their account.

In case you are accessing to sign in through the Manage Accounts section on **Valorx Home**, you will be directed to the same Sign In page for Valorx.

<div align="left"><figure><img src="https://2472585788-files.gitbook.io/~/files/v0/b/gitbook-x-prod.appspot.com/o/spaces%2F-MFqFFf4143HS0_Wagnz%2Fuploads%2F21ID81XIjwSNpFtjFh4X%2FFusion%20Docs%20Update%20as%20per%20V15%20-%2014.png?alt=media&amp;token=07ebe19c-6d82-4b63-9336-b498786f2773" alt="" width="417"><figcaption></figcaption></figure></div>

After clicking on the hyperlink, you will be directed to the "**Sign Up for your Valorx account**" page, where you will need to fill in all the required information. The form will ask for personal details such as your First and Last Name, Email address, Password, Phone number, and Company.

The Phone number field is optional and mainly related to sales. If you prefer not to provide this information, you can skip it.

After filling out the form, you can proceed by clicking the "**Sign up**" button to finalize the signup process.

<figure><img src="https://2472585788-files.gitbook.io/~/files/v0/b/gitbook-x-prod.appspot.com/o/spaces%2F-MFqFFf4143HS0_Wagnz%2Fuploads%2FWzyTG8cKnOKJaLKYCGAV%2FFusion%20Docs%20Update%20as%20per%20V15%20-%2015.png?alt=media&amp;token=43f4098c-427e-4845-b0f7-d887255170f7" alt=""><figcaption></figcaption></figure>

{% hint style="info" %}

* It is important for users to note that they should always use the same email address and password they used during the signup process to log in to their Valorx account.
* Users can upgrade the plan on our website to purchase the license or they contact sales when the 15 days free trial expires.
  {% endhint %}


# Reset Password

Forgetting a password after signing up can be a common occurrence, but there's no need to worry. You can easily reset your password by following these simple steps:

1. **Access the Login Page**: Visit [**Sign In to Valorx**](https://valorx.com/sign-in/) page.
2. **Locate the Password Reset Option**: Look for the "**Reset Password**" option on the login page. Click on this option to proceed with the password reset process.&#x20;

<div align="left"><figure><img src="https://2472585788-files.gitbook.io/~/files/v0/b/gitbook-x-prod.appspot.com/o/spaces%2F-MFqFFf4143HS0_Wagnz%2Fuploads%2F8DtFkj0OsxofRxIdkPQn%2FFusion%20Docs%20Update%20as%20per%20V15%20-%2016.png?alt=media&amp;token=ae61f40f-7f52-4881-a214-77a431be770e" alt="" width="412"><figcaption></figcaption></figure></div>

* **Provide Information**: In the password reset form, you will be prompted to enter your email address associated with your account. This step helps the system verify your identity and ensure that only authorized users can reset their passwords.

<div align="left"><figure><img src="https://2472585788-files.gitbook.io/~/files/v0/b/gitbook-x-prod.appspot.com/o/spaces%2F-MFqFFf4143HS0_Wagnz%2Fuploads%2FgYqDYiosxW2FFhQNHE7n%2FFusion%20Docs%20Update%20as%20per%20V15%20-%2017.png?alt=media&amp;token=36825ea4-7fac-4178-b01c-12270ef7a682" alt="" width="350"><figcaption></figcaption></figure></div>

* **Verification Process**: This verification process often involves receiving a verification code via email associated with your account. Enter the verification code and click on "**Verify Code**". Click **Send New Code** in case a code not sent to your email address.

<div align="left"><figure><img src="https://2472585788-files.gitbook.io/~/files/v0/b/gitbook-x-prod.appspot.com/o/spaces%2F-MFqFFf4143HS0_Wagnz%2Fuploads%2FK6xgRY8WInEVZiQWbTvE%2FFusion%20Docs%20Update%20as%20per%20V15%20-%2018.png?alt=media&amp;token=570c6d43-7fa6-4d10-a9d3-a895d7e2c210" alt="" width="350"><figcaption></figcaption></figure></div>

<div align="left"><figure><img src="https://2472585788-files.gitbook.io/~/files/v0/b/gitbook-x-prod.appspot.com/o/spaces%2F-MFqFFf4143HS0_Wagnz%2Fuploads%2F7xOr8cnRkG2F4oIWW9Rc%2FFusion%20Docs%20Update%20as%20per%20V15%20-%2019.png?alt=media&amp;token=068d0b26-7c46-4997-82a4-645ffbaba1c7" alt="" width="347"><figcaption></figcaption></figure></div>

* **Create and Confirm New Password**: Once your identity is verified, you will be directed to a page where you can create a new password. Enter a strong and unique password in **New Password** field and confirm it by re-entering it in **Confirm New Password** field provided on the page. This step ensures that you have entered the new password correctly without any typos or mistakes. Click **Continue to change the password**.

<div align="left"><figure><img src="https://2472585788-files.gitbook.io/~/files/v0/b/gitbook-x-prod.appspot.com/o/spaces%2F-MFqFFf4143HS0_Wagnz%2Fuploads%2FZg6cTJirz0ltZLn1cOWT%2FFusion%20Docs%20Update%20as%20per%20V15%20-%2020.png?alt=media&amp;token=bc4b79bf-892f-43eb-b644-0d9a2a296fd4" alt="" width="350"><figcaption></figcaption></figure></div>

* **Password Successfully Reset**: Once you have successfully entered and confirmed your new password, you will be directed to Valorx page. Click **Sign In** located at the right-hand side and continue with the sign In process.

<div align="left"><figure><img src="https://2472585788-files.gitbook.io/~/files/v0/b/gitbook-x-prod.appspot.com/o/spaces%2F-MFqFFf4143HS0_Wagnz%2Fuploads%2FAT6XqFltq7Vz8uy0ixjx%2FFusion%20Docs%20Update%20as%20per%20V15%20-%2021.png?alt=media&amp;token=3a6fe682-e1d5-48f1-b9f0-afc8d3f1da45" alt=""><figcaption></figcaption></figure></div>

***Note***: If you encounter any issues during the password reset process or if you do not receive a verification code, it is advisable to contact our customer service for further assistance.


# General Information

"My Account" contains various sections that provide users with access to different types of information and functionality. The first section, "General Information," contains details about the user or customer who has signed up or logged in to their account.

The General Information section typically includes fields for the user's first name, last name, company name, and email address. These details are typically provided during the signup process and are automatically populated in the General Information section.

In addition to these fields, users also have the option to manually enter additional information such as their phone number and job title. These fields may not be mandatory but can be useful for both the user and the service provider.

The General Information section is a key part of the "My Account" feature as it provides users with a centralized location to view and manage their personal information. By having access to this information, users can easily make any necessary updates or changes and ensure that their account details are accurate and up to date.

Overall, the General Information section of "My Account" provides users with a convenient and user-friendly way to manage their personal information and keep track of important details related to their account. By having easy access to this information, users can ensure that their account is set up correctly.

<figure><img src="https://2472585788-files.gitbook.io/~/files/v0/b/gitbook-x-prod.appspot.com/o/spaces%2F-MFqFFf4143HS0_Wagnz%2Fuploads%2F8AtaRhtuFPcTmgtM4h9M%2FGeneral%20Info.png?alt=media&amp;token=aa16cee1-de37-4c54-8027-09afab714561" alt=""><figcaption></figcaption></figure>


# Active Subscription

"Active Subscription" section in "My Account" provides users with information about their current subscription to a particular product. This section is particularly useful for users who have ongoing subscriptions, as it allows them to keep track of important details related to their subscriptions.

The "Active Subscription" section typically displays the product name, the quantity of the product that the user has subscribed to, and the subscription end date. These details provide users with a clear understanding of the subscription they have signed up for, including the quantity of the product and when their subscription will expire.

In addition to these details, the "Active Subscription" section may also display various actions that the user can take related to their subscription. For example, the user may be able to modify or cancel their subscription, update their payment details, or change the frequency of their subscription.

By having access to the "Active Subscription" section in "My Account," users can easily manage their ongoing subscriptions. They can keep track of important details related to their subscription, make any necessary changes or updates, and stay informed about the product they are subscribed to.

<figure><img src="https://2472585788-files.gitbook.io/~/files/v0/b/gitbook-x-prod.appspot.com/o/spaces%2F-MFqFFf4143HS0_Wagnz%2Fuploads%2FuzKNkY6s5TG0kht4tbNF%2FActive%20sub.png?alt=media&amp;token=db688f0d-982e-4476-b864-9ed14e7274a1" alt=""><figcaption></figcaption></figure>


# Environments

"Environment" section in "My Account" provides Customers with access to all the white-label Org Id(s) for both production and sandbox environments. This section contains important information related to each specific environment, such as the environment name, CRM (customer relationship management) system being used, environment ID, and type.

The "Environment" section allows Customers to easily view and manage all of their environments in one centralized location. Customers can add or delete environments as needed, which can be particularly useful for those who are managing multiple environments simultaneously.

Adding new environments can be useful for customers who need to create a new instance of a particular environment, such as a new sandbox environment for testing or development purposes. Similarly, deleting environments that are no longer needed can help to keep a customer's account organized and reduce clutter.

By having access to the "Environment" section in "My Account," customers can easily manage their various environments and ensure that they have the necessary resources to effectively use the service. This section provides customers with a convenient and user-friendly way to manage their environments, making it easier for them to stay organized and productive.

<figure><img src="https://2472585788-files.gitbook.io/~/files/v0/b/gitbook-x-prod.appspot.com/o/spaces%2F-MFqFFf4143HS0_Wagnz%2Fuploads%2FQ6ggvylXb4cmpTuYtiZI%2FEnvironment.png?alt=media&amp;token=7a3d788d-48ba-43b3-accb-526cc339d39e" alt=""><figcaption></figcaption></figure>


# Users

"Users" section in "My Account" provides an overview of all the users that have been added to a customer's account by the administrator. This section can be accessed and modified by the customer administrator, who has the necessary permissions to add, edit or delete users from the account. Customers with standard roles, on the other hand, will not be allowed to make any changes to this section.

The "Users" section displays important information about each user, including their first and last name, email address, role within the account, technical details, and billing information. This information is always editable, allowing administrators to update user information as needed. Additionally, administrators can delete users who are no longer active, and add new users to the account.

By having access to the "Users" section in "My Account," customer administrators can easily manage the users in their account and ensure that everyone has the appropriate access and permissions. For example, they can update a user's role or permissions to ensure that they have the appropriate level of access to the account's features and functionality. Additionally, administrators can modify user information, such as their contact information or billing details, as needed.

Overall, the "Users" section is an important feature in "My Account" that allows customer administrators to manage the users in their account in a user-friendly and efficient manner.

<figure><img src="https://2472585788-files.gitbook.io/~/files/v0/b/gitbook-x-prod.appspot.com/o/spaces%2F-MFqFFf4143HS0_Wagnz%2Fuploads%2FgmCronEWR9UMI0ezwvzJ%2FUsers%202.png?alt=media&amp;token=372474e1-3eae-4a1f-b53b-975b1aa66691" alt=""><figcaption></figcaption></figure>


# Billing Address

"Billing Address" section in "My Account" contains important information related to billing for the customer's account. This section is where customers can provide their billing address, which is necessary for the service provider to properly invoice the customer for their usage of the service.

The "Billing Address" section requires customers to provide certain information, such as their address, zip code, city, state, and country. Customers should ensure that this information is accurate and up-to-date, as it will be used for billing purposes. Once the information has been entered, customers can click on the "Save Changes" button to save the information.

By having access to the "Billing Address" section in "My Account," customers can easily manage their billing information in a centralized location. This can be particularly useful for those who need to update their billing address due to a move or other change in circumstances. Keeping the billing address up-to-date and accurate can help to ensure that customers receive accurate invoices and that there are no delays or issues with their billing.

Overall, the "Billing Address" section is an important section in "My Account" that provides customers with a simple and user-friendly way to manage their billing information. By keeping this information up-to-date and accurate, customers can ensure that their billing is processed properly and that they have access to the services they need.

<figure><img src="https://2472585788-files.gitbook.io/~/files/v0/b/gitbook-x-prod.appspot.com/o/spaces%2F-MFqFFf4143HS0_Wagnz%2Fuploads%2Fn3IJW8sqWEjBvV3fASpf%2FBilling%20Address.png?alt=media&amp;token=783df4f0-e33f-45be-8333-56414435d094" alt=""><figcaption></figcaption></figure>


# Get a Demo

Valorx offers the opportunity to request a demo session for Valorx Fusion. You can easily initiate this process by clicking [**here**](https://valorx.com/get-started/) or by selecting the "**Get Started**" available on different locations, including our website, Sign-in, and Sign-up pages.

<figure><img src="https://2472585788-files.gitbook.io/~/files/v0/b/gitbook-x-prod.appspot.com/o/spaces%2F-MFqFFf4143HS0_Wagnz%2Fuploads%2Fh01Ze7qRUx5fZygrV1di%2FFusion%20Docs%20Update%20as%20per%20V15%20-%2022.png?alt=media&amp;token=b1f3a45c-6287-459b-a98d-f2262d349622" alt=""><figcaption><p>Get Started</p></figcaption></figure>

On the following screen, consider the 'Book a Fusion Demo' section and click the '**Get a Demo'** button after entering your **Work Email**.

<figure><img src="https://2472585788-files.gitbook.io/~/files/v0/b/gitbook-x-prod.appspot.com/o/spaces%2F-MFqFFf4143HS0_Wagnz%2Fuploads%2FYpZDeSj9PC66Ls5RYIP0%2FFusion%20Docs%20Update%20as%20per%20V15%20-%2023.png?alt=media&amp;token=6df85033-dee7-4e67-be38-46217161625a" alt=""><figcaption></figcaption></figure>

When accessing the demo request page, you will be prompted to fill in your information. Provide the required details, and don't forget to specify how we can assist you under "**How can we help you?**". This is an opportunity to communicate your specific needs, interests, or any specific areas you would like to explore during the demo session.

Once you have filled in the necessary information and provided your specific requirements, click on the "**Submit**" button to send your demo request. Our team will then review your submission and get in touch with you to schedule the demo session based on your preferences and availability.

<div align="left"><figure><img src="https://2472585788-files.gitbook.io/~/files/v0/b/gitbook-x-prod.appspot.com/o/spaces%2F-MFqFFf4143HS0_Wagnz%2Fuploads%2FjPLH5dWtLJajwxnQUpff%2FFusion%20Docs%20Update%20as%20per%20V15%20-%2024.png?alt=media&amp;token=412d90d7-2ef9-4a94-97a5-f1da46c65ec6" alt="" width="320"><figcaption></figcaption></figure></div>

Upon submitting your demo request, a confirmation email will be sent to the work email address you provided. This email will serve as a confirmation that your request has been received. Please ensure to check your inbox, including the spam or junk folder, to locate the confirmation email.

If you realize that you have missed adding any important information or have any additional details to provide after submitting the demo request, you can simply reply back to the confirmation email. By replying to the email, you can include any additional information or specifications you would like to include, ensuring that our team has all the necessary details for the demo session. Our team will review your reply and incorporate the information into the planning of the demo session.

<div align="left"><figure><img src="https://2472585788-files.gitbook.io/~/files/v0/b/gitbook-x-prod.appspot.com/o/spaces%2F-MFqFFf4143HS0_Wagnz%2Fuploads%2FlHGzW6CspGh6Vg8wxtNX%2FSignup%203.png?alt=media&amp;token=fe9a6011-b7ca-4172-95f4-23439ef9e13e" alt="" width="488"><figcaption></figcaption></figure></div>


# Open an App in Design Studio

Here are the step-by-step instructions to open an app in Design Studio mode within Valorx Fusion using Microsoft Excel:

<table><thead><tr><th width="91">Step</th><th>Action</th></tr></thead><tbody><tr><td>1</td><td>Open Microsoft Excel on your computer.</td></tr><tr><td>2</td><td>Look for the "Valorx Fusion" option on the Excel ribbon. This option should be available after installing the Valorx Fusion add-in for Excel.</td></tr><tr><td>3</td><td>Click on the "Valorx Fusion" option on the Excel ribbon.</td></tr><tr><td>4</td><td>Click on the "Start" button to initiate the process of opening an app.</td></tr><tr><td>5</td><td>Locate the "Design Studio" option from the list of App list or locate the Design Studio <img src="https://2472585788-files.gitbook.io/~/files/v0/b/gitbook-x-prod.appspot.com/o/spaces%2F-MFqFFf4143HS0_Wagnz%2Fuploads%2Fhs1D4j7oPqrFFiiFoYDY%2Fimage.png?alt=media&amp;token=8154b5b8-7f20-459a-a773-82f856b34dbc" alt=""> icon.</td></tr><tr><td>6</td><td>Click on "Design Studio" icon to open the app in Design Studio mode.</td></tr></tbody></table>

<div align="left"><figure><img src="https://2472585788-files.gitbook.io/~/files/v0/b/gitbook-x-prod.appspot.com/o/spaces%2F-MFqFFf4143HS0_Wagnz%2Fuploads%2FU62DVTOUfy08TRQkEMJ0%2FFusion%20Docs%20Update%20as%20per%20V15%20-%2025.png?alt=media&amp;token=21b7ed3f-5278-41ec-9d01-2d5b1ba91630" alt=""><figcaption></figcaption></figure></div>

The app you wish to work with will now be accessible and ready for customization within Design Studio mode. Start making changes, modifications, and adjustments to the app's layout and functionality using the tools and features available in Design Studio mode.


# Data Modeling

Data Modeling plays a vital role in the initial phase of designing and developing our Valorx Fusion App in the **Design Studio** for **Windows**. It serves as the fundamental building block for the app, providing us with the capability to search for and integrate a wide range of objects and fields based on the specific requirements of our apps.

By engaging in Data Modeling, we can effectively define the structure and organization of our app's data. This process allows us to identify and select the necessary objects and fields that will form the backbone of our application's functionality.

Through Data Modeling, we gain the ability to search for and incorporate various objects that are relevant to our app's purpose. These objects may include customer data, product information, transaction records, or any other entities that are essential for the functioning of our app.

Furthermore, Data Modeling empowers us to define and configure the specific fields associated with these objects. This enables us to capture and store the required data accurately, ensuring that our app operates smoothly and efficiently.

Before starting with Data Modeling, users must ensure that they have access to the below.&#x20;

* [x] Install Valorx Fusion on your machine
* [x] Access to Design Studio
* [x] Establish a [**New Connection**](/valorx-fusion/getting-started/getting-started-with-valorx/connections-list#new-connection)
* [x] New App
* [x] [**Open an App in Design Studio Mode** ](/valorx-fusion/design-studio/open-an-app-in-design-studio)and from there, select the Data Modeling option.

<figure><img src="https://2472585788-files.gitbook.io/~/files/v0/b/gitbook-x-prod.appspot.com/o/spaces%2F-MFqFFf4143HS0_Wagnz%2Fuploads%2FMpifsMzFF3GPPZvIOyyA%2FData%20Modelling%2012.png?alt=media&amp;token=643d54a9-aa6e-40ab-87a5-a50d3a4b6cd4" alt=""><figcaption></figcaption></figure>

To begin incorporating objects into the app, make use of the Search Objects bar. By clicking on it, you can search for the specific objects that you require.&#x20;

**Search Bar**

Click on **Search Objects** bar to search for the objects which you need for the App.

Clicking on the "Fields" option will open up the object fields in Salesforce and present a comprehensive list of all the available fields. Designers have the flexibility to select fields according to their preferences, in addition to the mandatory fields. By utilizing the "Search Fields" feature, designers can conveniently search for specific fields. Moreover, they can enable or disable the required fields by simply toggling the toggler.

Once you have identified the desired object, select it and proceed by clicking on the "Save and Close" button. This action saves your chosen object and includes it in the Data Modeling.

<figure><img src="https://2472585788-files.gitbook.io/~/files/v0/b/gitbook-x-prod.appspot.com/o/spaces%2F-MFqFFf4143HS0_Wagnz%2Fuploads%2F4OmvW9LN8uACkctxn5vN%2FData%20Modelling%2013.png?alt=media&amp;token=d922aa0f-586f-4c15-84d2-7225635d88e5" alt=""><figcaption></figcaption></figure>

**Object Summary:** The Object Summary provides users a comprehensive view of how objects are utilized within the app. It provides a clear overview of key aspects such as Fields, Queries, and Maps associated with each object. Additionally, users can easily explore the relationships of an object by clicking on the link icon. This functionality enables users to quickly navigate and understand the connections and dependencies between various objects in the app.

**FIELDS:** The field mentioned will display the count of fields that are included in the app. To add more fields, click on the "FIELDS" option. This action will open a pop-up window where you can select the desired fields and add them to the respective objects.

**QUERY**: The specified field provides information about the total number of query tasks that have been created for the corresponding object. By referring to this field, users can quickly determine the count of query tasks associated with the object or they can create the Query task by clicking on New.

**MAPS:** This field will show the information about the total count of maps associated with the object, enabling users to assess the extent of mapping activities performed. Additionally, users can create a new map by clicking on the "New" button associated with the field.

<figure><img src="https://2472585788-files.gitbook.io/~/files/v0/b/gitbook-x-prod.appspot.com/o/spaces%2F-MFqFFf4143HS0_Wagnz%2Fuploads%2FCNNq3of46BooGIrzKqdm%2FData%20Modelling%207.png?alt=media&amp;token=272f51bc-f355-437d-8f5e-ad189b958f78" alt=""><figcaption></figcaption></figure>

* The Data Modeling feature automatically generates queries and maps for selected objects in parallel, which are then used to create a basic workflow. The Object summary section at the bottom displays the details of the map created for the object.
* In addition to creating maps, Data Modeling also generates queries for selected objects, taking into account the context of other objects and fields that have been added. It provides recommendations to add objects/fields and update the relevant query to filter the data accordingly. These recommendations are indicated by a bell icon.
* Clicking on the link icon opens a Relationship Explorer, which allows the user to search for related objects and add them with their relevant fields to establish relationships. It also updates the query filters based on the established relationships. This component provides a detailed exploration of relationships between objects and facilitates their inclusion in the workflow.

### **Object Details**

Object Details is expanded when an **Object** is selected from Summary list. It gives more details of the Object and ability to modify the Queries and Maps of that Object.

1. **FIELDS** section shows total number of fields included and total number of available fields for the Object. Click on **Manage Fields** to add or remove the fields.
   * **Note:** The **Select All** button is disabled when the field list contains **more than 40 fields**. This limitation is in place to maintain optimal performance and ensure a smooth experience when working with large objects.

     To enable the **Select All** button, reduce the visible field count to **40 or less**. You can do this by:

     * **Using the search bar** to filter by specific field names.
     * **Filtering by data type**, such as selecting only text, number, or lookup fields.

     These actions narrow down the list, making the **Select All** button available so you can add fields in manageable batches.
2. **QUERY** section shows the dropdown with all the Queries of the Object and the details of the filters created for the selected query. When Data Modeling creates the Query and uses that query for the basic workflow it is marked as default. User can also modify Query.&#x20;
3. **MAP** section shows the dropdown with all the Maps of the Object and the details of the selected Map. When Data Modeling creates the Map and uses that Map for the basic workflow it is marked as default.
4. **RECOMMENDATIONS** section shows the possible recommendations of either Object or Field to be included on the basis of other selected objects and fields. It also updates the query filter when recommendation is used by clicking “filter by” hyperlink.&#x20;
5. **Sync** button allows User to sync Object with **CRM** to get newly added field or any other changes.&#x20;
6. **Relationships** link button is same Relationship walker which allows User to explore related Objects and add them.

{% hint style="info" %}
To delete the child object, you must delete the parent object beforehand.
{% endhint %}

### **Default Workflow**

In addition, the Data Modeling process automatically generates a default workflow on the right side. This workflow plays a crucial role in organizing and visually representing the different components of the app. Users have the option to either edit the default workflow or create a new workflow by deleting it and starting afresh.

This section displays the Default Workflow created using Data Modeling screen. The sequence shows the Query sequence and Display sequence. It also provides ability to remove Object out of Default workflow and to skip creation of Map for any Object. By default, it creates Display and Save workflows but can be turned off anytime.

<div align="left"><figure><img src="https://2472585788-files.gitbook.io/~/files/v0/b/gitbook-x-prod.appspot.com/o/spaces%2F-MFqFFf4143HS0_Wagnz%2Fuploads%2FNIkk4y1EI1r0B88pvQHe%2FData%20Modelling%2010.png?alt=media&amp;token=11336b31-21db-4a8e-9a35-5edc6d1ced2d" alt="" width="326"><figcaption></figcaption></figure></div>

Below warning message will display when you close the Data Modelling and when there is a default workflow is created. Click **Yes** in case you do not want the workflow to be saved.

<div align="left"><figure><img src="https://2472585788-files.gitbook.io/~/files/v0/b/gitbook-x-prod.appspot.com/o/spaces%2F-MFqFFf4143HS0_Wagnz%2Fuploads%2FpzwEAAjRgnRoTA1QfhqC%2FData%20Modelling%2011.png?alt=media&amp;token=33f902e4-f7d6-4ef8-b773-c8cf59e1c0c1" alt="" width="235"><figcaption></figcaption></figure></div>

**Relationship Explorer**

Relationship button is accessible from both the Object Summary and Object Details sections to explore relationships associated with the selected object. This button allows users to navigate and examine the parent/child relationships of the object. This Relationship Explorer will show the object's immediate parent and child objects, as well as their respective parent and child objects, and so on, depending on the specified depth or level of exploration.

It allows user to explore **Parent/Child** relationship to Nth level and it also creates relationship. Furthermore, when relationships are included and explored, the feature creates a relationship-based filter in the Query task. A Query task is a predefined or user-defined search or query that retrieves specific data or objects based on certain criteria. By including the relationship-based filter, the system will automatically modify or add filters to the default workflow's Query task. This modification ensures that the query includes the necessary conditions to retrieve objects associated with the explored relationships.

<figure><img src="https://2472585788-files.gitbook.io/~/files/v0/b/gitbook-x-prod.appspot.com/o/spaces%2F-MFqFFf4143HS0_Wagnz%2Fuploads%2Ft4GhpaH4u6DVeZlcIbDb%2FData%20Modelling%2078.png?alt=media&amp;token=71f64f30-6e26-49fe-a168-52b76f18b4e7" alt=""><figcaption></figcaption></figure>

### **Form Map Editor**

In the Data Modeling screen, there is a feature that allows users to edit the Form Map. This feature enables users to map fields without needing to interact directly with an Excel sheet. Select the layout which suits the requirement. Here are the key components of this feature:

1. Available Field list for mapping: This refers to a list of fields or data elements that are available for mapping. These fields could represent various attributes, variables, or data points that need to be associated with specific columns or rows in the Excel sheet or form. Users can do this by clicking on Fields.
2. Number of columns and rows as per Layout: The layout refers to the structure or arrangement of the Excel sheet or form. It determines the number of columns and rows present. This information is relevant because it helps users understand the structure of the sheet or form they are working with. Click Add Columns to add them to the Map.
3. Relevant option to add either Column/Row: Depending on the layout of the Excel sheet or form, users are presented with a relevant option to add either a column or a row. This option allows users to expand the structure of the sheet or form by adding additional columns or rows as needed for mapping purposes. This flexibility ensures that users can accurately map the available fields to the appropriate locations in the sheet or form.

<figure><img src="https://2472585788-files.gitbook.io/~/files/v0/b/gitbook-x-prod.appspot.com/o/spaces%2F-MFqFFf4143HS0_Wagnz%2Fuploads%2FqAvkGjfMujhl1g2WIUQ0%2FData%20Modelling%209.png?alt=media&amp;token=89360347-c11f-4709-9bca-faae66727d0d" alt=""><figcaption></figcaption></figure>


# Maps

The Maps feature is an essential second step that users will take when creating the Valorx Fusion App. After selecting the desired objects, the next task is to determine where and how these selected items will be displayed within the App.

There are two main types of Maps available: Grid Map and Form Map. These can be created based on the specific requirements of the App. Grid Map is ideal for displaying data in a tabular format, while Form Map is used to present data in a structured form.

To begin this process, open an app in Design Studio and select **Maps**. This will initiate the mapping process, allowing users to set up how the selected objects will be presented and interacted with in the Valorx Fusion App.

<figure><img src="https://2472585788-files.gitbook.io/~/files/v0/b/gitbook-x-prod.appspot.com/o/spaces%2F-MFqFFf4143HS0_Wagnz%2Fuploads%2FyF3SkB0RQtOaB8nEhRLw%2FMaps%207.png?alt=media&amp;token=41ad5b81-3fce-44e4-926c-c5817b6e3e16" alt=""><figcaption></figcaption></figure>

Now Maps window will open, presenting you with the option of choosing between **Grid Map** and **Form Map**. Based on your specific needs and preferences, you can make the appropriate selection. If you require a tabular view of the data, opt for the **Grid Map**. On the other hand, if you prefer a more structured and organized display, go for the **Form Map**.

<figure><img src="https://2472585788-files.gitbook.io/~/files/v0/b/gitbook-x-prod.appspot.com/o/spaces%2F-MFqFFf4143HS0_Wagnz%2Fuploads%2FLJpl5AqOIQvW1Gru0Nzl%2FMaps%208.png?alt=media&amp;token=d70e61bf-ea90-45e9-836e-15b0aaf3d904" alt=""><figcaption></figcaption></figure>

### Grid Map

The Grid Map in Valorx Fusion App functions similarly to a table in Excel, making it an ideal choice for displaying extensive data sets. When dealing with large volumes of data, the Grid Map proves to be the most effective and efficient way to showcase information.

For example, in the context of Product and Pricing for Commerce Cloud, a Grid Map is employed to present all the Product records retrieved from the CRM (Customer Relationship Management) system. This layout allows users to easily view and analyze the product-related data in a structured and organized manner, akin to viewing data in a spreadsheet.

By using the Grid Map, users can quickly navigate through numerous records, efficiently manage product details, and gain valuable insights without feeling overwhelmed by the sheer volume of information. Its tabular format is well-suited for handling substantial datasets and simplifies data exploration and analysis in the Valorx Fusion App.

![](https://2472585788-files.gitbook.io/~/files/v0/b/gitbook-legacy-files/o/assets%2F-MFqFFf4143HS0_Wagnz%2F-MGLbnHlNzihcQRfC0Z9%2F-MGLihDAzjMxejiuZ4Zi%2Fimage.png?alt=media\&token=c1c6c9cd-ac93-4749-a777-e38df6fe293a)

Refer [**Grid Map**](#grid-map) to know more information.

### Form Map

As the name suggests, **Form Map** is suitable perfectly for any single record. Let's say you want an App that allows the user to pick a single Account and its related Contacts. From the section above, we know a Grid Map is needed for the Contacts because there can be multiple Contacts in an Account.

Account, however, will always have only one record by design. This is where *Form Map* comes into rescue. It can display the Account in a form layout that is more natural for the users to navigate.

Refer [**Form Map**](#form-map) to know more information.

#### Maps Color Settings

Settings section of the **Valorx** **Fusion Ribbon** is an essential tool for users who wants to configure their Valorx Fusion settings according to their requirements. One important area within this section relates to Maps (Grid and Form Maps), where users can access vital information about how to customize the color of maps. With these settings, users can easily tailor the visual aspects of their maps to their liking, ensuring that their data visualization is as clear as possible.

Please follow [**Settings**](/valorx-fusion/settings/valorx-fusion-settings) under **Valorx Fusion Settings** to know more about the Map Settings.


# Grid Map

A **Grid Map** works like a table in Excel, making it ideal for handling and displaying large volumes of data. Designers can create Grid Maps with powerful filtering, customization, and runtime options.

There are two modes available when creating a Grid Map:

## Getting Started

### Basic Mode

Basic Mode offers the same foundational Grid Map setup **without Grid Functions**. It’s useful for quick, lightweight configurations.

<figure><img src="https://2472585788-files.gitbook.io/~/files/v0/b/gitbook-x-prod.appspot.com/o/spaces%2F-MFqFFf4143HS0_Wagnz%2Fuploads%2F19Pk8XI1YpKDWBoOwaKy%2FBasic%20Mode.gif?alt=media&amp;token=efc4c3ee-ee04-45bc-9cbe-5b55c175523f" alt=""><figcaption></figcaption></figure>

### Advanced Mode

Advanced Mode offers all the capabilities of Grid Map, including enhanced data control, runtime flexibility, and advanced grid functions.

<figure><img src="https://2472585788-files.gitbook.io/~/files/v0/b/gitbook-x-prod.appspot.com/o/spaces%2F-MFqFFf4143HS0_Wagnz%2Fuploads%2F0cDtYRa2oV2lnioR3qMQ%2FGet%20Started%20with%20Grid%20Map.gif?alt=media&amp;token=0ff074b2-15f2-49f7-aba7-6bfd349e5989" alt=""><figcaption><p>Create a new Grid Map</p></figcaption></figure>

## Setup The Grid Map

* **Object:** Choose the object defined in Data Modeling. The Grid Map will be based on this object.
* **Name:** Provide or edit the Map name.
* **Start Location:**
  * **Worksheet:** Select an existing sheet from the dropdown or type a new name to create one.
  * **Cell Location:** Specify where the first column should start (e.g., B5).

<figure><img src="https://2472585788-files.gitbook.io/~/files/v0/b/gitbook-x-prod.appspot.com/o/spaces%2F-MFqFFf4143HS0_Wagnz%2Fuploads%2FPUKnc3Bb94Yy18R1du8Y%2FSetup%20the%20Grid%20Map.gif?alt=media&amp;token=0256a0e0-d962-4dc5-ba9b-8315079d6b20" alt=""><figcaption><p>Setup The Grid Map</p></figcaption></figure>

### Grid Functions

In Advanced Mode, Designers can use Grid Functions to enhance how the Grid Map behaves in runtime. There are three key features:

1. **Add a Save Group**

   * Save groups allow fields to be saved in different batches.
   * Useful when certain fields should be saved later or separately from others.

   <figure><img src="https://2472585788-files.gitbook.io/~/files/v0/b/gitbook-x-prod.appspot.com/o/spaces%2F-MFqFFf4143HS0_Wagnz%2Fuploads%2FyVG5nTLLW0MPxCum8KVa%2FAdd%20A%20Save%20Group.gif?alt=media&amp;token=cc6edd08-b8fa-453b-9d01-8498f30e8206" alt=""><figcaption><p>Add a Save Group</p></figcaption></figure>

2. **Reorder Multiple Fields**

   * Enables rearranging several fields at once.
   * Simplifies bulk field organization compared to moving them one by one.

   <figure><img src="https://2472585788-files.gitbook.io/~/files/v0/b/gitbook-x-prod.appspot.com/o/spaces%2F-MFqFFf4143HS0_Wagnz%2Fuploads%2F62NXSZ4ZzUvpAkXx1q67%2FReorder%20Multiple%20Fields.gif?alt=media&amp;token=50e9d759-c14b-4720-96b9-68cb234bda8a" alt=""><figcaption><p>Reorder Multiple Fields</p></figcaption></figure>

3. **Preload Grid Options**

   Improves performance by preloading data or blank rows before runtime.

   There are two ways to configure the **number of rows** to preload:

   1. **Static Record Count**

      * Preload a fixed number of blank rows (e.g., 10, 50, 100).

      <div align="left"><figure><img src="https://2472585788-files.gitbook.io/~/files/v0/b/gitbook-x-prod.appspot.com/o/spaces%2F-MFqFFf4143HS0_Wagnz%2Fuploads%2FarTxck3yVGTgYo4QPf4a%2FStatic%20Record%20Count%20Set.gif?alt=media&amp;token=c84bfddd-57d4-42f1-a62b-750eb2991dd7" alt=""><figcaption></figcaption></figure></div>

   2. **Record Based on Query**

      * Preload records from an existing query.
      * Only queries from the same object as the Grid Map are available.

      <div align="left"><figure><img src="https://2472585788-files.gitbook.io/~/files/v0/b/gitbook-x-prod.appspot.com/o/spaces%2F-MFqFFf4143HS0_Wagnz%2Fuploads%2FhpgE9ScJpnpWLDl00gTp%2FRecord%20based%20on%20Query%20Set.gif?alt=media&amp;token=002f9c07-c9ff-4bb3-a48a-b2b920baefe3" alt=""><figcaption></figcaption></figure></div>

   3. **Clear Configuration**

      * Removes all preloaded rows and indicators.
      * This option is only available if either **Static Record Count** or **Record Based on Query** is selected.

      <div align="left"><figure><img src="https://2472585788-files.gitbook.io/~/files/v0/b/gitbook-x-prod.appspot.com/o/spaces%2F-MFqFFf4143HS0_Wagnz%2Fuploads%2FkxSJcyS0tMmI4ErvHosc%2FClear%20Configurations.gif?alt=media&amp;token=30cae0f7-36df-4fe1-b587-749eea554282" alt=""><figcaption></figcaption></figure></div>

**Visual Indicators**

* A green **“P”** ![](https://docs.valorx.com/~gitbook/image?url=https%3A%2F%2F2472585788-files.gitbook.io%2F%7E%2Ffiles%2Fv0%2Fb%2Fgitbook-x-prod.appspot.com%2Fo%2Fspaces%252F-MFqFFf4143HS0_Wagnz%252Fuploads%252FyfemackARSprKPc0BsQs%252FP_clearer%2520v3.png%3Falt%3Dmedia%26token%3D4854231e-9621-498c-8fac-c14f94d625f8\&width=300\&dpr=4\&quality=100\&sign=c92df873\&sv=2) appears next to a Map name if preloading is enabled.
* A green **tick** ![](https://docs.valorx.com/~gitbook/image?url=https%3A%2F%2F2472585788-files.gitbook.io%2F%7E%2Ffiles%2Fv0%2Fb%2Fgitbook-x-prod.appspot.com%2Fo%2Fspaces%252F-MFqFFf4143HS0_Wagnz%252Fuploads%252Fh8Rv2VIEgqK2V8EeizN4%252FGreen%2520Tick.png%3Falt%3Dmedia%26token%3Dc10550fb-39eb-4374-b1e4-6eb9bd343433\&width=300\&dpr=4\&quality=100\&sign=b6e8833b\&sv=2) shows next to the Preload Grid Options button when configured.

<figure><img src="https://2472585788-files.gitbook.io/~/files/v0/b/gitbook-x-prod.appspot.com/o/spaces%2F-MFqFFf4143HS0_Wagnz%2Fuploads%2FoZmHMHz4omfiV0bsw0pp%2FPreloaded%20Grid.gif?alt=media&amp;token=63124c54-6a28-4b30-a3b7-5f3df39ebdfb" alt=""><figcaption><p>Set Preload Grid</p></figcaption></figure>

**Resync Preloaded Grid Data**

* Use **Resync** to refresh the grid with the latest data without saving the entire Map.
* Preloading is triggered when:
  * Fields are added or removed
  * Records are updated
  * Fields are rearranged
  * Preload Grid Options are updated

<figure><img src="https://2472585788-files.gitbook.io/~/files/v0/b/gitbook-x-prod.appspot.com/o/spaces%2F-MFqFFf4143HS0_Wagnz%2Fuploads%2FDtIpiviCKIUJqbTGjDPB%2FResync%20Preloaded%20Grid.gif?alt=media&amp;token=af2677e3-c57b-4784-be16-4758d411ad10" alt=""><figcaption><p>Resync Preloaded Grid</p></figcaption></figure>

## Field Configuration

Field Configuration defines how data fields appear and behave in your Grid Map. Designers can choose which fields to display, how they should be saved back to CRM, and adjust their layout in Excel.&#x20;

### Add Fields

Add extra fields directly from the Grid Map setup window without going back to **Data Modeling**.

This is useful when:

* You forgot to include a field during Data Modeling.
* You want to quickly add a new field for testing or runtime use.

<figure><img src="https://2472585788-files.gitbook.io/~/files/v0/b/gitbook-x-prod.appspot.com/o/spaces%2F-MFqFFf4143HS0_Wagnz%2Fuploads%2Fb9U3lBryXPcwJHn1JIuI%2FAdd%20Fields.gif?alt=media&amp;token=d178dc3e-85e5-4a48-8776-d14083d3c4c2" alt=""><figcaption></figcaption></figure>

### Display or Save Configurations

Control how each field behaves in the Grid Map by choosing whether it should display data, save data, or both. The fields location is shown at the Location column.

* **Display + Save**
  * Data is retrieved from CRM and shown in the Grid Map.
  * Any updates made in Excel are saved back to CRM.
* **Display Only**
  * Data is shown in the Grid Map but cannot be saved back.
* **Save Only**
  * Data is not displayed but values entered in Excel are saved back to CRM.
* **Unmap (Advanced Mode Only)**
  * The field is excluded from the Grid Map.
  * The sheet location is removed to indicate it isn’t mapped.

<figure><img src="https://2472585788-files.gitbook.io/~/files/v0/b/gitbook-x-prod.appspot.com/o/spaces%2F-MFqFFf4143HS0_Wagnz%2Fuploads%2F3D1YRprarl6yOK8e5lhn%2FDisplay%20or%20Save%20Configuration.gif?alt=media&amp;token=0bdfbce5-21f1-4e20-8c31-c8311696a31e" alt=""><figcaption><p>Display or Save Configuration</p></figcaption></figure>

### Reordering Fields

Rearrange the sequence of fields by dragging and dropping them into the desired order. This helps organize the Grid Map layout according to your preferences.

<figure><img src="https://2472585788-files.gitbook.io/~/files/v0/b/gitbook-x-prod.appspot.com/o/spaces%2F-MFqFFf4143HS0_Wagnz%2Fuploads%2F7QRNhsgu9OyobaWuipEB%2FReordering%20Fields.gif?alt=media&amp;token=c67bdac1-75fa-486e-9e3f-4e6c15bc478f" alt=""><figcaption></figcaption></figure>

### Spacer Columns

Insert a standard Excel column that isn’t mapped to any field. Spacer columns are useful for adding formulas, calculations, or simply creating extra space in runtime.

<figure><img src="https://2472585788-files.gitbook.io/~/files/v0/b/gitbook-x-prod.appspot.com/o/spaces%2F-MFqFFf4143HS0_Wagnz%2Fuploads%2Fbc1NW0eC0ZJZQGovizq3%2FAdd%20Spacer%20Column.gif?alt=media&amp;token=1b669e8b-08b5-4efd-aec3-5e322813bce3" alt=""><figcaption></figcaption></figure>

### API Name

Displays the API name of the field, making it easier to identify and reference fields consistently across the Grid Map.

### Schedule Item Location

Shows the specific column in the workbook where the field is mapped. This helps Designers quickly trace data placement within Excel.

### Data Type

Displays the field’s data type (e.g., Text, Number, Date). Knowing the data type ensures proper formatting and usage in runtime.

### Field Options

Allows Designers to configure additional settings for the field. For example, you can apply Excel-style conditional formatting to highlight values dynamically.

There are two options available:

* **Configure** – Set up field-specific rules or conditions.
* **Color Bar** – Apply a color bar to visually represent field values.

Click the **settings icon** next to it to access Field Options.

<figure><img src="https://2472585788-files.gitbook.io/~/files/v0/b/gitbook-x-prod.appspot.com/o/spaces%2F-MFqFFf4143HS0_Wagnz%2Fuploads%2FNfAT3x6XCCScv7gYRF6M%2FField%20Options.gif?alt=media&amp;token=b6910d63-7891-4a32-97db-93d91285570a" alt=""><figcaption><p>Field Configuration for Color Bar</p></figcaption></figure>

### Default Value

Specifies a default value to display in the field when the Grid Map is first loaded. This is useful for pre-populating common or expected entries.

<figure><img src="https://2472585788-files.gitbook.io/~/files/v0/b/gitbook-x-prod.appspot.com/o/spaces%2F-MFqFFf4143HS0_Wagnz%2Fuploads%2F79nmQ8pU9ENvCVgaNN54%2FDefault%20Value.gif?alt=media&amp;token=40b564b2-5925-42cb-b10f-22aef76bd20d" alt=""><figcaption></figcaption></figure>

### Hidden

Lets Designers hide the field in Excel while keeping it mapped in the background. This helps declutter the sheet while retaining field logic and functionality.

<figure><img src="https://2472585788-files.gitbook.io/~/files/v0/b/gitbook-x-prod.appspot.com/o/spaces%2F-MFqFFf4143HS0_Wagnz%2Fuploads%2FEOmTU6q9vyHQxn0B1KIA%2FHidden.gif?alt=media&amp;token=f4b010c9-00ab-4f55-8925-3c7d65f31441" alt=""><figcaption></figcaption></figure>

## Preview

Designers can preview how the Grid Map will look in Excel before saving and closing the configuration. Use this option to validate field arrangements and display settings, without committing changes.

<figure><img src="https://2472585788-files.gitbook.io/~/files/v0/b/gitbook-x-prod.appspot.com/o/spaces%2F-MFqFFf4143HS0_Wagnz%2Fuploads%2FyzBucC04qq7QaqugX7Do%2FPreview.gif?alt=media&amp;token=5198e71d-27d6-4fd4-875c-31a30a3ac453" alt=""><figcaption></figcaption></figure>

## **Display Options**

On the lower left of the Grid Map window, you can find Display Options that let you fine tune how a Grid Map operates in **Runtime**. Display Options has five different options like General, Border and Cor, Pivot, Sort and Security. Designers can just hover the Display Options to see what are the selections made in these five options.

![](https://2472585788-files.gitbook.io/~/files/v0/b/gitbook-x-prod.appspot.com/o/spaces%2F-MFqFFf4143HS0_Wagnz%2Fuploads%2FXdqyI5XTRRtohYZzmNtS%2FDisplay1.png?alt=media\&token=f0ec80c7-3b04-4f56-8015-6b7dc7d7d707)

**General**: In this we will find the information like columns, width, height. General is the first option on Display Options. Select **General** and below window will open.

<figure><img src="https://2472585788-files.gitbook.io/~/files/v0/b/gitbook-x-prod.appspot.com/o/spaces%2F-MFqFFf4143HS0_Wagnz%2Fuploads%2FNWkD06tEOLh2qejRk0Os%2FSave%205.png?alt=media&amp;token=bd18ab0b-772a-428e-b77b-6b042743922a" alt=""><figcaption></figcaption></figure>

* **AutoFit Columns** - Autofit will be applied to the Grid Map's columns after data is displayed and Minimum Width makes sure the columns do not get too narrow.
* **Autofit Rows** - Wrap text and autofit row after data is displayed. Cannot be used together with Autofit Columns.
* **Set Row Height** - Fix the row height after data is displayed.
* **Enable AutoFilter** - Automatically apply Excel Filter to the Grid Map.
* **View Gridlines** - Display Excel gridlines.&#x20;
* **Excel Named Range Usage** - Control how the mapped fields are named in Excel named range.
* **Include Field Name in Comments** - Insert Excel comments with the mapped field's name.
* **Do not allow the insertion of records** - Disable Insert Row in Toolbox during Runtime.
* **Do not allow deletion of records** - Disable Delete Row in Toolbox during Runtime.
* **Allow adding dynamic columns (runtime mode)** - Enable Customize Grids in Runtime.

**Border and Color:** Border, header's fill color, and header's font color are auto applied based on the setting here.

<div align="left"><img src="https://2472585788-files.gitbook.io/~/files/v0/b/gitbook-x-prod.appspot.com/o/spaces%2F-MFqFFf4143HS0_Wagnz%2Fuploads%2Fy9Vcrz5phHHuaUQOe8r1%2FDisplay2.png?alt=media&amp;token=174c2954-e526-413b-8613-b67a05fb83a9" alt="" width="563"></div>

**Pivot:** Enabling this feature auto creates a Pivot and Chart in Runtime after the data is displayed.

![](https://2472585788-files.gitbook.io/~/files/v0/b/gitbook-legacy-files/o/assets%2F-MFqFFf4143HS0_Wagnz%2F-MGMFzuafvexxmmw61dk%2F-MGMP9VapOGAiYHxOHGW%2Fimage.png?alt=media\&token=ac46707f-ac71-424e-81c0-39649847c57b)

**Sort:** Sort displayed data with the fields configured here.

![](https://2472585788-files.gitbook.io/~/files/v0/b/gitbook-x-prod.appspot.com/o/spaces%2F-MFqFFf4143HS0_Wagnz%2Fuploads%2FFT1qw7mdA3ENXxtYkMIK%2FDisplay3.png?alt=media\&token=3338593f-8ad6-4b21-809f-8159a6d1616e)

**Security: Worksheet Protection based on Field Metadata** through which user can protect the worksheet at **Map** level, and user can also identify their access level. Designers can protect the worksheet by providing a password. Users can change or select the color for the **Read** **Only** or **No** **Access** to make it easy to identify the access level.

![](https://2472585788-files.gitbook.io/~/files/v0/b/gitbook-x-prod.appspot.com/o/spaces%2F-MFqFFf4143HS0_Wagnz%2Fuploads%2F05V8CfkLaiVnhP1zumdk%2FDisplay4.png?alt=media\&token=332ee94e-ba8c-4594-bd1d-217f4fa1441e)

## **Save Options**

Save Options provide a granular control over the save operation in **Runtime**. This option is available on the bottom of the Map. Click on **Save Options** and below window will open. Users can provide multiple save options with multiple filters.

<figure><img src="https://2472585788-files.gitbook.io/~/files/v0/b/gitbook-x-prod.appspot.com/o/spaces%2F-MFqFFf4143HS0_Wagnz%2Fuploads%2FDOjam6O9M7GVWaiWpCal%2Fimage.png?alt=media&amp;token=795717e7-edfa-4472-84a1-62dbaaf3ec5f" alt=""><figcaption></figcaption></figure>

Let us have a look at the options available in **Save Options**.

* **Batch Size:** Records will be sent to your CRM in batches. The number of records per batch is controlled here.
* **Partial Commit:** Enable partial records to be saved even if some of the records in the same batch failed.
* **Concurrency Detection:** This feature helps when more than one user is working on the same record and prevents overwriting the data by the first user and triggers a summary message to the second user stating that the record has failed and also displays other details. Users should enable the "Concurrency Detection" from **Save Options**.

<div align="left"><figure><img src="https://2472585788-files.gitbook.io/~/files/v0/b/gitbook-x-prod.appspot.com/o/spaces%2F-MFqFFf4143HS0_Wagnz%2Fuploads%2FUYolIQW7H28TjOBrvwC1%2FFusion.png?alt=media&amp;token=6d81f7d8-9421-4ef7-be3b-806fcf6fb203" alt="" width="431"><figcaption></figcaption></figure></div>

* This feature will detect if more than 1 user try to modify the same data on same records. It will warn the subsequent user than the first user made a change to the record after subsequent user has retrieved the data. System would stop the subsequent user from overwriting the first users changes.
* **Disable Fast Save:** Save operation will process Salesforce calls sequentially when this Fast Save option is disabled.
* **Process blank values during save:** Insert blank rows as records.
* **Disable Save Summary:** Excludes the Save task result from the Save Summary displayed to end users.
* **Save Conditions:** Conditions can be configured here to control what records get saved in Runtime. Records that do not match the condition will not be processed.&#x20;


# Form Map

Form Map is perfect fit for any single record. This is used to display small data which can be viewed in the form of a letter. Let's show you how a Form Map is created.  &#x20;

Click **Maps** from **Valorx Fusion Ribbon**, and Maps windows will open which will have **Grid Map** or **Form Map**. Select **New Form Map**.

<figure><img src="https://2472585788-files.gitbook.io/~/files/v0/b/gitbook-x-prod.appspot.com/o/spaces%2F-MFqFFf4143HS0_Wagnz%2Fuploads%2FnHDdw8UF6Ps1jrUKBRT4%2FSave%204.png?alt=media&amp;token=826c9ce2-08fa-4661-baee-52010a92a80f" alt=""><figcaption></figcaption></figure>

Configure Form Map window will open when we select **New Form Map** where Users can select the object and configure the map. Select the **Object** from the drop-down and all the fields will be displayed.

<div align="left"><img src="https://2472585788-files.gitbook.io/~/files/v0/b/gitbook-legacy-files/o/assets%2F-MFqFFf4143HS0_Wagnz%2F-MGMFzuafvexxmmw61dk%2F-MGMR_EAYS2hDhOqIKYW%2Fimage.png?alt=media&amp;token=351b5990-9d52-41ad-9a10-bea388ac518d" alt="" width="563"></div>

**Mapping Fields:** Fields from **Form Map** are mapped by dragging and dropping a field onto an Excel cell.&#x20;

<div align="left"><img src="https://2472585788-files.gitbook.io/~/files/v0/b/gitbook-legacy-files/o/assets%2F-MFqFFf4143HS0_Wagnz%2F-MGMFzuafvexxmmw61dk%2F-MGMRmsn699GsrDpGj-r%2Fimage.png?alt=media&amp;token=78908e02-668e-4140-866b-7db7078ff57f" alt="" width="375"></div>

{% hint style="info" %}
By default, a mapped field will be marked as Display and Save. You can uncheck them based on your needs.

Users can also map multiple fields at the same time by selecting multiple fields and drag them to Excel.&#x20;
{% endhint %}

<div align="left"><img src="https://2472585788-files.gitbook.io/~/files/v0/b/gitbook-legacy-files/o/assets%2F-MFqFFf4143HS0_Wagnz%2F-MGMFzuafvexxmmw61dk%2F-MGMSAVEVUGmWCvxlRrV%2Fimage.png?alt=media&amp;token=5fb043d8-4cf9-4373-8249-37d2fbb29139" alt="" width="375"></div>

The layout is controlled in the Map Properties.

<div align="left"><img src="https://2472585788-files.gitbook.io/~/files/v0/b/gitbook-legacy-files/o/assets%2F-MFqFFf4143HS0_Wagnz%2F-MGMFzuafvexxmmw61dk%2F-MGMSXhrELuxEOA56ghS%2Fimage.png?alt=media&amp;token=bc261a4b-aa86-4edb-ba8b-0c021abb115e" alt=""></div>

**Shortcut to add Fields**: Forgot to select a field you need? You don't need to go back to Data Modeling. You can add more fields from here.

<div align="left"><figure><img src="https://2472585788-files.gitbook.io/~/files/v0/b/gitbook-x-prod.appspot.com/o/spaces%2F-MFqFFf4143HS0_Wagnz%2Fuploads%2F7vLbR5sSAyGSmhPrf5rI%2Fimage.png?alt=media&amp;token=8debe12f-2786-4b18-aa59-27be788d3aa1" alt=""><figcaption></figcaption></figure></div>

### Display Options

On the lower left of the Form Map window, you can find Display Options that let you fine tune how a Form Map operates in Runtime.

**General:** Form Map contains General, Border and Color and Security sections just like our Grid Map. Let's discuss them in detail.

![](https://2472585788-files.gitbook.io/~/files/v0/b/gitbook-x-prod.appspot.com/o/spaces%2F-MFqFFf4143HS0_Wagnz%2Fuploads%2FkQ0MiCicyenVY3WveAZa%2FForm2.png?alt=media\&token=70a87798-615d-4c12-9876-543efa789eef)

* **AutoFit Columns:** Autofit will be applied to the Grid Map's columns after data is displayed and Minimum Width makes sure the columns do not get too narrow.
* **View Gridlines:** Display Excel gridlines.&#x20;
* **Excel Named Range Usage:** Control how the mapped fields are named in Excel named range.
* **Include Field Name in Comments:** Insert Excel comments with the mapped field's name.

**Border and Color:** Border, header's fill color, and header's font color are auto applied based on the setting here.

![](https://2472585788-files.gitbook.io/~/files/v0/b/gitbook-x-prod.appspot.com/o/spaces%2F-MFqFFf4143HS0_Wagnz%2Fuploads%2FiT1hRKuMLzRF3SbX7LvR%2FForm3.png?alt=media\&token=7b968340-6b0d-4b60-b159-5a2106e52dca)

**Security: Worksheet Protection based on Field Metadata** through which user can protect the worksheet at **Map** level, and user can also identify their access level. Designers can protect the worksheet by providing a password. Users can change or select the color for the **Read** **Only** or **No** **Access** to make it easy to identify the access level.

![](https://2472585788-files.gitbook.io/~/files/v0/b/gitbook-x-prod.appspot.com/o/spaces%2F-MFqFFf4143HS0_Wagnz%2Fuploads%2FgaQ5Nwrqsa9GtUSOk2Kr%2FForm4.png?alt=media\&token=063385a0-b23c-4fa8-8d00-dedfa0530e78)

### **Save Options**&#x20;

Save Options provide a granular control over the save operation in **Runtime**. This option is available on the bottom of the Map. Click on **Save Options** and below window will open. Users can provide multiple save options with multiple filters.

<figure><img src="https://2472585788-files.gitbook.io/~/files/v0/b/gitbook-x-prod.appspot.com/o/spaces%2F-MFqFFf4143HS0_Wagnz%2Fuploads%2FDOjam6O9M7GVWaiWpCal%2Fimage.png?alt=media&amp;token=795717e7-edfa-4472-84a1-62dbaaf3ec5f" alt=""><figcaption></figcaption></figure>

* **Batch Size :** Records will be sent to your CRM in batches. The number of records per batch is controlled here.
* **Partial Commit:** Enable partial records to be saved even if some of the records in the same batch failed.
* **Concurrency Detection:** This feature helps when more than one user is working on the same record and prevents overwriting the data by the first user and triggers a summary message to the second user stating that the record has failed and also displays other details. Users should enable the "Concurrency Detection" from **Save Options**.\
  ***Example***: Let us imagine we have User 1 and User 2 and retrieve the same record at 9:04 am and 9:05 am respectively. If User 1 makes a change and tries to save at 9:07:15:100am and User 2 tries to save at 9:07:15:300am (200 milliseconds apart) then User 1’s changes will be saved, and User 2 will get a warning message stating that data was modified by User 1.”

<div align="left"><figure><img src="https://2472585788-files.gitbook.io/~/files/v0/b/gitbook-x-prod.appspot.com/o/spaces%2F-MFqFFf4143HS0_Wagnz%2Fuploads%2FUYolIQW7H28TjOBrvwC1%2FFusion.png?alt=media&amp;token=6d81f7d8-9421-4ef7-be3b-806fcf6fb203" alt="" width="431"><figcaption></figcaption></figure></div>

* **Disable Fast Save:** Save operation will process Salesforce calls sequentially when Fast Save option is disabled.
* **Process blank values during save:** Insert blank rows as records.
* **Disable Save Summary:** Excludes the Save task result from the Save Summary displayed to end users.
* **Save Conditions:** Conditions can be configured here to control what records get saved in Runtime. Records that do not match the condition will not be processed.


# Tasks

As the name suggests Tasks, Designers can add the tasks before executing the app in runtime. Designers can create eight different kind of tasks.

Open an **Excel** and click on **Start** and open an app from **Connection list**.

<div align="left"><img src="https://2472585788-files.gitbook.io/~/files/v0/b/gitbook-x-prod.appspot.com/o/spaces%2F-MFqFFf4143HS0_Wagnz%2Fuploads%2FY1Sr0XbxamKAUV8BSFL8%2FApp%20store.png?alt=media&amp;token=77ab2544-646e-41cb-897e-54fae110c593" alt="" width="563"></div>

#### Query

This Task retrieves data from your **CRM** and is typically used to display on the Maps that you have created in the earlier steps. Refer [**Query**](/valorx-fusion/design-studio/tasks/query) for more information.

#### API

API Task can call readily available Salesforce Webservices or to perform computations or actions that are not suitable for spreadsheet to handle. Follow [**API**](/valorx-fusion/design-studio/tasks/api) for more information.

#### Macro

With Macro Task, you can integrate Excel automation into your Valorx Fusion Apps to speed up some of the tedious manual operations. Refer [**Macro**](/valorx-fusion/design-studio/tasks/macro) for more information.

#### Dataset

Dataset combines or find similar data retrieved using multiple Query Tasks. Refer [**Dataset**](/valorx-fusion/design-studio/tasks/dataset) for more information.

#### Add/Delete

This Task enables you to dynamically add or delete records from Grid Map. Refer [**Add/Delete**](/valorx-fusion/design-studio/tasks/add-delete) for more information.

#### Document

Document Task supports saving a Valorx Fusion App as an Excel or PDF attachment onto a Salesforce record in either the Notes & Attachment or File section. Refer [**Document**](/valorx-fusion/design-studio/tasks/document) for more information.

#### Data Import

The Data Import feature enables users to effortlessly import data from external sources directly into the application. It supports CSV or Excel formats, offering flexibility and convenience for tasks like data migration and updating existing records. Refer to [**Data Import**](/valorx-fusion/design-studio/tasks/data-import) for more information.

#### Clear

Clearing Grid Maps and Form Maps can be achieved using Clear Task. It clears the Maps on Excel without affecting the records in your CRM. Refer [**Clear**](/valorx-fusion/design-studio/tasks/clear) for more information.

#### Refresh Ribbon

In Workflow and UX, you will learn more about creating ribbon buttons for Runtime Users to interact with. This Task can dynamically show or hide those buttons. Refer [**Refresh Ribbon**](/valorx-fusion/design-studio/tasks/refresh-ribbon) for more information.

#### Launch CRM

The Launch CRM task allows users to open specific data from the CRM, particularly beneficial for those dealing with large datasets who need to review CRM records. Refer to [**Launch CRM**](/valorx-fusion/design-studio/tasks/launch-crm) for more information.

#### Refresh Map

The "Refresh Map" function refreshes the map based on the Designer's specifications and provided instructions. Refer to [**Refresh Map**](/valorx-fusion/design-studio/tasks/refresh-map) for more information.

#### Add Field

The Add Field task enables the users to add a field(s) in the sheet while executing any App in the runtime mode. Refer to [**Add Field** ](/valorx-fusion/design-studio/tasks/add-field)for more information.


# Query

Query is used to build the relationship between the Maps and the Data Modelling. Designers can create the Query Task in three different Modes like Standard, User Selection (Full) and User Selection (Compact).&#x20;

To get started with creating a **Query Task** open an **Excel** and click **Start** from **Valorx Fusion Ribbon**.

<div align="left"><img src="https://2472585788-files.gitbook.io/~/files/v0/b/gitbook-x-prod.appspot.com/o/spaces%2F-MFqFFf4143HS0_Wagnz%2Fuploads%2FY1Sr0XbxamKAUV8BSFL8%2FApp%20store.png?alt=media&amp;token=77ab2544-646e-41cb-897e-54fae110c593" alt="" width="563"></div>

Now, open an app from **Connections List** in **Design Studio**, and click on **Task** and select **New Query**.

![](https://2472585788-files.gitbook.io/~/files/v0/b/gitbook-x-prod.appspot.com/o/spaces%2F-MFqFFf4143HS0_Wagnz%2Fuploads%2Fq2egwUEcLzA3l5wW4ENl%2FFusion%20Docs%20Update%20as%20per%20V15%20-%2026.png?alt=media\&token=18c4f1e1-8cd7-493a-a6a1-ee5aa977d251)

A Query Task pane will open which will have three different selection types like Standard, User Selection (Full) and User Selection (Compact). Click on **Add Filter** and once the filters are added click **Save**.
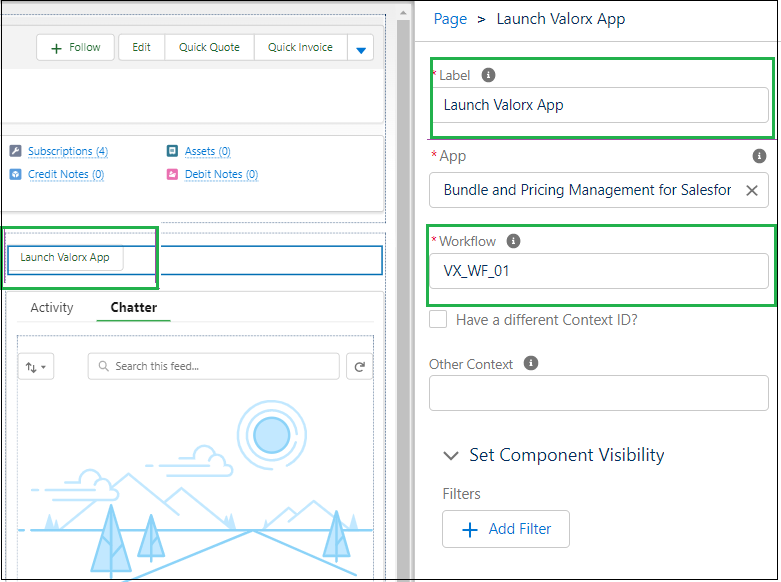
![](https://2472585788-files.gitbook.io/~/files/v0/b/gitbook-x-prod.appspot.com/o/spaces%2F-MFqFFf4143HS0_Wagnz%2Fuploads%2FyKnmyH3a53XWn7keI0vM%2FQuery%201.png?alt=media\&token=f9ad7efa-c144-498e-b064-23c69f74553c)

**Standard** : Designers can add this standard query task when Users need not perform or select any action in Runtime. Standard Query Task happens in the background without needing Runtime users to perform any actions.&#x20;

![](https://2472585788-files.gitbook.io/~/files/v0/b/gitbook-legacy-files/o/assets%2F-MFqFFf4143HS0_Wagnz%2F-MGMFzuafvexxmmw61dk%2F-MGMVWOOi3SBoX0wsZsH%2Fimage.png?alt=media\&token=d5be7d4e-3baf-40d3-a72c-744d57b4681d)

**User Selection (Full)** : This Query task will displays a list of records for the users to filter and choose.

![](https://2472585788-files.gitbook.io/~/files/v0/b/gitbook-legacy-files/o/assets%2F-MFqFFf4143HS0_Wagnz%2F-MGMFzuafvexxmmw61dk%2F-MGMVc_magvmlosmCmLY%2Fimage.png?alt=media\&token=ce4877de-1b8a-4260-b523-94a9bba29799)

**User Selection (Compact)** : User Selection (Compact) allows users to configure the filters, but they can't choose the records that are retrieved. All records that matches the filters will be retrieved.

![](https://2472585788-files.gitbook.io/~/files/v0/b/gitbook-legacy-files/o/assets%2F-MFqFFf4143HS0_Wagnz%2F-MGMFzuafvexxmmw61dk%2F-MGMVg4mtxvGSd0K8MsH%2Fimage.png?alt=media\&token=434d406f-c535-4346-9063-5188a3ba3ef3)


# API

**Application Program Interface (API)** allows Valorx Fusion App to call Salesforce Webservices. Salesforce will allow to create API using external platforms. Designers can create an Apex Class in **Salesforce** by logging into your **Org Id** or they can even use the existing or predefined API enabled classes.

* Refer [**Exposing Apex Classes as REST Web Services**](https://developer.salesforce.com/docs/atlas.en-us.apexcode.meta/apexcode/apex_rest.htm).
* Refer [**Exposing APEX Methods as SOAP Web Services**](https://developer.salesforce.com/docs/atlas.en-us.apexcode.meta/apexcode/apex_web_services.htm).

Create a Apex Class in Salesforce. Once a class is created then, open an app from **Connections List** in **Design Studio**, and click on **Task** and select **New API Task**.

![](https://2472585788-files.gitbook.io/~/files/v0/b/gitbook-x-prod.appspot.com/o/spaces%2F-MFqFFf4143HS0_Wagnz%2Fuploads%2FS7qtwvndEsgvxotMyZKu%2FFusion%20Docs%20Update%20as%20per%20V15%20-%2027.png?alt=media\&token=6f12461c-af85-4834-9f09-8ed4612ddfb7)

**API Task** window will open which will have Class Name, Name, Classes and Actions.

![](https://2472585788-files.gitbook.io/~/files/v0/b/gitbook-x-prod.appspot.com/o/spaces%2F-MFqFFf4143HS0_Wagnz%2Fuploads%2FuvFqr4kVmSusX2snNstL%2FMicrosoftTeams-image%20\(19\).png?alt=media\&token=92726d9e-f1fd-4736-8b1e-a411a6007553)

Follow the below steps to create and run an API through Valorx Fusion.

* Provide the name of the API task under **Class Name**.
* Select the class from the drop-down provided under "*Classes*".
* Select the **Actions** from the drop-down ( Method that we used to create API task).
* Parameter Mapping will be displayed depending on the Actions selected.
* Select where to display the results under Return Type Mapping.
* Click **Save**.


# Macro

Macros are used to record the set of actions, save, run. Macros are used to save time on repetitive tasks when we do not want to do the same task every time. Macros can make wonders and we want you to experience those wonders with our Valorx Fusion.

To get started with this follow the below steps.

Open an **Excel**, click **Start** from Valorx Fusion Ribbon.

<div align="left"><img src="https://2472585788-files.gitbook.io/~/files/v0/b/gitbook-x-prod.appspot.com/o/spaces%2F-MFqFFf4143HS0_Wagnz%2Fuploads%2FY1Sr0XbxamKAUV8BSFL8%2FApp%20store.png?alt=media&amp;token=77ab2544-646e-41cb-897e-54fae110c593" alt="" width="563"></div>

Follow the instruction provided to view the Developer option on the ribbon. Developer option is used to write macro in Excel

* Select **File** from the ribbon and click on **Options**.
* Select **Customize** the Ribbon from **Excel Options**.
* Select Developer and click **OK**.

![](https://2472585788-files.gitbook.io/~/files/v0/b/gitbook-x-prod.appspot.com/o/spaces%2F-MFqFFf4143HS0_Wagnz%2Fuploads%2FiFVHD1vKfsd6ttmLRUA8%2FMacro.png?alt=media\&token=119b87f6-8dc6-4919-bd58-10d1ca258620)

Developer button will now show up on the Valorx Ribbon.

<div align="left"><img src="https://2472585788-files.gitbook.io/~/files/v0/b/gitbook-x-prod.appspot.com/o/spaces%2F-MFqFFf4143HS0_Wagnz%2Fuploads%2FtaHznl78dIPTpcdHicoM%2FMacro%201.png?alt=media&amp;token=1079fd2f-a9e0-410b-92b6-e9bf75f050e8" alt="" width="563"></div>

Open an app and click on **Tasks** and select Macros now click on **New Macro Task**. Below validation message will be displayed when there is no macro create on workbook or when Valorx Fusion is unable to access the macro settings. Follow the instruction provided under Information.

![](https://2472585788-files.gitbook.io/~/files/v0/b/gitbook-x-prod.appspot.com/o/spaces%2F-MFqFFf4143HS0_Wagnz%2Fuploads%2FrphLwTN9gRDzAklN1UVn%2FGoogle%20Macro.png?alt=media\&token=d15dbac4-1d1c-4c49-b635-f08b7f2e5e42)

To get started with creating a macro follow the below steps.

* Select **Developer** from **Valorx Fusion Ribbon**.
* Click **Macros** and a dialog box will open.

![](https://2472585788-files.gitbook.io/~/files/v0/b/gitbook-x-prod.appspot.com/o/spaces%2F-MFqFFf4143HS0_Wagnz%2Fuploads%2FBFNO3uWRUGvQnUqO8dSg%2FMacro%202.png?alt=media\&token=af79a76f-7547-44cf-9dcb-43ccd43cc46e)

Provide the name of the macro under **Macro Name** and click **Create**.

<div align="left"><img src="https://2472585788-files.gitbook.io/~/files/v0/b/gitbook-x-prod.appspot.com/o/spaces%2F-MFqFFf4143HS0_Wagnz%2Fuploads%2FhzajJcaEEsV93Ql7VTFp%2FMacro%203.png?alt=media&amp;token=1bbcaa70-aa22-4bda-a599-87aae8c365d0" alt="" width="375"></div>

Now, write the macro in the provided box. Macro needs to be written between the "Sub" and "End Sub".

![](https://2472585788-files.gitbook.io/~/files/v0/b/gitbook-x-prod.appspot.com/o/spaces%2F-MFqFFf4143HS0_Wagnz%2Fuploads%2FnmSgOyBklIhgqSsFwxRt%2FMicrosoftTeams-image%20\(15\).png?alt=media\&token=fe43dfae-39e5-4dae-ad9d-52708e101de7)

Once the macro is created now open a **New Macro Task** and provide the name of the Macro. Designers can choose the macros from Available Macros. Macro Task allows Valorx Fusion App to execute VBA hosted in the Excel file.

<div align="left"><img src="https://2472585788-files.gitbook.io/~/files/v0/b/gitbook-legacy-files/o/assets%2F-MFqFFf4143HS0_Wagnz%2F-MGMFzuafvexxmmw61dk%2F-MGMXqKxWJQk3OF0-Eut%2Fimage.png?alt=media&amp;token=a63734de-a8a9-44bf-a0fc-8b635fa37c69" alt="" width="188"></div>

{% hint style="info" %}
Designers also can record the macro by clicking on Record Macro.
{% endhint %}


# Dataset

Dataset Task can combine or find intersect records from two to ten dataset retrieved by Query Tasks by using AND/OR operator.

To get started with creating a **Dataset Task** open an **Excel** and click **Start** from **Valorx Fusion Ribbon**.

<div align="left"><img src="https://2472585788-files.gitbook.io/~/files/v0/b/gitbook-x-prod.appspot.com/o/spaces%2F-MFqFFf4143HS0_Wagnz%2Fuploads%2FY1Sr0XbxamKAUV8BSFL8%2FApp%20store.png?alt=media&amp;token=77ab2544-646e-41cb-897e-54fae110c593" alt="" width="563"></div>

Now, open an app from **Connections List** in **Design Studio**, and click on **Task** and select **New Dataset Task.**

![](https://2472585788-files.gitbook.io/~/files/v0/b/gitbook-x-prod.appspot.com/o/spaces%2F-MFqFFf4143HS0_Wagnz%2Fuploads%2F10wZKBRQFw1m0CNm6XXv%2FFusion%20Docs%20Update%20as%20per%20V15%20-%2028.png?alt=media\&token=c87c5314-3ac9-4604-86d2-da454d13e02d)

**Dataset Task** bar will open which will contain Object Name, Name, Number of Dataset to merge and Operator.

<div align="left"><img src="https://2472585788-files.gitbook.io/~/files/v0/b/gitbook-x-prod.appspot.com/o/spaces%2F-MFqFFf4143HS0_Wagnz%2Fuploads%2FmP3ZqoQj9p5q2DSBWgKU%2FDataset%201.png?alt=media&amp;token=4cfbbad1-5ab4-4347-ae93-90d0524c40e8" alt="" width="375"></div>


# Add/Delete

The **Add/Delete Task** in Fusion allows Designers to insert or remove rows from a grid in a more dynamic and configurable way than standard Excel options. With enhanced filters and custom logic, this feature offers more flexibility and control within your app.

## Getting Started

1. Open Excel and launch **Fusion** via the **Fusion Ribbon**.
2. Select your app from the **Connections** list.
3. Go to the **Tasks** menu, click **New Task**, then select **Add/Delete**. or\
   Go to the **Tasks** menu, select **Add/Delete**, then click **New Add/Delete Task**.

<figure><img src="https://2472585788-files.gitbook.io/~/files/v0/b/gitbook-x-prod.appspot.com/o/spaces%2F-MFqFFf4143HS0_Wagnz%2Fuploads%2FhmochQ5gPWmvNp2C0Fmf%2FAdd%20Add%20Delete%20Task.gif?alt=media&amp;token=885d3629-a73a-45e5-adf4-941fb2cb4994" alt=""><figcaption><p>New Task - Add/Delete</p></figcaption></figure>

***

## Add Task

To create an Add Task:

1. In the Add/Delete Task window, set the **Type** to **ADD**.
2. Enter the task **Name**.
3. Choose the **Map** and the corresponding **Object Name** from the dropdown.

<figure><img src="https://2472585788-files.gitbook.io/~/files/v0/b/gitbook-x-prod.appspot.com/o/spaces%2F-MFqFFf4143HS0_Wagnz%2Fuploads%2Fc69bqkNmNMwGegYlRmTD%2FAdd%20Task%20-%20Name%20and%20Map.gif?alt=media&amp;token=34e11ee3-75ef-48d8-ae5d-892ccfed135f" alt=""><figcaption><p>Set the name and map of the Add Task</p></figcaption></figure>

### Add Task Properties

You can define how rows will be added using one of the four available **Add Task Properties**:

#### STATIC

Use the **STATIC** option to add a fixed number of rows to the bottom of the grid.

**Steps:**

1. Select **STATIC** as the property type.
2. Enter the number of rows you want to add in the **Static Record Count** field.

> 💡 Use this option when the number of rows to be added is always the same and doesn't need to change at runtime.

<figure><img src="https://2472585788-files.gitbook.io/~/files/v0/b/gitbook-x-prod.appspot.com/o/spaces%2F-MFqFFf4143HS0_Wagnz%2Fuploads%2FscQBJKhwq9ynT0JpizH4%2FAdd%20Task%20-%20Static.gif?alt=media&amp;token=c0b101f5-d55e-486b-b662-7f4b938df270" alt=""><figcaption></figcaption></figure>

#### CELL REFERENCE

Use this option to dynamically add rows based on a cell value—without needing to reopen the Design Studio.

**Steps:**

1. Enter the **cell reference** of the topmost cell of the map in the **Cell** field.
   * **Format:** `<MapName>!<CellAddress>`
   * **Example:** `Schedule Item!$A$1`
2. During runtime, update the value in that cell with the number of rows you want to add.\
   Fusion will insert that number of rows at the bottom of the grid.
3. **Quick setup tip:**\
   Before entering the cell reference, click the desired cell in your worksheet. Then, click the selector button next to the **Cell** field to automatically populate it with your selected cell.

> 💡 **Tip:** This method gives Designers the flexibility to control row count at runtime—no need to reconfigure the Add task in Design Studio.

<figure><img src="https://2472585788-files.gitbook.io/~/files/v0/b/gitbook-x-prod.appspot.com/o/spaces%2F-MFqFFf4143HS0_Wagnz%2Fuploads%2Fl0dToAP9qGotVul1pLEl%2FAdd%20Task%20-%20Cell%20Reference.gif?alt=media&amp;token=2f41a15b-5336-4391-b316-674c23872452" alt=""><figcaption></figcaption></figure>

#### NAMED RANGE REFERENCE

Use a **named cell** to dynamically control the number of rows added at runtime.

**Steps:**

1. In Excel, right-click the desired cell and select **Define Name**.
2. Assign a name to the cell (e.g., `RecordCount`) and click **OK**.
3. In the **Add Task** configuration, search for and select the **Named Range** from the dropdown list.
4. During runtime, update the value of that named cell to insert that number of rows at the bottom of the grid.

> 💡 **Cell Reference vs Named Range Reference**\
> When your Excel layout changes—such as when rows are added or removed—**Cell References** may break and need to be manually updated.\
> In contrast, **Named Ranges** automatically adjust and remain consistent.

<figure><img src="https://2472585788-files.gitbook.io/~/files/v0/b/gitbook-x-prod.appspot.com/o/spaces%2F-MFqFFf4143HS0_Wagnz%2Fuploads%2Fm4QbmZAMNlRy1D3XITk7%2FAdd%20Task%20-%20Name%20Range%20Reference.gif?alt=media&amp;token=a27d837a-ea53-45fb-aaa7-a833962aed0f" alt=""><figcaption></figcaption></figure>

#### RECORD COUNT

Use the **Record Count** option to add rows based on the number of records returned by another map.

**Steps:**

1. Select **Record Count** as the property type.
2. Choose the **target map** that you want to reference.
3. Configure the input in the **Workflow**.

Fusion will automatically insert the same number of rows as the records found in the selected map.

**Example:**\
If the map **CustomerAccount** returns 5 records, Fusion will add **5 rows** to the grid during runtime.

> 💡 This is useful when you want to ensure row count dynamically matches another dataset.

<figure><img src="https://2472585788-files.gitbook.io/~/files/v0/b/gitbook-x-prod.appspot.com/o/spaces%2F-MFqFFf4143HS0_Wagnz%2Fuploads%2FhmZ3Ucih7gY8YTkDCzki%2FAdd%20Task%20-%20Record%20Count.gif?alt=media&amp;token=2fa8ce58-ab0a-4555-8369-2f48c41e8463" alt=""><figcaption></figcaption></figure>

### In Flight Message Properties

Customize the message users see while the Add Task is running.

**Message Style Options:**

* **Default**\
  Displays the standard message:\
  *“Inserting rows to the grid”*
* **Custom**\
  Enter your own message (up to 50 characters).\
  Example: *“Adding {0} new entries for this trial”*

  > {0} will be replaced with the number of records being added.
* **No Message**\
  If selected, Fusion will show a fallback message such as:\
  *“Executing Workflow”*

**Include Record Count**

Tick this checkbox to display the total number of records in the message.

> Works with both **Default** and **Custom** styles.

<div align="left"><figure><img src="https://2472585788-files.gitbook.io/~/files/v0/b/gitbook-x-prod.appspot.com/o/spaces%2F-MFqFFf4143HS0_Wagnz%2Fuploads%2FUqUna7nvkBijnMDZQCby%2FAdd%20Task%20-%20In%20Flight%20Message.gif?alt=media&amp;token=176e66d9-3540-460c-9e6f-dd2a88876b90" alt=""><figcaption></figcaption></figure></div>

### Final Step – Save the Add Task
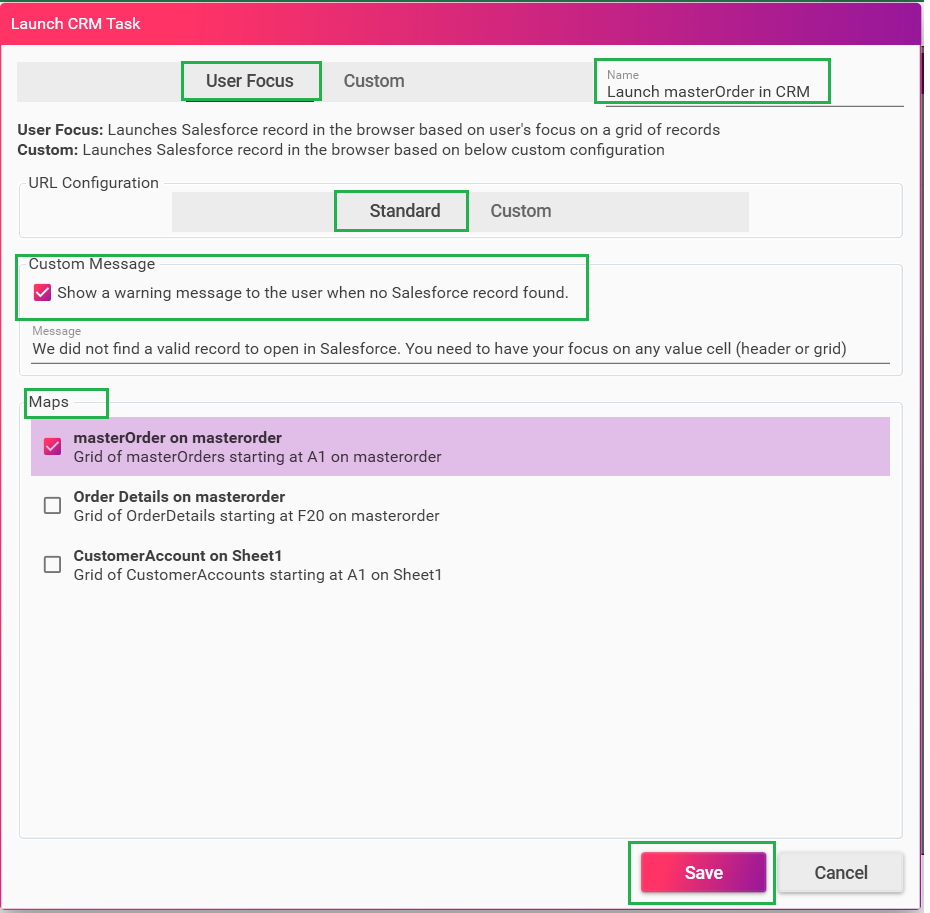
After configuring all required fields and properties (including Messaging, Map, and Add Task type), make sure to **click Save** to apply the changes.

> ⚠️ **Note:** The Add Task will not run in the app unless it has been saved.

<figure><img src="https://2472585788-files.gitbook.io/~/files/v0/b/gitbook-x-prod.appspot.com/o/spaces%2F-MFqFFf4143HS0_Wagnz%2Fuploads%2F1jLQcvceaNSsDvjWZBo6%2FAdd%20Task%20-%20Save.gif?alt=media&amp;token=5ea6b600-3330-42a9-9d45-29f21d52e076" alt=""><figcaption></figcaption></figure>

***

## Delete Task

To create a Delete Task:

1. In the Add/Delete Task window, set the **Type** to **DELETE**.
2. Enter the task **Name**.
3. Choose the **Map** and the corresponding **Object Name** from the dropdown.

<figure><img src="https://2472585788-files.gitbook.io/~/files/v0/b/gitbook-x-prod.appspot.com/o/spaces%2F-MFqFFf4143HS0_Wagnz%2Fuploads%2FA8GABT432jPUxyrsNL3h%2FDelete%20Task%20-%20Map.gif?alt=media&amp;token=7d97f53d-039f-498c-8b2c-c0477cd5dea3" alt=""><figcaption></figcaption></figure>

### Delete Task Properties

Configure how records should be deleted during runtime using the options below:

#### Apply Delete Operation to Selected Record(s) Only

Enable this to delete records **based on the user's selection** in the grid during runtime.

> Use this when you want users to have control over which rows are deleted.

<figure><img src="https://2472585788-files.gitbook.io/~/files/v0/b/gitbook-x-prod.appspot.com/o/spaces%2F-MFqFFf4143HS0_Wagnz%2Fuploads%2FtrtsizECfNAL2OshAqoz%2FDelete%20Task%20-%20Apply%20Delete%20Selected.gif?alt=media&amp;token=819f60fc-a3e0-4d38-9a0c-c075fe185f93" alt=""><figcaption></figcaption></figure>

#### Disable Fast Delete

Enable this option to **turn off the fast delete feature**.

> This is helpful in scenarios where slower, more controlled deletion is required (e.g., when dependencies or validations are involved).

<figure><img src="https://2472585788-files.gitbook.io/~/files/v0/b/gitbook-x-prod.appspot.com/o/spaces%2F-MFqFFf4143HS0_Wagnz%2Fuploads%2Fk9dSritq8Aj2dpHAVxzd%2FDelete%20Task%20-%20Disable%20Fast%20Delete.gif?alt=media&amp;token=929e92a1-60cd-443e-9e5d-93aa2ae4488e" alt=""><figcaption></figcaption></figure>

#### Add Condition Filters *(Optional)*

Use filters to delete only the records that meet specific conditions.

**Steps:**

1. Click **Add Condition Filter**.
2. Configure each condition by setting the following:
   * **Map Field**
   * **Type**
   * **Operator**
   * **Value**
3. (Optional) Click the **remove** icon to delete a condition.
4. Enable **Condition Filters Logic** if you want to define logical relationships between filters (e.g., AND/OR).

<figure><img src="https://2472585788-files.gitbook.io/~/files/v0/b/gitbook-x-prod.appspot.com/o/spaces%2F-MFqFFf4143HS0_Wagnz%2Fuploads%2FZ7EnLsjuKjEtLy4iDetI%2FDelete%20Task%20-%20Add%20condition%20Filter.gif?alt=media&amp;token=cb59974f-a692-44ff-a3ad-2a8a4fd065e3" alt=""><figcaption></figcaption></figure>

#### Delete Confirmation

Prompt users before deleting records to prevent accidental deletions.

**Steps:**

1. Enable **Ask for confirmation before deleting records**.
2. Enter a custom confirmation message (optional).\
   Example: *"Are you sure you want to delete the selected records?"*

> 💡 Use this feature to add a layer of safety and clarity for end users.

<figure><img src="https://2472585788-files.gitbook.io/~/files/v0/b/gitbook-x-prod.appspot.com/o/spaces%2F-MFqFFf4143HS0_Wagnz%2Fuploads%2F8Pg9pDOFSF9kAdkb3d9W%2Fimage.png?alt=media&amp;token=39141073-8c2d-497f-aab9-4cfd33371881" alt=""><figcaption></figcaption></figure>

### Delete Task – Messaging Options

Fusion allows you to customize the messages displayed **during** and **after** the Delete Task is executed. This helps provide clarity to users and improves the runtime experience.

#### In-Flight Message

This message appears while the delete operation is running.

**Message Style Options:**

* **Default**\
  *“Deleting rows from the grid”*
* **Custom**\
  Write your own message (up to 50 characters).\
  Example: *“Deleting {0} patient entries”*

  > `{0}` will be replaced with the actual number of records being deleted.
* **No Message**\
  Fusion will display a fallback message such as: *“Deleting 'number of records' records”*

<div align="left"><figure><img src="https://2472585788-files.gitbook.io/~/files/v0/b/gitbook-x-prod.appspot.com/o/spaces%2F-MFqFFf4143HS0_Wagnz%2Fuploads%2FZ8VyLi6MrtfyjQ5sUH93%2FDelete%20Task%20-%20In%20Flight%20Message%20v2.gif?alt=media&amp;token=f80d3c38-f552-4dfc-bf48-f4dcf8f97f2d" alt=""><figcaption></figcaption></figure></div>

#### Skipped Summary Configurator

This message appears after the delete operation completes and summarizes any records that couldn’t be deleted.

**Message Style Options:**

* **Default**\
  *“records were skipped”*
* **Custom**\
  Example: *“Deleting {0} patient records were skipped”*
* **No Message**\
  Fusion will use a default fallback message.

<div align="left"><figure><img src="https://2472585788-files.gitbook.io/~/files/v0/b/gitbook-x-prod.appspot.com/o/spaces%2F-MFqFFf4143HS0_Wagnz%2Fuploads%2F6pbydVFdq1B0GcDKjPJM%2FDelete%20Task%20-%20Skip%20Summary%20Configurator.gif?alt=media&amp;token=bad61f0c-a606-42c5-a7ea-7bba44f5ad16" alt=""><figcaption></figcaption></figure></div>

#### Include Record Count

Enable the **Include record count** checkbox to show the total number of records in your message.

> 💡 Works for both **In-flight** and **Skip Summary** messages when using Default or Custom styles.

***

### Final Step – Save the Delete Task

After configuring all properties, don’t forget to **click Save** to activate the Delete Task.

> ⚠️ **Note:** The task must be saved for it to be available during runtime.

<figure><img src="https://2472585788-files.gitbook.io/~/files/v0/b/gitbook-x-prod.appspot.com/o/spaces%2F-MFqFFf4143HS0_Wagnz%2Fuploads%2FGhncVsZrvbcDV7piVsUw%2FDelete%20Task%20-%20Final%20Step.gif?alt=media&amp;token=d18815e8-77a4-4666-a88e-eabffe63735f" alt=""><figcaption></figcaption></figure>

***

## What’s Next?

After creating and saving your Add or Delete Task, **Designers must configure the task in the Workflow** to make it executable at runtime.

👉 Go to Workflow Configuration *(*[*Add/Delete Task Workflow*](/valorx-fusion/design-studio/workflow-and-ux/add-delete)*)*

> 💡 Tasks that are not added to a workflow will not run in the app.


# Document

The **Document Task** allows Designers to save the Valorx Fusion App as an Excel or PDF file directly to a Salesforce record, either under **Notes and Attachments** or **Files**.

## **Getting Started**

1. Click **Task** and select **Document**.
2. Choose **New Document Task**. A configuration window will open with four sections: **Location, File Format, Selection,** and **File Name**.

<figure><img src="https://2472585788-files.gitbook.io/~/files/v0/b/gitbook-x-prod.appspot.com/o/spaces%2F-MFqFFf4143HS0_Wagnz%2Fuploads%2Fw9DSpNkFMq0uZ3xIzGQ2%2FDocument%20Task.gif?alt=media&amp;token=9bcf25d6-179a-44a1-af03-099f1bcd2a1d" alt=""><figcaption></figcaption></figure>

## **Configuration Options**

**Location**\
Salesforce provides two storage options:

* **Files** – Saves the app file to Salesforce Files (recommended).
* **Notes and Attachments** – Saves to both Files and Notes & Attachments.

**File Format**\
Save the app in either **Excel (.xlsx)** or **PDF (.pdf)** format.

**Selection**\
Choose what content to save:

* **Entire Workbook** – Saves the whole workbook.
* **Custom Sheets** – Select specific sheets or portions of the workbook.

**File Name**\
Define how the file will be named in Salesforce. Options include:

* **App Name**
* **Custom Name**
* **Named Range**
* **Cell Reference**\
  You can also append a timestamp if needed.

<figure><img src="https://2472585788-files.gitbook.io/~/files/v0/b/gitbook-x-prod.appspot.com/o/spaces%2F-MFqFFf4143HS0_Wagnz%2Fuploads%2FyOhTCEkZPBNBKzP6OKz2%2FDocument%20Task%20-%20Configuration.gif?alt=media&amp;token=bbab511e-32fc-4abc-8d62-9f563007d924" alt=""><figcaption></figcaption></figure>


# Data Import

Data Import feature, an invaluable enhancement to our **Task** module. With Data Import, users gain seamless and efficient capabilities to import data from external sources directly into the app. This feature offers support for importing data in **CSV** or **Excel** formats, providing users with flexibility and convenience for tasks such as data migration or updating existing records.

To leverage the Data Import feature, users simply need to select the desired object and import the corresponding **CSV** or **Excel** file into the **Grid Map**. By mapping the fields between the external data source and the application, users can effortlessly import the data and automatically populate the relevant fields within the selected object.

* Open an App In Design Studio from Valorx Fusion and click on **Tasks**.
* Click **Data Import** and now select **New Data Import** task.

<figure><img src="https://2472585788-files.gitbook.io/~/files/v0/b/gitbook-x-prod.appspot.com/o/spaces%2F-MFqFFf4143HS0_Wagnz%2Fuploads%2FKcIKWNtTdRdXx8N9ue5U%2FFusion%20Docs%20Update%20as%20per%20V15%20-%2030.png?alt=media&amp;token=87f6ad04-da22-4dbb-b334-9c88dd8993ad" alt=""><figcaption></figcaption></figure>

* Select the **Name**, **Object**, and **Map** from the drop-down.
* Click **Add Condition Filter** and add any filters as per the requirement.
* Check in the **Add Condition Filters Logic** in case we need to add any logic filter.
* Click **Save**.

<figure><img src="https://2472585788-files.gitbook.io/~/files/v0/b/gitbook-x-prod.appspot.com/o/spaces%2F-MFqFFf4143HS0_Wagnz%2Fuploads%2Fjm40hm1kWo6pSXbWTIDl%2FData%20Import%201.png?alt=media&amp;token=8c20c1e1-04d1-4a12-a24f-ab935e44b848" alt=""><figcaption></figcaption></figure>

***Tip***: Enabling the "**Allow user to change Map in Runtime**" option will disable the condition filters and allow users to change the maps in runtime.

* To create a workflow, navigate to the Workflow and UX section.
* Save the application and execute it. Open the runtime file, and click on the button that was created in the workflow.

<figure><img src="https://2472585788-files.gitbook.io/~/files/v0/b/gitbook-x-prod.appspot.com/o/spaces%2F-MFqFFf4143HS0_Wagnz%2Fuploads%2FOfsK7l27msD8BTMaNHai%2FData%20Import%202.png?alt=media&amp;token=9dbd3df4-8940-4533-8d20-0a472e6819e3" alt=""><figcaption></figcaption></figure>

* To upload a file, either click on "**Select file here**" or simply drag and drop the file into the designated area.
* After selecting the file, click on "**Next**" to proceed.
* If the file contains headers in the first row, check the box labeled "**Sheet Contains Headers**".&#x20;

<div align="left"><figure><img src="https://2472585788-files.gitbook.io/~/files/v0/b/gitbook-x-prod.appspot.com/o/spaces%2F-MFqFFf4143HS0_Wagnz%2Fuploads%2FHFEHPMAbj0nK5q3T8Diw%2FData%20Import%203.png?alt=media&amp;token=037a913c-d49b-4f8c-9cea-77f2e8f19bf6" alt=""><figcaption></figcaption></figure></div>

* To save the mapping for future use, select the "Remember my mappings" option. This will store the mapping locally and make it available in the dropdown for future reference.
* To map the fields, either choose from the dropdown or modify the mapping by selecting "**Change**".
* Hover over the "Step contains import conditions" to view the added conditions for the import task.
* Once ready, proceed by clicking on "**Next**".

<figure><img src="https://2472585788-files.gitbook.io/~/files/v0/b/gitbook-x-prod.appspot.com/o/spaces%2F-MFqFFf4143HS0_Wagnz%2Fuploads%2F95G7qiZUO30JPfa1FqVR%2FData%20Import%204.png?alt=media&amp;token=9bd0cb0d-24fc-4b6a-a541-0f0eefab4536" alt=""><figcaption></figcaption></figure>

***Tip***: First-time users, it is necessary to map the columns with the fields in the imported file.

* After importing the file, a window will display a **Summary** of the imported data. To proceed, click on the "**Next**" button.
* Once you click "**Next**," the application will execute the import process for the data.

<figure><img src="https://2472585788-files.gitbook.io/~/files/v0/b/gitbook-x-prod.appspot.com/o/spaces%2F-MFqFFf4143HS0_Wagnz%2Fuploads%2Ff6tvpykhpxz5ly2oWGyy%2FData%20Import%205.png?alt=media&amp;token=9aa15b32-9854-4ba1-8a05-6ac0c16fadb6" alt=""><figcaption></figcaption></figure>


# Refresh Ribbon

{% hint style="warning" %}
This feature is deprecated from Fusion **V20.20** **onwards** and has been replaced by the [**Ribbon Section**](/valorx-fusion/design-studio/tasks/state-management#ribbon-section) in [**State Management Task**](/valorx-fusion/design-studio/tasks/state-management).&#x20;

For ribbon tasks created in **Fusion V20.10 and earlier**, the **Refresh Ribbon Task** can now be found in the **Ribbon Section of the State Management Task.**
{% endhint %}

**Refresh Ribbon** task will hide or disable those button which are not used when an app opens. It will display all the buttons which Designer defines on the Workflow either in group or single buttons.  Refresh Ribbon task will always refreshes the ribbon as per the instruction provided by the Designer.

To get started with creating a **Refresh Ribbon Task** open an **Excel** and click **Start** from **Valorx Fusion Ribbon**.

<div align="left"><img src="https://2472585788-files.gitbook.io/~/files/v0/b/gitbook-x-prod.appspot.com/o/spaces%2F-MFqFFf4143HS0_Wagnz%2Fuploads%2FY1Sr0XbxamKAUV8BSFL8%2FApp%20store.png?alt=media&amp;token=77ab2544-646e-41cb-897e-54fae110c593" alt="" width="563"></div>

Now, open an app from **Connections List** in **Design Studio**, and click on **Task** and select **New Refresh Ribbon Task**.

![](https://2472585788-files.gitbook.io/~/files/v0/b/gitbook-x-prod.appspot.com/o/spaces%2F-MFqFFf4143HS0_Wagnz%2Fuploads%2Fv5i7myn2SyxhgjlMJoyY%2FFusion%20Docs%20Update%20as%20per%20V15%20-%2032.png?alt=media\&token=8677b026-d40a-4ee7-8ced-f7fb2e37e8b2)

A **Refresh Ribbon** task bar will open where Designers can find all the runtime buttons of **Valorx Fusion**. Designers will have an option either to Hide or Show the buttons over the Valorx Fusion Ribbon. Designers can decide whether they want the button to be displayed in a group or individual button display.

![](https://2472585788-files.gitbook.io/~/files/v0/b/gitbook-x-prod.appspot.com/o/spaces%2F-MFqFFf4143HS0_Wagnz%2Fuploads%2FwD7vvM0HmP8ecnWcuudf%2FRefresh%201.png?alt=media\&token=20d1237c-1505-4b94-a593-07ee4b65ab28)

Designers also have an option called **Rule based** apart from than hide or show. Once ,we select Rule then we can see Define Rule where, Designers can Add the rules of their choice depending on the complexity of the app.

<div align="left"><img src="https://2472585788-files.gitbook.io/~/files/v0/b/gitbook-x-prod.appspot.com/o/spaces%2F-MFqFFf4143HS0_Wagnz%2Fuploads%2F0JKum187Awco6FdjGYYl%2FRefresh%203.png?alt=media&amp;token=3f038e2d-b9f1-4ca2-ba47-6d0634866bc4" alt=""></div>

Click **Define Rules** which opens "*Rules of : Refresh Ribbon Task*". Select **Add Rule** then, we can find different attributes to add the rules. Designers can even have an option which is called "*Add Rule Logic*".

![](https://2472585788-files.gitbook.io/~/files/v0/b/gitbook-x-prod.appspot.com/o/spaces%2F-MFqFFf4143HS0_Wagnz%2Fuploads%2Fr6i2cvDbRAkmUYNs1ZCt%2FRefresh%204.png?alt=media\&token=99b711ca-eb89-4dbc-8390-d4aced0b435b)

**Rule Type**: Rule type is nothing but, on which basis Designer want to define the rule. In this, we have few options like Excel Reference, Name Range Reference, Launch Mode, Save Results and Field Values.&#x20;

![](https://2472585788-files.gitbook.io/~/files/v0/b/gitbook-x-prod.appspot.com/o/spaces%2F-MFqFFf4143HS0_Wagnz%2Fuploads%2FSva8EPWiyQ2jElpGmF1g%2FRefresh%205.png?alt=media\&token=b9c39af8-bd86-4fc0-a205-cfc92194b2db)

**Data Intake Object**: This will indicate on which basis the data will take the input. It is based on the rule type and this will contain all the objects on the map.

**Field Name**: This will contain all the field names on the map.

**Operator**: Operator will contains drop-down through which will define the results based on the data intake.

**Value Type**: This field will contain the value from which the results needs to be defined like Excel Reference, Constant Value, Name Range Reference.

**Value**: Designer will provide a value in this field and this field is linked to operator. In case Designer provides Equals in Operator and provide Value as 5 hence, the results will be displayed which are equal to 5.

{% hint style="info" %}
Rules will be defined either on a single button or for a group we cannot define rules for a single button in a group.
{% endhint %}

**Workflow and UX**: Designers will define the buttons in Workflow. On this Workflow Designers will find Default Visibility by enabling this option we can see the buttons on the Valorx Ribbons. In case this is disabled we cannot find the buttons on the Ribbon.

![](https://2472585788-files.gitbook.io/~/files/v0/b/gitbook-x-prod.appspot.com/o/spaces%2F-MFqFFf4143HS0_Wagnz%2Fuploads%2F31pQCRINqaEiVU5Ylu7k%2FRefresh%206.png?alt=media\&token=99ab3e6e-e574-4b54-96da-81168822037b)


# Clear

The **Clear Task** allows you to remove records from a Map in Excel without deleting them from your CRM. The records will continue to exist in Salesforce.

Clear Task offers two modes: **Clear All** and **Clear Record ID**. The clear task support **Conditional Filters**, ensuring operations only run when filter conditions are met. This prevents unintended data clearing and gives Designers greater control.

## Getting Started

1. Click **Task** and select **New Clear Task**.
2. The **Clear Task** window will open, displaying the following options:
   * **Name**
   * **Map**
   * **Object Name**
   * **Mode**

<figure><img src="https://2472585788-files.gitbook.io/~/files/v0/b/gitbook-x-prod.appspot.com/o/spaces%2F-MFqFFf4143HS0_Wagnz%2Fuploads%2FT9Bpg1KAcKGbvRrSj9wE%2FClear%20Task.gif?alt=media&amp;token=066bafd9-5de5-4d97-aa48-5f1a26375fab" alt=""><figcaption></figcaption></figure>

## Modes

### **Clear All**

The **Clear All** mode removes all records from Excel and re-initializes the Map. Designers can enable the option **Ask for confirmation before clearing records** to avoid accidental deletions. Operations only proceed when **Conditional Filter** criteria are met.

<figure><img src="https://2472585788-files.gitbook.io/~/files/v0/b/gitbook-x-prod.appspot.com/o/spaces%2F-MFqFFf4143HS0_Wagnz%2Fuploads%2F98I7ge9s24JZcrQYMAp2%2FClear%20Task%20Clear%20All.gif?alt=media&amp;token=deb57b1f-0088-412b-9389-327801711491" alt=""><figcaption></figcaption></figure>

### **Clear Record ID**

The **Clear Record ID** mode keeps records in Excel but removes their association with your CRM. When saved, these records are processed as **new records** in your CRM. Operations only proceed when **Conditional Filter** criteria are met.

<figure><img src="https://2472585788-files.gitbook.io/~/files/v0/b/gitbook-x-prod.appspot.com/o/spaces%2F-MFqFFf4143HS0_Wagnz%2Fuploads%2FbKKYCQfI1i9iRJpTvkhV%2FClear%20Task%20Clear%20Record%20ID.gif?alt=media&amp;token=42454211-296d-46cd-bdb4-a4956920efac" alt=""><figcaption></figcaption></figure>


# Launch CRM

Valorx Fusion will provide the end users with an option to open the data from **CRM** and this option is known as **Launch CRM**. It will be useful to Users with huge data and want to check the record from **CRM**. Designers when they want to configure data from **Excel** to **CRM** then, **Launch CRM** task will be used.

To get started with creating a **Launch CRM Task** open an **Excel** and click **Start** from **Valorx Fusion Ribbon**.

<div align="left"><img src="https://2472585788-files.gitbook.io/~/files/v0/b/gitbook-x-prod.appspot.com/o/spaces%2F-MFqFFf4143HS0_Wagnz%2Fuploads%2FY1Sr0XbxamKAUV8BSFL8%2FApp%20store.png?alt=media&amp;token=77ab2544-646e-41cb-897e-54fae110c593" alt="" width="563"></div>

Now, open an app from **Connections List** in **Design Studio**, and click on **Task** and select **New Launch CRM Task**.

![](https://2472585788-files.gitbook.io/~/files/v0/b/gitbook-x-prod.appspot.com/o/spaces%2F-MFqFFf4143HS0_Wagnz%2Fuploads%2FabPMhANArSiQxBy8raeK%2FFusion%20Docs%20Update%20as%20per%20V15%20-%2033.png?alt=media\&token=2d71b1ec-4a01-4191-912a-e48db66f84bf)

Now a Task bar will open which will have Name, Type of Task, URL Configuration and Custom Message.

<div align="left"><img src="https://2472585788-files.gitbook.io/~/files/v0/b/gitbook-x-prod.appspot.com/o/spaces%2F-MFqFFf4143HS0_Wagnz%2Fuploads%2FLVesCuB9CEypY68CiLee%2FLaunch%20CRM%201.png?alt=media&amp;token=2ae03591-0cd9-40d1-9e7e-a34329d6ad9f" alt="" width="563"></div>

**User Focus**: This will launch the **C**RM records based upon the Users selection on a grid.

**Custom**: This launches **CRM** records based on the custom configuration.

**Standard**: Standard in URL Configuration is very simple and Users need not to provide any URL or define any URL.

**Custom**: Designers needs to provide the URL and Custom the URL&#x20;

Follow the below steps for **Launch CRM** using **User Focus** and **Standard** URL Configuration.

* Provide the name of the task under **Name**.
* Select the **Maps** which will be displayed on the "Maps" Section.&#x20;
* Select **User Focus** and now select "Standard" from **URL Configuration**.
* Check in the message box if needed or uncheck as per the requirement.
* Click **Save**.
* Create a button on the **Workflow and UX**, and then Save and Run the app.
* Select one record and click the button which was created. Once, we click on the button it will open the record from **Salesforce**.

<div align="left"><img src="https://2472585788-files.gitbook.io/~/files/v0/b/gitbook-x-prod.appspot.com/o/spaces%2F-MFqFFf4143HS0_Wagnz%2Fuploads%2FY3JnBhTIYP152JdF2k6K%2FLaunch%20CRM%202.png?alt=media&amp;token=e5af026c-564c-4fd0-8cfb-72e0d1897779" alt="" width="563"></div>

Follow the below steps for **Launch CRM** using **User Focus** and **Standard** URL Configuration.

* Provide the name of the task under **Name**.
* Select **Custom** and now select "Custom" from **URL Configuration**.
* Select Form Map, Cell Reference or Name Range Reference as per the requirement.
* Click **Save**.
* Create a button on the **Workflow and UX**, and then Save and Run the app.
* Click the button which was created. Once, we click on the button it opens the record from **Salesforce**.

<div align="left"><img src="https://2472585788-files.gitbook.io/~/files/v0/b/gitbook-x-prod.appspot.com/o/spaces%2F-MFqFFf4143HS0_Wagnz%2Fuploads%2FHkC70J2VNAAa9XFsNvtN%2FLaunch%20CRM%203.png?alt=media&amp;token=2fa2d176-d124-41cb-b74d-37e8f3831362" alt="" width="563"></div>


# Refresh Map

Refresh Map as the name suggests it will refreshes the map as per the requirement of the Designer and according to the instructions provided.

To get started with creating a Launch CRM Task open an **Excel** and click **Start** from **Valorx Fusion Ribbon**.

<div align="left"><img src="https://2472585788-files.gitbook.io/~/files/v0/b/gitbook-x-prod.appspot.com/o/spaces%2F-MFqFFf4143HS0_Wagnz%2Fuploads%2FY1Sr0XbxamKAUV8BSFL8%2FApp%20store.png?alt=media&amp;token=77ab2544-646e-41cb-897e-54fae110c593" alt="" width="563"></div>

Now, open an app from **Connections List** in **Design Studio**, and click on **Task** and select **New Refresh Map Task.**

![](https://2472585788-files.gitbook.io/~/files/v0/b/gitbook-x-prod.appspot.com/o/spaces%2F-MFqFFf4143HS0_Wagnz%2Fuploads%2Fq5VSCZIyXHjniPCVPXR1%2FFusion%20Docs%20Update%20as%20per%20V15%20-%2034.png?alt=media\&token=b4b66330-9c45-4f83-8b29-ed3b01eab092)

Refresh Map Task window will open which will contain the Name, Map, Object Name of Map, Options and Search.

![](https://2472585788-files.gitbook.io/~/files/v0/b/gitbook-x-prod.appspot.com/o/spaces%2F-MFqFFf4143HS0_Wagnz%2Fuploads%2FJJPLqDlae6lrCnBKQHrq%2FRefresh%20Map%201.png?alt=media\&token=641922e8-b47f-4efc-8be3-f485f889907d)

* Select the **Map** which needs to be refreshed in **Runtime** according to which the Name and Object Name on Map will change.
* Select the option either **Refresh entire map** or **Clear Transaction Status**.
* Check in the confirmation "*Ask for confirmation before removing unsaved records*".
* Click **Save**.


# Add Field

The Add Field task enables the users to **add a field(s) in the sheet while executing any App in the runtime mode**.

> You can access it from the **Add Field** tab in the **Tasks** menu. By clicking the 'New Add Field Task' button, the Add Filed Task screen appears as shown in the image below:

<figure><img src="https://2472585788-files.gitbook.io/~/files/v0/b/gitbook-x-prod.appspot.com/o/spaces%2F-MFqFFf4143HS0_Wagnz%2Fuploads%2FIeFILuTO9ZXmNpZrHOwt%2FRelease%20Notes%20Fusion%20V15%20-%201.png?alt=media&amp;token=539b737e-11c3-4e5d-860e-11c609c61d5a" alt=""><figcaption><p>Add Field Task</p></figcaption></figure>

You can select the desired configuration for adding a field(s) using the options described as follows:

> 1. Selecting the desired map upon which the field is to be added.
> 2. Field Type: Fields List or Spacer (blank) Field.
> 3. Start Location where the field has to be added.
> 4. Map Field Type: Display Only or Display And Save
> 5. Value type: Static, Cell Reference and Named Range
> 6. Add Value: Input field values

Once the Add Field Task has been created, you can create a **workflow** and use it to add field(s) in the runtime mode.&#x20;


# Dynamic API

Dynamic API brings Postman-style API configuration directly into Fusion workflows. It lets you configure API endpoints, authentication, parameters, headers, and request bodies in Design Studio, while dynamically binding values from Excel cells, named ranges, workflow Data Intakes, Maps, and API Variables.

At runtime, Fusion resolves these values using the current workbook and workflow data, sends the API request, and stores the response in Excel or an API Variable for use in subsequent tasks. This lets you integrate with external APIs and build dynamic workflows without writing custom code.

You can access it from the **Dynamic API** tab in the **Tasks** menu. By clicking the 'New Dynamic API Task' button, the Dynamic API Task screen appears as shown in the image below:

<figure><img src="https://2472585788-files.gitbook.io/~/files/v0/b/gitbook-x-prod.appspot.com/o/spaces%2F-MFqFFf4143HS0_Wagnz%2Fuploads%2F2wSunhJbamDERE3axceF%2FDynamic%20API%20Access.gif?alt=media&amp;token=b6ab7072-068f-4c06-9c3f-914619bae713" alt=""><figcaption><p>Access Dynamic API Task</p></figcaption></figure>

***

## Creating a Dynamic API task

To create a new task, click **New Dynamic API Task**, then work through the following steps.

{% stepper %}
{% step %}

#### Name The Dynamic API Task.&#x20;

Give it a clear, unique name in the Task Name field at the top of the window.

<figure><img src="https://2472585788-files.gitbook.io/~/files/v0/b/gitbook-x-prod.appspot.com/o/spaces%2F-MFqFFf4143HS0_Wagnz%2Fuploads%2FpMW7q3N9qzl4sDeGPNp2%2FAdd%20Task%20Name.gif?alt=media&amp;token=2a59cefe-2549-456e-9b0d-1580a4c65ebe" alt=""><figcaption><p>Enter Task Name</p></figcaption></figure>
{% endstep %}

{% step %}

#### Choose The Method

Choose the HTTP method: **GET**, **POST**, **PUT**, **PATCH**, or **DELETE** based on what the external system expects. Then, enter the web address (URL) of the external system.

* *For more information, see* [*Method and URL*](#method-and-url)*.*

<figure><img src="https://2472585788-files.gitbook.io/~/files/v0/b/gitbook-x-prod.appspot.com/o/spaces%2F-MFqFFf4143HS0_Wagnz%2Fuploads%2FHhB11dbSMcPPZmPhtuAU%2FSet%20The%20Method.gif?alt=media&amp;token=9761d8d5-0dc9-4ccb-bd1c-eeb340fec854" alt=""><figcaption><p>Choose The Method</p></figcaption></figure>
{% endstep %}

{% step %}

#### **Configure The Request Tabs.**&#x20;

Work through **Params, Authorization, Headers, Body,** and **Settings** as needed for your API.\
*For more information, see* [*Params*](#params)*,* [*Authorization*](#authorization)*,* [*Headers*](#headers)*,* [*Body*](#body)*, and* [*Settings*](#settings)*.*

<figure><img src="https://2472585788-files.gitbook.io/~/files/v0/b/gitbook-x-prod.appspot.com/o/spaces%2F-MFqFFf4143HS0_Wagnz%2Fuploads%2Fxas4UrtAtt8SlqdrmfEE%2Fimage.png?alt=media&amp;token=080c6a5f-dce6-439d-818d-6e017421ff93" alt=""><figcaption><p>Request Tabs</p></figcaption></figure>
{% endstep %}

{% step %}

#### Configure The Response.&#x20;

Click **Next** to choose where the response should be saved and, optionally, which fields to keep.\
*For more information, see* [*Response Configuration*](#response-configuration)*.*

<figure><img src="https://2472585788-files.gitbook.io/~/files/v0/b/gitbook-x-prod.appspot.com/o/spaces%2F-MFqFFf4143HS0_Wagnz%2Fuploads%2FvXzQWeN7T3re5m5XkB7j%2Fimage.png?alt=media&amp;token=ad6ea99a-dcd1-43f2-9cac-40278564f0d6" alt=""><figcaption><p>Response Configuration</p></figcaption></figure>
{% endstep %}

{% step %}

#### Save

Once you've configured the request, click **Save**. The task appears in the Dynamic API task list and is ready to be added to a workflow.

<figure><img src="https://2472585788-files.gitbook.io/~/files/v0/b/gitbook-x-prod.appspot.com/o/spaces%2F-MFqFFf4143HS0_Wagnz%2Fuploads%2FZvFVV7w5fzu5b4ftTkuy%2FSave%20Dynamic%20API%20Task.gif?alt=media&amp;token=e831b884-f656-43fd-b530-424482f1dc9c" alt=""><figcaption><p>Save</p></figcaption></figure>
{% endstep %}
{% endstepper %}

***

## The Task Window

<figure><img src="https://2472585788-files.gitbook.io/~/files/v0/b/gitbook-x-prod.appspot.com/o/spaces%2F-MFqFFf4143HS0_Wagnz%2Fuploads%2FYqztXEegfSG4vjHjaBD9%2Fimage.png?alt=media&amp;token=c1d3346d-98c2-43dc-a266-e96c3c86f1d1" alt=""><figcaption><p>Dynamic API Window</p></figcaption></figure>

<table><thead><tr><th width="119" valign="middle">Control</th><th valign="bottom">What it does</th></tr></thead><tbody><tr><td valign="middle"><strong>Variables</strong></td><td valign="bottom">Opens the API Variables panel. The number shown is how many variables your app has. See “Using API Variables”.</td></tr><tr><td valign="middle"><strong>✕ / Cancel</strong></td><td valign="bottom">Closes the task without saving. If you have unsaved changes, you’ll be asked to confirm.</td></tr><tr><td valign="middle"><strong>Next</strong></td><td valign="bottom">Checks your request and moves to the response screen.</td></tr><tr><td valign="middle"><strong>Back</strong></td><td valign="bottom">Returns from the response screen to the request tabs.</td></tr><tr><td valign="middle"><strong>Save</strong></td><td valign="bottom">Checks everything and saves the task into your app.</td></tr></tbody></table>

***

## Method and URL

<figure><img src="https://2472585788-files.gitbook.io/~/files/v0/b/gitbook-x-prod.appspot.com/o/spaces%2F-MFqFFf4143HS0_Wagnz%2Fuploads%2FOPEVgJCamllSwqylxNOG%2FSet%20Up%20Request%20Parameter.gif?alt=media&amp;token=8095f294-1987-4727-9230-ab5b76b608f1" alt=""><figcaption><p>Set Up Request Parameters</p></figcaption></figure>

Type the address into the URL field. As you add parameters on the **Params** tab, they appear after the URL as a live preview, so you can see the whole address at a glance.

* Pasting a full URL that already has a query string works too, Fusion splits it automatically into the address and individual Params rows.
* Don’t type a “?” yourself. Query parameters belong on the Params tab so their values can stay dynamic.
* HTTPS only. A plain “http\://” address, or one with a username/password baked in, isn’t accepted.

The address plus its query string needs to stay under 2,048 characters

### Where Values Come From

Almost every value you enter, a parameter, a header, a field in the body, a password, has a Source next to it. This decides whether the value is fixed or read fresh every time the task runs.

<figure><img src="https://2472585788-files.gitbook.io/~/files/v0/b/gitbook-x-prod.appspot.com/o/spaces%2F-MFqFFf4143HS0_Wagnz%2Fuploads%2Fet9VZHsYhCUsozcfsKGh%2FParams%20Fields.gif?alt=media&amp;token=3db8289c-0647-41f9-8164-571de937935d" alt=""><figcaption></figcaption></figure>

<table><thead><tr><th width="124.22222900390625" valign="middle">Source</th><th width="174.4444580078125" valign="middle">You pick</th><th valign="middle">At run time</th></tr></thead><tbody><tr><td valign="middle">Constant</td><td valign="middle">Type the value in</td><td valign="middle">Sent exactly as typed, every run.</td></tr><tr><td valign="middle">Cell</td><td valign="middle">A worksheet cell</td><td valign="middle">Read live from that cell each time.</td></tr><tr><td valign="middle">Range</td><td valign="middle">A named range</td><td valign="middle">Read live, one value or several if the field allows a list.</td></tr><tr><td valign="middle">Field</td><td valign="middle">An object and one of its fields</td><td valign="middle">Read from a dataset the workflow supplies. You’ll choose which dataset when you add the task to a workflow.</td></tr><tr><td valign="middle">API Variable</td><td valign="middle">A saved variable, or one field inside it</td><td valign="middle">Read from the value stored by an earlier task or sign-in.</td></tr></tbody></table>

When you select **Field** as the source, Fusion retrieves the value from the results of a query task elsewhere in your [workflow](/valorx-fusion/design-studio/workflow-and-ux/dynamic-api). For example, you can use a specific field from an **Account** or **Opportunity** record. Because the query results are available only when the workflow runs, you must specify which query result the field should come from. Configure this on the [workflow](/valorx-fusion/design-studio/workflow-and-ux/dynamic-api) screen.

***

## Params

A grid of query parameters, one row per parameter. Add a row with the + icon; remove one with the bin icon.

<figure><img src="https://2472585788-files.gitbook.io/~/files/v0/b/gitbook-x-prod.appspot.com/o/spaces%2F-MFqFFf4143HS0_Wagnz%2Fuploads%2Fvsus8VDxGKhjm4AMgJYS%2FParam.gif?alt=media&amp;token=9dcd4091-bacb-456e-a242-2a197391e4af" alt=""><figcaption></figcaption></figure>

<table data-search="false"><thead><tr><th width="169" valign="bottom">Column</th><th valign="bottom">Notes</th></tr></thead><tbody><tr><td valign="bottom">Checkbox</td><td valign="bottom">Untick to leave a row out of the request without deleting it.</td></tr><tr><td valign="bottom">Key</td><td valign="bottom">The parameter name.</td></tr><tr><td valign="bottom">Source</td><td valign="bottom">Constant, Cell, Range, Field, or API Variable.</td></tr><tr><td valign="bottom">Value</td><td valign="bottom">Changes to match the source you picked.</td></tr><tr><td valign="bottom">Description</td><td valign="bottom">Your own notes. Never sent.</td></tr></tbody></table>

***

## Authorization

Choose the authorization type required by the external system. Dynamic API supports the following authorization:

* **None -** Executes the API request without authentication. Use this option when the external API does not require you to sign in or provide credentials.
* **Basic Authentication -** Authenticates using a username and password. Enter the credentials required by the external API.
* **Bearer Token -** Sends an access token with the API request. Enter the token provided by the external API.
* **API Key -** Authenticates using an API key provided by the target API. Depending on the API, the key may be sent in the request headers or as part of the URL.
* **OAuth 2.0 -** Supports token-based authorization for APIs that use OAuth 2.0. Depending on the API, you may need to sign in through a secure authentication window to authorize access.

<figure><img src="https://2472585788-files.gitbook.io/~/files/v0/b/gitbook-x-prod.appspot.com/o/spaces%2F-MFqFFf4143HS0_Wagnz%2Fuploads%2FS6bqhwckRIlcnDI84WWj%2FSet%20Up%20Authorization.gif?alt=media&amp;token=fd9568bb-ceba-4135-b764-7c6827fd4ca8" alt=""><figcaption><p>Set Up Authorization</p></figcaption></figure>

### OAuth 2.0

OAuth is set up once as a named token and then reused across tasks. Give the token a name and choose whether it should be Persistent (saved for future sessions) or Session (cleared when Excel closes), then pick a grant type:

<figure><img src="https://2472585788-files.gitbook.io/~/files/v0/b/gitbook-x-prod.appspot.com/o/spaces%2F-MFqFFf4143HS0_Wagnz%2Fuploads%2F05oO5BDKszk2YOKRzh4W%2FOAuth%202.0.png?alt=media&amp;token=d5525569-d86c-43d2-9f3b-8d7fb8e33e56" alt=""><figcaption><p>OAuth 2.0</p></figcaption></figure>

<table><thead><tr><th width="175.3333740234375" valign="middle">Grant type</th><th width="411.888916015625" valign="middle">Required fields</th><th width="158.5555419921875" valign="middle">Sign-in</th></tr></thead><tbody><tr><td valign="middle">Client Credentials</td><td valign="middle">Access Token URL, Client ID, Client Secret</td><td valign="middle">Silent</td></tr><tr><td valign="middle">Password Credentials</td><td valign="middle">Access Token URL, Client ID, Client Secret, Username, Password</td><td valign="middle">Silent</td></tr><tr><td valign="middle">Authorization Code</td><td valign="middle">Callback URL, Auth URL, Access Token URL, Client ID, Client Secret</td><td valign="middle">Browser window</td></tr><tr><td valign="middle">Authorization Code (With PKCE)</td><td valign="middle">Same as above, plus Code Challenge Method and Code Verifier</td><td valign="middle">Browser window</td></tr><tr><td valign="middle">None</td><td valign="middle">No fields, for providers that don’t need a token exchange</td><td valign="middle">—</td></tr></tbody></table>

At execution, Fusion uses an explicitly configured token first. If no token is configured, it uses the selected **Authentication** variable. If the token has expired and refresh is enabled, Fusion attempts to refresh it. If the refresh fails, Fusion acquires a new token. For **Authorization Code** and **PKCE**, this may open the sign-in window.

Once created, the token is saved as an API Variable, so other tasks in the app can reuse it instead of signing in again.

***

## Headers

A grid of request headers, in the same style as Params, but with an extra Data Type column since header values are often typed more strictly by the receiving system.

Alongside the source, you’ll also set a **Data Type** (String, Number, Boolean, Object, or Null). This is what keeps the outgoing request correctly formatted rather than treating everything as plain text.

<figure><img src="https://2472585788-files.gitbook.io/~/files/v0/b/gitbook-x-prod.appspot.com/o/spaces%2F-MFqFFf4143HS0_Wagnz%2Fuploads%2FSmlzX0LboHZgaqk8L5QN%2FSet%20Up%20Headers.gif?alt=media&amp;token=970edfbc-82d0-4a1a-969a-9c57a67779ee" alt=""><figcaption><p>Add Headers</p></figcaption></figure>

<table data-header-hidden data-search="false"><thead><tr><th width="151.22216796875" valign="bottom"></th><th valign="bottom"></th></tr></thead><tbody><tr><td valign="bottom">Key</td><td valign="bottom">The header name.</td></tr><tr><td valign="bottom">Source</td><td valign="bottom">Constant, Cell, Range, Field, or API Variable.</td></tr><tr><td valign="bottom">Value</td><td valign="bottom">Changes to match the source you picked.</td></tr><tr><td valign="bottom">Data Type</td><td valign="bottom">String, Number, Boolean, Object, or Null.</td></tr><tr><td valign="bottom">Description</td><td valign="bottom">Your own notes. Never sent.</td></tr><tr><td valign="bottom">Checkbox</td><td valign="bottom">Untick to leave a row out of the request without deleting it.</td></tr></tbody></table>

Setting a Content-Type header here overrides the default used for a JSON body.

***

## Body

Choose how the request body is built on the left of the Body tab.

<table><thead><tr><th width="115.3333740234375" valign="middle">Mode</th><th valign="middle">What you get</th><th valign="middle">Reach for it when</th></tr></thead><tbody><tr><td valign="middle">None</td><td valign="middle">No body sent</td><td valign="middle">GET and DELETE calls</td></tr><tr><td valign="middle">Form Data</td><td valign="middle">A key/value grid, sent as multipart form data</td><td valign="middle">The API expects an HTML-form style upload</td></tr><tr><td valign="middle">URL Encoded</td><td valign="middle">A key/value grid, sent as an encoded form</td><td valign="middle">Older endpoints expecting application/x-www-form-urlencoded</td></tr><tr><td valign="middle">JSON</td><td valign="middle">A structured payload you build field by field, in either a Tree or Editor view</td><td valign="middle">Most modern APIs, this is the most flexible option</td></tr><tr><td valign="middle">Reference</td><td valign="middle">The whole payload comes from a Cell, Range, or API Variable you point at</td><td valign="middle">The JSON is already built somewhere else, like an earlier task’s response</td></tr></tbody></table>

<figure><img src="https://2472585788-files.gitbook.io/~/files/v0/b/gitbook-x-prod.appspot.com/o/spaces%2F-MFqFFf4143HS0_Wagnz%2Fuploads%2FbdZ1c9myGXE5ORX9oSia%2FBody%20New.gif?alt=media&amp;token=9fb8a6c7-7f7e-41b7-8565-22b22f419843" alt=""><figcaption><p>Build the Request Body</p></figcaption></figure>

### Building a JSON Body

A JSON body isn’t just typed text, it’s built as a structure of fields, each with its own name, type, and source. There are two ways to work on it:

* **Editor view** shows the same body as JSON text. It’s the fastest way to get a shape in: paste a sample request from the API’s documentation, then switch to Tree to wire individual fields up to cells or datasets.<br>

  <figure><img src="https://2472585788-files.gitbook.io/~/files/v0/b/gitbook-x-prod.appspot.com/o/spaces%2F-MFqFFf4143HS0_Wagnz%2Fuploads%2F2gcS1E5JGaWxbatHqOou%2Fimage.png?alt=media&amp;token=43723ed2-18e4-44ac-8e24-e0107764cb52" alt=""><figcaption><p>JSON (Editor)</p></figcaption></figure>
* **Tree view** is where you set sources, types, and build repeating sections (for example, one line item per row of a dataset).<br>

  <figure><img src="https://2472585788-files.gitbook.io/~/files/v0/b/gitbook-x-prod.appspot.com/o/spaces%2F-MFqFFf4143HS0_Wagnz%2Fuploads%2FpnfnRE3t9jHpeIubk3uO%2Fimage.png?alt=media&amp;token=a11a5f06-2e09-4bb7-aed9-74e0e78ea297" alt=""><figcaption><p>JSON (Tree View)</p></figcaption></figure>

A reliable way to build a body:

1. In Editor, paste a sample request (two or three example rows if it includes a repeating list).
2. Switch to Tree and confirm the types and array settings look right.
3. Set the Source on each field that should come from your workbook.
4. Switch back to Editor for a final check, live fields show as placeholders so you can see exactly what will be sent.

### Reference mode

Skip building the body field by field and point at where the finished payload already lives:

<figure><img src="https://2472585788-files.gitbook.io/~/files/v0/b/gitbook-x-prod.appspot.com/o/spaces%2F-MFqFFf4143HS0_Wagnz%2Fuploads%2FTjhCUAdID6RA6H2iX1fJ%2FReference%20Mode.gif?alt=media&amp;token=dfb047a0-e1f3-4ba9-b975-31a8a4b5a9f7" alt=""><figcaption><p>Reference Mode</p></figcaption></figure>

<table><thead><tr><th width="160.111083984375" valign="bottom">Source</th><th valign="bottom">What will be sent</th></tr></thead><tbody><tr><td valign="bottom">Cell</td><td valign="bottom">The text in that one cell, read fresh each run.</td></tr><tr><td valign="bottom">Range</td><td valign="bottom">The text the named range resolves to.</td></tr><tr><td valign="bottom">API Variable</td><td valign="bottom">Whatever the variable currently holds.</td></tr></tbody></table>

The value has to be valid JSON (an object or array, not a single number or word) or the step will fail with a message telling you which cell, range, or variable to check. If your payload could be very long, use an API Variable rather than a single cell, since a worksheet cell can only hold up to 32,767 characters.

***

## Settings

Configure additional options that control how the task behaves.

<figure><img src="https://2472585788-files.gitbook.io/~/files/v0/b/gitbook-x-prod.appspot.com/o/spaces%2F-MFqFFf4143HS0_Wagnz%2Fuploads%2F6jxHY7QwBuZzZHVo3WKO%2FSettings%20New.gif?alt=media&amp;token=69e0212d-82d4-4202-9d21-131cab1505f1" alt=""><figcaption><p>Configure Settings</p></figcaption></figure>

<table><thead><tr><th width="163.11102294921875" valign="middle">Setting</th><th width="137" valign="middle">Options</th><th valign="middle">What it controls</th></tr></thead><tbody><tr><td valign="middle">Type mismatch handling for referenced values</td><td valign="middle">Runtime Error / Use Null</td><td valign="middle">What happens when a cell, range, or field value doesn’t match the data type you declared, fail the run, or send a blank value and carry on.</td></tr><tr><td valign="middle">Fetch access token using refresh token</td><td valign="middle">Yes / No</td><td valign="middle">Whether an expired sign-in is renewed automatically in the background before asking anyone to sign in again.</td></tr><tr><td valign="middle">Always prompt for authentication</td><td valign="middle">Yes / No</td><td valign="middle">Off by default, the task reuses a saved sign-in. Turn on to require fresh credentials every run.</td></tr><tr><td valign="middle">Maximum number of redirects</td><td valign="middle">A number</td><td valign="middle">How many redirects the request will follow before giving up.</td></tr></tbody></table>

***

## Response Configuration

Clicking Next takes you to Response Configuration, where you choose where the response should be saved.

* **Cell** - A specific worksheet cell.
* **Range** - A named range.
* **API Variable** - A saved variable, so a later task can read the answer. You can create one right here.

<figure><img src="https://2472585788-files.gitbook.io/~/files/v0/b/gitbook-x-prod.appspot.com/o/spaces%2F-MFqFFf4143HS0_Wagnz%2Fuploads%2FbngnnEKrzVpIq4mgHyfD%2FConfigure%20Response%20v2.gif?alt=media&amp;token=2d619608-6fc8-42c4-a9c3-86dead37cce1" alt=""><figcaption><p>Response Configuration</p></figcaption></figure>

By default, the whole response is written to your chosen destination. If you only want specific fields, define a Response Schema using the same Editor/Tree approach as the request body, paste a sample response to get the shape, then trim it down to just what you need.

***

## Using API Variables

An **API Variable** is a named holder for a value that can be reused across Dynamic API tasks. You can use API Variables to store values such as authentication tokens, IDs returned by one API call and used by another, or a base URL that you want to define in one place.

API Variables belong to the app rather than to a single task, allowing multiple tasks to use the same value.

<figure><img src="https://2472585788-files.gitbook.io/~/files/v0/b/gitbook-x-prod.appspot.com/o/spaces%2F-MFqFFf4143HS0_Wagnz%2Fuploads%2FixJnvr33BXoMlixfeCrA%2FSet%20API%20Variables.gif?alt=media&amp;token=26bbbd5b-6281-475f-92d5-fc9a748bee77" alt=""><figcaption><p>Configure API Variables</p></figcaption></figure>

To configure an API Variable, click **Variables** at the top of the task editor. When creating a variable, configure the following:

* **Shape** - Determines the type of data the variable stores:
  * **Scalar** - Stores a single value, such as text, a number, or a country code.
  * **JSON** - Stores structured data, such as the response returned by an API.
* **Scope** - Determines how long the variable remains available:
  * **Persistent** - Keeps the value available across sessions.
  * **Session** - Keeps the value available only for the current session and clears it when Excel closes.
* **Populated by** - Determines how the variable gets its value:
  * **Constant** - A value that you enter manually.
  * **Response** - Data returned by an API call.

A variable that’s currently being used elsewhere in your app is protected, editing it may be limited to just its name and scope, and deleting it is blocked until it’s no longer in use.

#### Using a variable

Anywhere you see a Source, choose API Variable. Scalar variables appear as single entries; JSON variables expand so you can pick a field inside them. The picker only offers variables that fit the field you’re filling.

#### Filling a variable

Values arrive two ways: you typed them in as a Constant, or a run wrote them via a task’s Response Configuration. A value written by one task is visible to the next task in the same run.

#### Scope and lifetime

<table><thead><tr><th width="115.3333740234375" valign="middle">Scope</th><th valign="middle">Lives for</th><th valign="middle">Choose it when</th></tr></thead><tbody><tr><td valign="middle">Persistent</td><td valign="middle">Across Excel restarts, encrypted on your own machine.</td><td valign="middle">You don’t want to sign in every morning.</td></tr><tr><td valign="middle">Session</td><td valign="middle">Only while Excel is open, never written to disk.</td><td valign="middle">Your organization’s policy forbids credentials at rest.</td></tr></tbody></table>

***

## What’s Next?

After creating and saving your Dynamic API Task, **Designers must configure the task in the Workflow** to make it executable at runtime.

👉 Go to Workflow Configuration *(*[*Dynamic API*](/valorx-fusion/design-studio/workflow-and-ux/dynamic-api)*)*

> 💡 Tasks that are not added to a workflow will not run in the app.


# State Management

**State Management** enables designers to control the dynamic visibility and locking behavior of their app at runtime. Rules can be defined for three distinct areas of the app: the **Ribbon**, **Sheets**, and **Maps** (grids and form maps).

> You can access it from the **State Management** tab in the **Tasks** menu. By clicking the 'New State Management Task' button, the State Management Task screen appears as shown in the image below:

<figure><img src="https://2472585788-files.gitbook.io/~/files/v0/b/gitbook-x-prod.appspot.com/o/spaces%2F-MFqFFf4143HS0_Wagnz%2Fuploads%2FExsraiSWegM9DJbC59Mw%2FState%20Management.gif?alt=media&amp;token=28f6c0ee-75d9-4d3e-aabc-9c4cd052eb49" alt=""><figcaption><p>Access State Management Task</p></figcaption></figure>

{% hint style="warning" %}
At least one rule must be created before the task can be saved.
{% endhint %}

***

## Ribbon Section

{% hint style="info" %}
For ribbon tasks created in **Fusion V20.10 and earlier**, the **Refresh Ribbon Task** can now be found in this **Ribbon Section of the State Management Task**
{% endhint %}

Ribbon Rules allow designers to control which buttons and button groups are shown or hidden in the app ribbon at runtime. Rules can be applied without any conditions (always apply) or based on defined When-Then conditions.

#### How to add a Ribbon rule:

1. Enter a Task Name
2. Select the Ribbon Section tab.
3. Click "+ Add Rule". A "RULE OF : RIBBON SECTION" pop-up opens.
4. Enter a Rule Name.
5. Configure the When (condition) and Then (action) as needed.
6. Click Save to apply the rule.

**Note**: The When (condition) block is optional. If left empty, the action defined in the Then block will always apply at runtime regardless of any data or user state. If conditions are added, the action only\
applies when those conditions are met.

<figure><img src="https://2472585788-files.gitbook.io/~/files/v0/b/gitbook-x-prod.appspot.com/o/spaces%2F-MFqFFf4143HS0_Wagnz%2Fuploads%2F718MbH2xmeUvalWG2xCZ%2FRibbon%20Rule.gif?alt=media&amp;token=eb5ee03c-7889-4012-8b6b-978d211ad4ae" alt=""><figcaption><p>Ribbon Section</p></figcaption></figure>

#### Ribbon Rule Configuration

**When (Condition) — Optional**

* Uses the same condition builder as existing Fusion Rules.
* Supports multiple conditions. Conditions can be added, edited, or removed.
* If left empty, the Then action always applies at runtime

**Then (Action)**

* Select one or more Buttons or Button Groups from the dropdown.
* Choose the action from the following options:

<table><thead><tr><th width="138.44439697265625">Options</th><th>Description</th></tr></thead><tbody><tr><td>Rule Based</td><td>The button/group visibility is controlled by the When condition defined above.</td></tr><tr><td>Show</td><td>The selected button/group is always shown.</td></tr><tr><td>Hide</td><td>The selected button/group is always hidden.</td></tr></tbody></table>

## Sheet Section

Sheet Rules allow designers to control the visibility of individual sheets within the app at runtime. Each sheet can be set to always show, always hide, or show/hide based on defined conditions.

#### How to add a Sheet rule:

1. Enter a Task Name
2. Select the Sheet Section tab.
3. Click "+ Add Rule",  "RULE OF : SHEET SECTION" pop-up opens.
4. Enter a Rule Name.
5. Configure the When (condition) and Then (action) as needed.
6. Click Save to apply the rule.

<figure><img src="https://2472585788-files.gitbook.io/~/files/v0/b/gitbook-x-prod.appspot.com/o/spaces%2F-MFqFFf4143HS0_Wagnz%2Fuploads%2FKcQf6ktnBfLeGnKIzyDL%2FSheet%20Rule.gif?alt=media&amp;token=a45373f3-78aa-4f30-83df-9a7db1a7c5ab" alt=""><figcaption><p>Sheet Section</p></figcaption></figure>

#### Sheet Rule Configuration

**When (Condition) — Optional**

* Uses the same condition builder as existing Fusion Rules.
* Click "+ Add" to add one or more conditions.
* If left empty, the Then action always applies at runtime.

**Then (Action)**

* Select Sheet: Choose the target sheet from the dropdown.
* Action: Choose Show or Hide for the selected sheet.
* Click "+ Add" to add multiple sheet action rows.
* Multiple sheets can be configured within a single rule

<table><thead><tr><th width="138.44439697265625">Options</th><th>Description</th></tr></thead><tbody><tr><td>Rule Based</td><td>The sheet visibility is controlled by the When condition defined above.</td></tr><tr><td>Show</td><td>The selected sheet  is always shown.</td></tr><tr><td>Hide</td><td>The selected sheet  is always hidden.</td></tr></tbody></table>

## Map Section

Conditional Locking gives designers control over when and how data is editable within a grid or form map at runtime. Rules can be defined to automatically lock or unlock cells, rows, or columns based on data conditions or formulas. Lock states update dynamically as underlying data changes.

#### How to add a Map rule:

1. Enter a Task Name
2. Select the Map Section tab.
3. Click "+ Add Rule". A "RULE OF : MAPS SECTION" pop-up opens.
4. Enter a Rule Name.
5. Configure the When (condition) and Then (action) as needed.
6. Click Save to apply the rule.

<figure><img src="https://2472585788-files.gitbook.io/~/files/v0/b/gitbook-x-prod.appspot.com/o/spaces%2F-MFqFFf4143HS0_Wagnz%2Fuploads%2FKLUniSfq4PtzVIC8819X%2FMaps%20Rule.gif?alt=media&amp;token=bf38e8cf-94a5-486c-929e-ccef2d0993c5" alt=""><figcaption><p>Maps Section</p></figcaption></figure>

#### Maps Rule Configuration

**When (Condition) — Optional**

* Uses the same condition builder as existing Fusion Rules.
* Click "+ Add" to add one or more conditions.
* If left empty, the locking action always applies at runtime.

**Then (Action)**

A dropdown allows selection of the locking type:

<table><thead><tr><th width="138.44439697265625">Options</th><th>Description</th></tr></thead><tbody><tr><td>Lock Cell</td><td>Lock specific individual cells based on Salesforce data, spacer column values, or conditional formatting colors.</td></tr><tr><td>Lock Row</td><td>Lock entire rows of data when a defined condition is met. Useful for preventing edits on approved, closed, or read-only records.</td></tr><tr><td>Lock Column</td><td>Lock entire columns either permanently (always locked) or conditionally based on defined rules.</td></tr></tbody></table>

* After selecting the lock type, a "Select Value Type" dropdown appears to specify how the target cell, row, or column is identified.
* Click "+ Add" to add multiple locking action rows within a single rule.


# Workflow and UX

Workflow and UX screen is the place where an app designer can craft user experience of runtime of an app. This screen has two sections which are explained as follows.

<figure><img src="https://2472585788-files.gitbook.io/~/files/v0/b/gitbook-x-prod.appspot.com/o/spaces%2F-MFqFFf4143HS0_Wagnz%2Fuploads%2FJNv9WFjBjA6VAqoXRryu%2FWorkflow%20New.png?alt=media&amp;token=a67fee55-3c52-401a-ba3f-fece2aaaba81" alt=""><figcaption></figcaption></figure>

### Ribbon UX

This section provides the ability to visualize the ribbon when the app is opened in Runtime.&#x20;

<figure><img src="https://2472585788-files.gitbook.io/~/files/v0/b/gitbook-x-prod.appspot.com/o/spaces%2F-MFqFFf4143HS0_Wagnz%2Fuploads%2FsfhbcPYo37EgLsdgtQqL%2FWorkflow%20New%201.png?alt=media&amp;token=499a4c1f-a94f-4678-ac77-34175d1785a9" alt=""><figcaption></figcaption></figure>

On selecting any ribbon button it also highlights related workflow from the below workflow list. User can change the icon and the size of the button. There is one button property called Default Visibility which indicates whether the button is visible at runtime or not. Hidden buttons can be made visible with Refresh Ribbon Task. Last button property is Run at App Launch which indicates the workflow associated is configured to run immediately on launching app in runtime.

App designer can also control visibility of buttons appearing in Toolbox section of ribbon at runtime. Ribbon UX component is also collapsible so if you just want to focus on Workflow List only it can be collapsed.

### Workflows

This section provides list of existing workflows and ability to create, edit, clone and delete workflows.

![Workflow List](https://2472585788-files.gitbook.io/~/files/v0/b/gitbook-legacy-files/o/assets%2F-MFqFFf4143HS0_Wagnz%2F-MGOXj7qUdREjJNGJ29H%2F-MGOckg1MXUI1vfWbsWD%2FWFUX-3.png?alt=media\&token=0decf5bd-895c-4eea-9fd1-51408731fb4b)

Each entry in this list shows Name of workflow, Ribbon Button name of workflow, Workflow Id which is used to configure workflow on Wind, number of steps in workflow and behavior which indicates whether the workflow is configured to run at app launch, whether workflow is enabled for Wind and if yes is it scheduled on Wind or not. These different behaviors can be controlled from the workflow designer while creating or editing workflow.


# Workflow Settings - Button Click

Designer will configure the workflow and add a button which will be displayed on the Valorx Fusion Ribbon bar. These buttons which Designers design will be displayed under Runtime UX. Users can launch the app just by clicking on the button. Designers can choose the buttons of their choice and provide a name to the buttons as per the requirement.

Follow the below steps to create the app buttons.

* Click on **Workflow and UX** and Workflow window will open.
* Click on **New Workflow** and create the workflow.

![](https://2472585788-files.gitbook.io/~/files/v0/b/gitbook-x-prod.appspot.com/o/spaces%2F-MFqFFf4143HS0_Wagnz%2Fuploads%2FuyOkEBQfo9Fs7TMaNTSy%2FButton.png?alt=media\&token=ba85cefc-939f-4d1e-8197-fc2fc72de2e8)

* Once the workflow is created on the right hand Users will find a **Excel Ribbons**.
* Users needs to click on **Change** and select the button of their choice from Valorx Icon Store and click **OK**.
* Select the size of the icon **Large Icon** or **Small Icon**.
* Click **Save**.

![](https://2472585788-files.gitbook.io/~/files/v0/b/gitbook-x-prod.appspot.com/o/spaces%2F-MFqFFf4143HS0_Wagnz%2Fuploads%2FkPMyQlYE0rZihsPTlfhu%2FButton%201.png?alt=media\&token=baa6ffd6-f86b-4837-9daf-205f97152476)

Designers has successfully created the buttons in **Design Studio**. Now, the buttons which Designers has created will be displayed on the Valorx Ribbon.

Let's have a look at the below image, the buttons in highlighted area are created by the Designer in   Workflow and named that section as My opportunities. Users, can just click on those buttons in Runtime and the results will be displayed.

![](https://2472585788-files.gitbook.io/~/files/v0/b/gitbook-x-prod.appspot.com/o/spaces%2F-MFqFFf4143HS0_Wagnz%2Fuploads%2Fpsi3mBDhPS5Es4Zsr7fL%2FRuntime%203.png?alt=media\&token=a413f787-5c2d-4644-bca9-1bd319877d4b)


# Workflow Designer

Workflow is a place where all bits and pieces come together to create a magic. It provides a drag-and-drop interface for designing a meaningful course of actions utilizing Maps, Tasks and many other useful features of Workflow. It resembles flowchart where each step contributes to the final goal of the flow.

![](https://2472585788-files.gitbook.io/~/files/v0/b/gitbook-legacy-files/o/assets%2F-MFqFFf4143HS0_Wagnz%2F-MGcA7Gda9Y2zWEUTvVK%2F-MGcXVPARM49cIs-RE2s%2FWF-1.png?alt=media\&token=90938928-9a83-4693-8b7f-13354bbafe4a)

### Workflow Settings

Workflow settings contain two things Workflow properties and selected Task properties.

<div align="left"><figure><img src="https://2472585788-files.gitbook.io/~/files/v0/b/gitbook-x-prod.appspot.com/o/spaces%2F-MFqFFf4143HS0_Wagnz%2Fuploads%2FZWuERvxKuOwxIwrbI59j%2FWorkflow%20New%202.png?alt=media&amp;token=431452a6-2dbc-4405-9cf9-efe9d13420e8" alt="" width="284"><figcaption></figcaption></figure></div>

Workflow properties get expanded by clicking Workflow Name. It allows the user to edit workflow properties like Name, Workflow ID, which will be used in Launch from CRM, and Run at App Launch, which enables the workflow to run when the App is opened in runtime mode. Users can enable the offline mode by checking the offline mode option.&#x20;

#### Run Tasks Parallelly in Workflow&#x20;

**Parallel Workflow** enables the simultaneous execution of Query tasks, API tasks, or both within a workflow. Traditionally, workflows execute these tasks sequentially, one after the other. With Parallel Workflow, eligible tasks are executed simultaneously, significantly reducing total processing time and improving workflow efficiency.

Follow these steps to set up and execute a parallel workflow in Design Studio.

1. **Open the App in Design Studio:**

   * Launch the desired app from Design Studio.
   * In the Valorx Fusion ribbon, click on **Workflow** and **UX** to open the workflow editor.

   <div align="left"><figure><img src="https://2472585788-files.gitbook.io/~/files/v0/b/gitbook-x-prod.appspot.com/o/spaces%2F-MFqFFf4143HS0_Wagnz%2Fuploads%2Fwv3ethtxZk2JZKvdbgSg%2FOffline%20mode%20Workflow.png?alt=media&amp;token=8df32c78-8446-4639-ae95-8a009a27d4b5" alt="" width="563"><figcaption></figcaption></figure></div>

2. **Add Query Tasks to the Designer Canvas:**

   * From the toolbar, drag and drop at least **two Query Tasks** onto the Designer Canvas. \
     ***Note**: A minimum of two Query Tasks (Standard Mode) is required to run tasks in parallel.*

   <figure><img src="https://2472585788-files.gitbook.io/~/files/v0/b/gitbook-x-prod.appspot.com/o/spaces%2F-MFqFFf4143HS0_Wagnz%2Fuploads%2FdMmUf39vZW1r5r4kuvL9%2F1.%20Parallel%20Workflow%20Query%20Task.png?alt=media&amp;token=882c07c4-63c2-4dda-b914-2ef56ccf1422" alt=""><figcaption><p>Adding the Query Task</p></figcaption></figure>

3. **Select Query Tasks for Parallel Execution:**

   * Use your cursor to click and select all the Query Tasks you wish to execute in parallel. Ensure that multiple tasks are selected for parallel execution.

   <figure><img src="https://2472585788-files.gitbook.io/~/files/v0/b/gitbook-x-prod.appspot.com/o/spaces%2F-MFqFFf4143HS0_Wagnz%2Fuploads%2FqR6skDytzTFcZhbnJJAN%2F2.%20Parallel%20Workflow%20Select%20Query%20Task.gif?alt=media&amp;token=c8ff37c4-401e-44b8-bd8e-fe3ac8fc2dce" alt=""><figcaption><p>Selecting all the Query Tasks</p></figcaption></figure>

4. **Enable Parallel Execution:**

   * On the **Workflow Settings** panel located on the right side of the workflow window, locate the **Enable Parallel Execution** option.
   * Check the box to enable parallel task execution.

   <figure><img src="https://2472585788-files.gitbook.io/~/files/v0/b/gitbook-x-prod.appspot.com/o/spaces%2F-MFqFFf4143HS0_Wagnz%2Fuploads%2F7KhN3ZWWfoZ0QnusFhZB%2F3.%20Enable%20Parallel%20Workflow.gif?alt=media&amp;token=831a9816-422b-4a6a-8f53-c282973d3e97" alt=""><figcaption><p>Enable the Parallel Execution</p></figcaption></figure>

5. **Save the Workflow:**

   * Once you’ve enabled parallel execution, click **Save** to apply the changes.

   <figure><img src="https://2472585788-files.gitbook.io/~/files/v0/b/gitbook-x-prod.appspot.com/o/spaces%2F-MFqFFf4143HS0_Wagnz%2Fuploads%2FI73bLx3lEyclJ8aM2h4R%2F4.%20Save%20Parallel%20Workflow.gif?alt=media&amp;token=0626bd1f-d41f-4184-a459-6cf6d145e023" alt=""><figcaption><p>Save the Parallel Workflow</p></figcaption></figure>

#### Run Workflows Offline&#x20;

**Offline Mode** for Workflow Ux is one of the important features which we have implemented in **V13**. Offline mode will help the users to use the app even if they are offline and it will avoid many steps. Users will always have the option to go back **Online**. Users need to first enable this offline mode from **Workflow and UX** and **Settings**.&#x20;

Follow the below steps to enable the offline mode from **Settings**.&#x20;

* Open an App in **Design Studio**.&#x20;
* Click **Settings** from the **Valorx Fusion** ribbon tab.

<div align="left"><figure><img src="https://2472585788-files.gitbook.io/~/files/v0/b/gitbook-x-prod.appspot.com/o/spaces%2F-MFqFFf4143HS0_Wagnz%2Fuploads%2Fay9iHWf08dttl4Uy7LaH%2FOffline%20mode%20settings.png?alt=media&amp;token=c71a6d33-2d33-4758-96a1-2b6de7db11ae" alt="" width="563"><figcaption></figcaption></figure></div>

* Go to App Settings and select “**Enable Offline Mode**”, "**Run when going offline**" and "**Run when going online**".

<figure><img src="https://2472585788-files.gitbook.io/~/files/v0/b/gitbook-x-prod.appspot.com/o/spaces%2F-MFqFFf4143HS0_Wagnz%2Fuploads%2FMWLkSUpWbJgwXfqokUwM%2FOffline%20mode%20Workflow%204.png?alt=media&amp;token=95e2d4f5-7b7d-4d2e-b41b-1924b5984d11" alt=""><figcaption></figcaption></figure>

Follow the below steps to enable the offline mode from **Workflow and UX**.

* Open an App from Design Studio and click on **Workflow and UX** from the **Valorx Fusion** ribbon button.

<div align="left"><figure><img src="https://2472585788-files.gitbook.io/~/files/v0/b/gitbook-x-prod.appspot.com/o/spaces%2F-MFqFFf4143HS0_Wagnz%2Fuploads%2Fwv3ethtxZk2JZKvdbgSg%2FOffline%20mode%20Workflow.png?alt=media&amp;token=8df32c78-8446-4639-ae95-8a009a27d4b5" alt="" width="563"><figcaption></figcaption></figure></div>

* Open the **Workflow** now on the right-hand side of the workflow. Click the edit button ![](https://2472585788-files.gitbook.io/~/files/v0/b/gitbook-x-prod.appspot.com/o/spaces%2F-MFqFFf4143HS0_Wagnz%2Fuploads%2FK83sCrM6Lctn6oFQ2gE3%2Fimage.png?alt=media\&token=bc41eb8e-e8af-4821-9390-2306ec7919d5) under Workflow Settings.
* Check in the option for "**Run while going Offline**".
* Click **Save**.

<figure><img src="https://2472585788-files.gitbook.io/~/files/v0/b/gitbook-x-prod.appspot.com/o/spaces%2F-MFqFFf4143HS0_Wagnz%2Fuploads%2F0qe6lWjQwKevQFkTRb29%2FOffline%20mode%20Workflow%201.png?alt=media&amp;token=242970b3-e000-4568-b128-d2b5fd05cf25" alt=""><figcaption></figcaption></figure>

Now, open the App in Runtime mode and save the app in desired location. Users will find two options when they open the saved file.

Connect the app with any one of the two options:&#x20;

1. **Connect** - This will connect you to the app in Design Studio.&#x20;
2. **Continue** **Offline** – This will open the Runtime Saved file and Users can make the changes to the App.

<div align="left"><figure><img src="https://2472585788-files.gitbook.io/~/files/v0/b/gitbook-x-prod.appspot.com/o/spaces%2F-MFqFFf4143HS0_Wagnz%2Fuploads%2Ff8dLjfPxPsLuKs2xgyUR%2FOffline%20mode%20Workflow%202.png?alt=media&amp;token=605b896a-d9e8-4356-a341-4f895d342d61" alt="" width="432"><figcaption></figcaption></figure></div>

***Note***: Users can go online when they want by clicking on “Go Online” this will again connect us to Design Studio.&#x20;

<div align="left"><figure><img src="https://2472585788-files.gitbook.io/~/files/v0/b/gitbook-x-prod.appspot.com/o/spaces%2F-MFqFFf4143HS0_Wagnz%2Fuploads%2F09tdA8YUE5DpT2xOgUO5%2FOffline%20mode%20Workflow%203.png?alt=media&amp;token=dcaa7005-6b0c-4cef-871e-4f4ff1188c6a" alt="" width="563"><figcaption><p><br> </p></figcaption></figure></div>

**'Launch from CRM instructions' Button**

Users can find a button named "Launch from CRM instructions" when the 'Launch from CRM' button is enabled in the Workflow Settings, which will open a popup window that guides the users on how to configure a workflow to launch it from CRM. When launch from CRM is checked, the Behavior column in workflow list shows <img src="https://2472585788-files.gitbook.io/~/files/v0/b/gitbook-legacy-files/o/assets%2F-MFqFFf4143HS0_Wagnz%2F-MGhDf2jOyD_tnEOiUgg%2F-MGh_UE25dr2SANeFcmA%2FWorkflowTriggerLFC.png?alt=media&amp;token=89ef7b62-a5ae-4d77-a3cd-4a9a5d864f52" alt="" data-size="line"> icon.

![Launch from CRM instructions](https://2472585788-files.gitbook.io/~/files/v0/b/gitbook-legacy-files/o/assets%2F-MFqFFf4143HS0_Wagnz%2F-MGcA7Gda9Y2zWEUTvVK%2F-MGch83xN_slw01JsJ_K%2FWF-3.png?alt=media\&token=10e63fb5-c5cd-4871-842a-986816b84501)

### Designer Canvas

Designer canvas is an area where User can drag and drop various tasks from Toolbox and it becomes a Step of the workflow.

![Designer Canvas](https://2472585788-files.gitbook.io/~/files/v0/b/gitbook-legacy-files/o/assets%2F-MFqFFf4143HS0_Wagnz%2F-MGcA7Gda9Y2zWEUTvVK%2F-MGcjoxHCb7gNLyN9514%2FWF-6.png?alt=media\&token=581cc4b9-2f1c-4ac3-aafd-a6712bc2f3ce)

Each step is connected with an arrow connector which specifies the direction of the flow and the next Step in sequence. It also provides ability of zooming and panning, fit to screen and other helping features to visualize and navigate within the canvas.

{% hint style="info" %}
Workflow always has a step named "Start" which is its default starting point when executed.
{% endhint %}

#### Workflow Trigger

Workflow trigger has a section which is named as Excel Ribbon.

When Excel Ribbon is checked workflow gets associated with a Ribbon button. Excel Ribbon section allows user to either select or create Button Group which will be rendered at Runtime in Ribbon. User can change the Label of the button, its icon and the size of the button. These are the same things that can be done from Ribbon UX too.

<div align="left"><figure><img src="https://2472585788-files.gitbook.io/~/files/v0/b/gitbook-x-prod.appspot.com/o/spaces%2F-MFqFFf4143HS0_Wagnz%2Fuploads%2FXbS8jkWQg2zHT1XRiurz%2FWorkflow%20New3.png?alt=media&amp;token=3999121a-ca71-4e9d-8221-bea00555c6b6" alt="" width="277"><figcaption></figcaption></figure></div>

Users can select the size of the button either small or large and also select the button of their choice from Valorx Icon Store.


# Toolbox

Toolbox is one of the most important aspect of Workflow. Designers can make decision of how to display the way an app looks by using the toolbox options. Designers can define the Design mode configurations using the workflow toolbox. However, the runtime toolbox will define the Runtime mode configurations and these are two different toolbox variations.

Toolbox contains all Tasks grouped by type of Task. In addition workflow also provides bunch of Common Tasks too which includes Display and Save which uses Maps to display data and save data. Toolbox contains all the tasks which becomes a Step of workflow on dragging and dropping the same on designer canvas. You can create new task from workflow designer itself by clicking<img src="https://2472585788-files.gitbook.io/~/files/v0/b/gitbook-legacy-files/o/assets%2F-MFqFFf4143HS0_Wagnz%2F-MGcA7Gda9Y2zWEUTvVK%2F-MGcisZjkgFCAbUm9F6l%2FWF-5.png?alt=media&amp;token=4eb2f6ed-f109-4b92-8e8a-8f33ae74ad5b" alt="" data-size="line">icon beside every task type. Apart from regular tasks workflow has its own set of tasks named "Common Tasks".

Toolbox has different sections like Common Tasks, Query, API, Macro, Dataset, Refresh Ribbon, Clear, Launch CRM, Refresh Map.

Open an **Excel** and open an app in Design Studio from connections list, and click **Workflow and UX.**

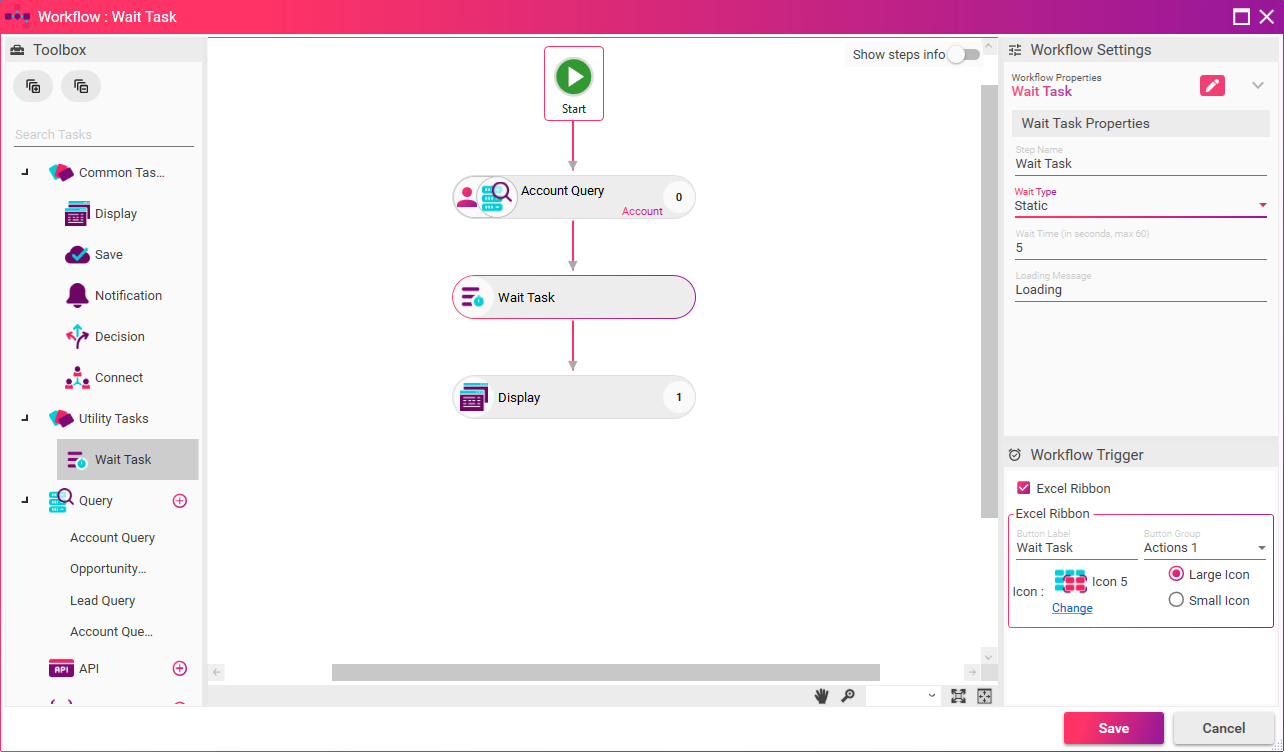
<div align="left"><img src="https://2472585788-files.gitbook.io/~/files/v0/b/gitbook-x-prod.appspot.com/o/spaces%2F-MFqFFf4143HS0_Wagnz%2Fuploads%2FKpzCXtiGD8sQcdrdcxYY%2FW%20Toolbox.png?alt=media&amp;token=2acfe1d4-5c95-4f08-94e5-c6f7cd39ed87" alt="" width="563"></div>

Select **New Workflow** from the below Workflow and UX window and provide the name of the workflow under **Workflow Name**, and click **Create.**

![](https://2472585788-files.gitbook.io/~/files/v0/b/gitbook-x-prod.appspot.com/o/spaces%2F-MFqFFf4143HS0_Wagnz%2Fuploads%2FptKUIwsI87ou5DPtcgj7%2FW%20Toolbox1.png?alt=media\&token=36dd3117-9092-4065-999d-40b2870c12a1)

Below window will open up when we click Create. Toolbox will be displayed on the left hand side of the window.&#x20;

![](https://2472585788-files.gitbook.io/~/files/v0/b/gitbook-x-prod.appspot.com/o/spaces%2F-MFqFFf4143HS0_Wagnz%2Fuploads%2FVahtTK6HacIeEY0PSwdo%2FW%20Toolbox2.png?alt=media\&token=0bb39770-05e2-41bb-9e1b-b6071568d165)


# Common Tasks

The Task feature includes several sections, one of which is **Common Tasks**. As the name implies, this section contains frequently used and familiar functions. Expand the **Common Tasks** group to view its subsections, which include **Display**, **Save**, **Notification**, **Decision**, and **Connect**.

![](https://2472585788-files.gitbook.io/~/files/v0/b/gitbook-x-prod.appspot.com/o/spaces%2F-MFqFFf4143HS0_Wagnz%2Fuploads%2F3YONHxA8ylQsLdnzkM96%2FCommon%20Tasks.gif?alt=media\&token=43ee4dcb-f526-45e4-9b30-a02557d4b688)

### **Display**

Display task is used to render data on spreadsheet. User needs to select Maps and its relevant Data Intake to display data. Display Properties shows the list of existing maps and user needs to select relevant Data Intake for the included map. User needs to select at least one map for every Display task.

![](https://2472585788-files.gitbook.io/~/files/v0/b/gitbook-x-prod.appspot.com/o/spaces%2F-MFqFFf4143HS0_Wagnz%2Fuploads%2FmV4uMieXWems9KO3lY0y%2FDisplay.gif?alt=media\&token=8f8aa036-964b-49cb-b097-2a897c67a868)

***

### **Save**

Save task is used to save data of spreadsheet back to CRM. User needs to select Maps for which save operation is to be done. Save Properties shows the list of All save groups and user needs to select at least one save group for every Save task.

![](https://2472585788-files.gitbook.io/~/files/v0/b/gitbook-x-prod.appspot.com/o/spaces%2F-MFqFFf4143HS0_Wagnz%2Fuploads%2F2uKrdtWOLkG9oAN6s3FM%2FSave%20Task%20Properties.gif?alt=media\&token=185ac33d-5013-437d-b1b2-825ff1203a8a)

***

### **Notification**

During workflow execution at any point if we need to notify user or we need to take simple user input like Yes/No or OK/Cancel to select next execution path Notification task comes handy and very useful.

![](https://2472585788-files.gitbook.io/~/files/v0/b/gitbook-x-prod.appspot.com/o/spaces%2F-MFqFFf4143HS0_Wagnz%2Fuploads%2FYR9uFq69271JLAKItZ1S%2FWorkflow%20Notification.png?alt=media\&token=be25e6a7-f85c-4bb3-8185-7c2cde14a64d)

Notification Properties has a Message Type property which has three possible values Static, Cell Reference and Named Range Reference. For Static message type user needs to provide message while for Cell Reference and Named Range Reference user needs to provide location or select Named Range from available named range list. User can show message content based on Message Type. Next property is Options with values Ok, Ok Cancel and Yes No. Notification has two out going paths named "True" and "False". When Option value is "Ok" there is only true path and for the rest of the options there are two paths. For every outgoing path user needs to select either the Step of the workflow or "Exit Workflow" to stop execution. User can also set the Image of the Notification based on what is the purpose of the Notification task.

![](https://2472585788-files.gitbook.io/~/files/v0/b/gitbook-x-prod.appspot.com/o/spaces%2F-MFqFFf4143HS0_Wagnz%2Fuploads%2FCTG9fSQG1AwweDXkUzct%2FWorkflow%20Notification%201.png?alt=media\&token=62d81f54-448a-42ff-8b69-1ac510c73805)

And the last property is Loop threshold which is very important. This integer property indicates how many times the Step is allowed to execute in a single workflow execution. Based on outgoing path we may end up creating a loop where the same step gets executed multiple times. To avoid infinite looping of execution this property indicates the threshold value and on exceeding this value at runtime workflow gets terminated.

***

### **Decision**

This task has multiple outgoing paths based on multiple conditions configured. It provides the ability to design conditional flow based on multiple conditions. Decision task is very crucial when you want to have conditional flow in your workflow based on some set of conditions.

***

### **Connect**

Connect task provides the ability to change the CRM connection at runtime when you have to deal with data from multiple CRM connections in a single app. It's a very natural requirement to have data from multiple connections in a single app. To achieve this workflow designer have Connect task. You can have as many connect tasks as you want and each connect task has a property called Connection Identifier which is a unique name used to identify a connection across all workflows. Users can either type in a new connection identifier name or select it from the available list of connection identifiers.\
\
When Connect task is executed user needs to provide a connection to assign it to a connection identifier. Once the connection identifier is assigned a connection it remembers it and changes the active connection to the selected connection when executed. Connect properties also provide an option to select a connection for Identifier either "On Step Execution" or "Before workflow Start". If a workflow contains any Connect task configured to provide connection. Before workflow starts, a popup window to select a connection will appear before workflow execution.

Connect task will connect apps to multiple org's workflows, and migrate the data from one app to another during runtime. When a workflow is created using connect task then, the workflow will take the data from Org 1 and display or migrate the data to Org 2.

Follow the below steps to create a workflow with connect task.

* Open an app and create a workflow.
* Now, drag and drop the connect from Common Tasks.
* On the right-hand side now select the Connection Identifier where the user needs to map the workflow to an active connection.
* Select either you want to execute it " On Step Execution" or "Before the workflow starts" and click Save.
* Save and run the workflow.

![](https://2472585788-files.gitbook.io/~/files/v0/b/gitbook-x-prod.appspot.com/o/spaces%2F-MFqFFf4143HS0_Wagnz%2Fuploads%2FPn1ydOS6dwmuMqTiXHxj%2FConnect.png?alt=media\&token=06c506f0-9349-4fb3-a55b-d2fe7f644256)

Here, is an example of a Connect task multi-org data migration or comparison app. Steps in Blue are from Org 1 which are connecting the steps in Green from Org 2.

![](https://2472585788-files.gitbook.io/~/files/v0/b/gitbook-x-prod.appspot.com/o/spaces%2F-MFqFFf4143HS0_Wagnz%2Fuploads%2Fgp0rY8oOjJbA7AxfThhg%2FConnect.png?alt=media\&token=b59e6b0d-3e6a-4644-b2ba-1ccef4d367c8)


# Utility Tasks

The **Utility Task** group includes specialized tasks that extend the capabilities of your workflow. These tasks help streamline complex logic and improve overall workflow efficiency.

Currently, the Utility Task group includes:

* **Wait Task**: Introduces a timed pause within the workflow, allowing for delays before proceeding to the next step. Useful for timing dependencies or creating pauses between actions.
* **Connected Workflow Task**: Allows you to call and execute another pre-built workflow within your current workflow. This promotes reusability of common steps such as validations, queries, or data formatting—helping you keep workflows clean, consistent, and easier to manage.

📌 *More utility tasks will be introduced in future updates to further expand the design possibilities.*

***

### ![](https://2472585788-files.gitbook.io/~/files/v0/b/gitbook-x-prod.appspot.com/o/spaces%2F-MFqFFf4143HS0_Wagnz%2Fuploads%2F8zU9lBPRVrGmpPPwOW5p%2FWait%20Task.png?alt=media\&token=ac1086b3-5508-4f5f-8149-8bbeecb92cfa) Wait Task

The **Wait Task** is designed to introduce controlled pauses during workflow execution, particularly for scenarios that require temporary halts before continuing with the next action.

<figure><img src="https://2472585788-files.gitbook.io/~/files/v0/b/gitbook-x-prod.appspot.com/o/spaces%2F-MFqFFf4143HS0_Wagnz%2Fuploads%2FxxMWR4Aj14ItGXF0sip3%2FWait%20Task.png?alt=media&amp;token=f6145e7c-a8cd-4756-9c8b-7665c1ad31e6" alt=""><figcaption><p>Wait Task</p></figcaption></figure>

#### 🚀 **Accessing the Wait Task**

1. Navigate to the **Utility Tasks** dropdown.
2. Select **Wait Task** from the list.
3. Drag and drop the **Wait Task** onto the **Designer Canvas** to add it to your workflow.

#### 🧩 **Wait Task Properties**

**1. Wait Type**

Users can configure the type of wait depending on their workflow requirements. Three options are available:

* **Static:**
  * Uses a fixed wait time specified in the **Wait Time** field.
  * Default value: 5 seconds.
  * Range: 0.0 to 60 seconds.
* **Cell Reference:**
  * Uses a value from a specific cell in the sheet.
  * The value must be between 0.0 and 60 seconds.
* **Named Range Reference:**
  * Uses a pre-defined Named Range as the wait duration.
  * The value in the Named Range must be between 0.0 and 60 seconds.

***Notes:** If the value entered exceeds 60 seconds, it will automatically be adjusted to the maximum limit of 60 seconds. For the **Static** option, users will receive an error message prompting them to revise the value if it exceeds this limit.*

**2. Loading Message**

* This field allows users to customize a message that displays during the wait period.
* The loading message provides feedback to users, indicating that the task is executing.

With the **Wait Task**, users can now introduce necessary pauses in their workflows, allowing for more efficient and controlled task execution.

***

### ![](https://2472585788-files.gitbook.io/~/files/v0/b/gitbook-x-prod.appspot.com/o/spaces%2F-MFqFFf4143HS0_Wagnz%2Fuploads%2F2O1IfbReTmofcPm5qKon%2FConnected%20Workflow.png?alt=media\&token=e3a8d4da-0a0a-4994-862e-11f217646ccd) Connected Workflow

The **Connected Workflow** feature is designed to help Fusion App Designers simplify complex workflows by reusing common task sequences across multiple workflows. It promotes efficiency, consistency, and easier maintenance by modularizing frequently used steps.

#### 🚀 Accessing the Connected Workflow

To add a Connected Workflow to your process:

1. Go to the **Utility Tasks** dropdown in the Designer.
2. Select **Connected Workflow**.
3. Drag and drop it onto the Designer Canvas where you want it to run.
4. In the **Workflow** field, select the workflow you’ve already created that you want to call from this step.

#### 🧩 Connected Workflow Task Properties

* **Step Name**: Defaults to *Connected Workflow*. You can rename it to reflect its purpose in the main workflow.
* **Workflow**: Choose the existing workflow you want to call from this step.
* **Loop Threshold Value**: Set to *10* by default. Defines the maximum number of iterations allowed during looping scenarios.
* **Resume when connected workflow fails/cancels:** Enable this checkbox if you want the calling workflow to continue even if the connected workflow fails or is canceled.

#### 📘 Example: Calling a Connected Workflow

* **Quote WF Connector** contains common standard task like Quote Line of Quote, Price Book of Quote and Price Book Entry of Price Book.<br>

  <figure><img src="https://2472585788-files.gitbook.io/~/files/v0/b/gitbook-x-prod.appspot.com/o/spaces%2F-MFqFFf4143HS0_Wagnz%2Fuploads%2FEFRXPcF7s8Gy2WMexugM%2FWF%20Connector.png?alt=media&amp;token=17307740-dc64-4b3b-bf92-1bf002a64a30" alt=""><figcaption><p>Quote WF Connector</p></figcaption></figure>
* Instead of rebuilding these steps in every workflow, you can call **Quote WF Connector** from workflows like **Workflow : Opportunity LFS.**
* The result? Cleaner, more manageable workflows.<br>

  <figure><img src="https://2472585788-files.gitbook.io/~/files/v0/b/gitbook-x-prod.appspot.com/o/spaces%2F-MFqFFf4143HS0_Wagnz%2Fuploads%2FaJLkzVn2ox9j9v9cNMb8%2FWorkflow%20connected%20workflow.gif?alt=media&amp;token=38cbc7d2-90f2-497f-a0a0-c48fe568edd5" alt=""><figcaption><p><strong>Workflow : Opportunity LFS.</strong></p></figcaption></figure>

Connected Workflows are a great way to reduce duplication, keep workflows clean, and encourage reusability across your Fusion Apps. This feature ensures robust workflow control with fewer steps.


# Salesforce APIs

This documentation provides an overview of the Salesforce APIs supported by Valorx Fusion, detailing how these APIs enable seamless integration and enhance functionality within the platform.

### CPQ APIs

The **CPQ APIs** provide essential functionality for managing quotes, products, and related data within Salesforce CPQ. These APIs facilitate tasks like reading, validating, calculating, and saving quotes, as well as adding and retrieving products.&#x20;

{% hint style="info" %}
These CPQ APIs will be available in the workflow only if your Salesforce org has the Salesforce CPQ package installed and the Quote and Quote Line objects are included in the data model. Only then will you be able to access and use the CPQ API tasks within the workflow.
{% endhint %}

Below is a summary of the core properties and functionalities of the CPQ APIs:

#### **1. Read Quote API**

**Description:**\
Retrieves detailed information about a specific quote, including its associated Quote Lines and related data.

<figure><img src="https://2472585788-files.gitbook.io/~/files/v0/b/gitbook-x-prod.appspot.com/o/spaces%2F-MFqFFf4143HS0_Wagnz%2Fuploads%2FUyHTaOx8mgDSDp30nTL9%2FRead%20Quote%20API.png?alt=media&amp;token=2d362f0c-6136-49e4-867f-618f68962e59" alt=""><figcaption><p>Read Quote API</p></figcaption></figure>

**Use Case:**

* Fetching the current state of a quote for review or updates.

**Inputs:**

* Quote Form Map

**Outputs:**

* Quote Model with Quote Lines

#### **2. Calculate Quote API**

**Description:**\
Performs pricing calculations for a quote, applying rules such as discounts, taxes, and promotions.

<figure><img src="https://2472585788-files.gitbook.io/~/files/v0/b/gitbook-x-prod.appspot.com/o/spaces%2F-MFqFFf4143HS0_Wagnz%2Fuploads%2F3zvlTqmTjoGs2swkz3bZ%2FCalculate%20Quote%20API.png?alt=media&amp;token=8ee4e28e-23e0-4e61-bd3d-48a667cda954" alt=""><figcaption><p>Calculate Quote API</p></figcaption></figure>

**Use Case:**

* Ensuring accurate pricing before finalizing a quote.

**Inputs:**

* Quote Form Map
* Quote Line Grid Map

**Outputs:**

* Updated Quote Model with calculated prices

#### **3. Validate Quote API**

**Description:**\
Checks the quote for errors or discrepancies, ensuring it meets predefined business rules.

<figure><img src="https://2472585788-files.gitbook.io/~/files/v0/b/gitbook-x-prod.appspot.com/o/spaces%2F-MFqFFf4143HS0_Wagnz%2Fuploads%2Fp6yWdBtKkBZLc3G92Snh%2FValidate%20Quote%20API.png?alt=media&amp;token=8ec1982c-e704-4bb3-8b4d-3d4ba9bf6ecd" alt=""><figcaption><p>Validate Quote API</p></figcaption></figure>

**Use Case:**

* Verifying quote accuracy before submission or approval.

**Inputs:**

* Quote Model

**Outputs:**

* Validation Results (Pass/Fail)
* List of Errors (if any)

#### **4. Save Quote API**

**Description:**\
Saves changes made to the quote and updates the Quote Model in Salesforce.

<figure><img src="https://2472585788-files.gitbook.io/~/files/v0/b/gitbook-x-prod.appspot.com/o/spaces%2F-MFqFFf4143HS0_Wagnz%2Fuploads%2F4ZZiIhf5PXCZXOqHwCjz%2FSave%20Quote%20API.png?alt=media&amp;token=a428ebc7-8161-41b8-b46e-392d20975557" alt=""><figcaption><p>Save Quote API</p></figcaption></figure>

**Use Case:**

* Persisting updates to a quote after modifications.

**Inputs:**

* Updated Quote Model

**Outputs:**

* Confirmation of successful save

#### **5. Read Product API**

**Description:**\
Retrieves product information from the Salesforce Product Catalog.

<figure><img src="https://2472585788-files.gitbook.io/~/files/v0/b/gitbook-x-prod.appspot.com/o/spaces%2F-MFqFFf4143HS0_Wagnz%2Fuploads%2FIlBOkgHmJAddxDbpPV5y%2FRead%20Product%20API.png?alt=media&amp;token=2a6a3a84-8b9c-4757-86c6-dcdb37771fe2" alt=""><figcaption><p>Read Quote API</p></figcaption></figure>

**Use Case:**

* Fetching product details for inclusion in a quote.

**Inputs:**

* Product ID or Filter Criteria

**Outputs:**

* Product Details

#### **6. Add Product API**

**Description:**\
Adds a product to a specific quote, updating the Quote Line Model.

<figure><img src="https://2472585788-files.gitbook.io/~/files/v0/b/gitbook-x-prod.appspot.com/o/spaces%2F-MFqFFf4143HS0_Wagnz%2Fuploads%2FT0zjT9jna07q4rtSBapz%2FAdd%20Product%20API.png?alt=media&amp;token=f2c37bf3-aa8a-444c-91e5-45acd4cd77e9" alt=""><figcaption><p>Add Product API</p></figcaption></figure>

**Use Case:**

* Including additional products in an existing quote.

**Inputs:**

* Quote ID
* Product ID
* Quantity

**Outputs:**

* Updated Quote Model with the new product

***

#### Notes

* These APIs are designed to integrate seamlessly with Salesforce CPQ functionality.
* Proper authentication and API permissions are required for access.
* Responses are returned in standard Salesforce data formats (e.g., JSON or XML).

By leveraging these APIs, users can automate and streamline their quote and product management processes, improving efficiency and accuracy.


# Query

Query Task is one of the properties where Designers will make the steps. Whenever we drag and drop any task from Toolbox to designer canvas it becomes a step of the workflow. So for every step in workflow there is a common property called Step Name which is a Task name by default but user can overwrite it anytime. Lets have a quick look at the task properties of different tasks.

Every Query task returns data and every step created from Query task needs an Output Name to uniquely identify the data retrieved in that specific step. Query task can also contain Filters of different types. Whenever filter of type Data Intake is there in Query it requires that Data Intake to execute the Query task. For such Data Intake filtered tasks Query properties will have Data Intakes section to select required Object data which is nothing but an output of other task. Edit button to edit actual Query Task associated with the step.

Expand the Query Task and you will find all the Maps. Drag and drop it in the workflow below the **Start** button.

![](https://2472585788-files.gitbook.io/~/files/v0/b/gitbook-x-prod.appspot.com/o/spaces%2F-MFqFFf4143HS0_Wagnz%2Fuploads%2F6nIMQqayPF0geTp8c25c%2FQuery%20W.png?alt=media\&token=6879e4ba-e2d2-4291-9465-d2742c182541)

On the right hand side we can find Workflow Settings where Designers will add the Data Intake and select the Ribbon Icons which will be displayed under **Workflow Trigger**.

![](https://2472585788-files.gitbook.io/~/files/v0/b/gitbook-x-prod.appspot.com/o/spaces%2F-MFqFFf4143HS0_Wagnz%2Fuploads%2FxuPMM5USx0K58vd1cBWd%2FQuery%20W1.png?alt=media\&token=6d2acac1-3b35-4745-9609-cc44300874fd)


# API

**Application Program Interface (API)** apart form Step name if an API task is configured to have input from Data Intake then API properties will have Data Intakes section to select required Object data which is nothing but an output of other task. It can also have Output Name property only if Action selected in API task has return type Object.

Refer [**API**](/valorx-fusion/design-studio/tasks/api) to know how to create an API class.

Once an API query task is created it will display in the API workflow properties. Expand the API properties and you will find all the API classes. Designers needs to just drag and drop the API as per the app requirement.

![](https://2472585788-files.gitbook.io/~/files/v0/b/gitbook-x-prod.appspot.com/o/spaces%2F-MFqFFf4143HS0_Wagnz%2Fuploads%2FqEF238itiPbIvSbBX26B%2FWorkflow%20API.png?alt=media\&token=5b312285-e059-4083-bfb1-b95c0622256b)

On the right hand side Designers can find Edit API Task by clicking on it a window will open in which Designers can edit the API class. Designers can even select a button to display on the Ribbon from **Workflow Trigger**.

![](https://2472585788-files.gitbook.io/~/files/v0/b/gitbook-x-prod.appspot.com/o/spaces%2F-MFqFFf4143HS0_Wagnz%2Fuploads%2F7LLIiyvalTrWzzlgcj32%2FWorkflow%20API%201.png?alt=media\&token=776162c5-47da-4642-8d61-b0636acd12f2)


# Launch CRM

Designers have an option to launch the app rom **CRM** or **Salesforce** when, they want. This is made simple with one of our workflow properties **Launch CRM**. Designers will have to create a Launch CRM task query which will be displayed under workflow.&#x20;

Open an app and select Workflow and UX from Valorx Fusion Ribbon.

<div align="left"><img src="https://2472585788-files.gitbook.io/~/files/v0/b/gitbook-x-prod.appspot.com/o/spaces%2F-MFqFFf4143HS0_Wagnz%2Fuploads%2FKpzCXtiGD8sQcdrdcxYY%2FW%20Toolbox.png?alt=media&amp;token=2acfe1d4-5c95-4f08-94e5-c6f7cd39ed87" alt="" width="563"></div>

Designers will find Workflow Settings on the right hand side. Click on the drop-down and the Workflow properties gets expanded. Designers can find two options like Launch from CRM and Run at App Launch.&#x20;

![](https://2472585788-files.gitbook.io/~/files/v0/b/gitbook-x-prod.appspot.com/o/spaces%2F-MFqFFf4143HS0_Wagnz%2Fuploads%2FUfOLjrbrAFy6ySQPhxv1%2FWorkflow%20Launch%20CRM%201.png?alt=media\&token=515e42ed-1870-481c-8849-8e17560ae539)

Select "Launch from CRM " this will provide the Launch from CRM instructions button click on it and a popup window opens which will guide the user on how to configure a workflow to launch it from CRM.

![](https://2472585788-files.gitbook.io/~/files/v0/b/gitbook-x-prod.appspot.com/o/spaces%2F-MFqFFf4143HS0_Wagnz%2Fuploads%2FSftcBRqoXfg639JTuGuR%2FWorkflow%20Launch%20CRM%202.png?alt=media\&token=e1bbe2c5-c6a8-4927-80b9-fa43fd987880)

Refer [**Launch from CRM**](/valorx-fusion/runtime/runtime-ux/launch-from-salesforce-lfs) to know more information on the instructions button.

Designers can easily find when an app is selected to Launch from CRM as the app will be marked with the symbol shown below.

![](https://2472585788-files.gitbook.io/~/files/v0/b/gitbook-x-prod.appspot.com/o/spaces%2F-MFqFFf4143HS0_Wagnz%2Fuploads%2Fo4WJsfQA4xCNtrg7O4C9%2FWorkflow%20Launch%20CRM%203.png?alt=media\&token=58fdc367-102f-4d7e-94e1-579d61f2c75d)


# Macro

Designers will create a Macro task to put it under the workflow. Refer Macro to know hot to write a macro.&#x20;

Open the [**Macro**](/valorx-fusion/design-studio/tasks/macro) properties from the workflow on the left hand side.&#x20;

Drag and drop the macro in the workflow and on the right hand side Designers can find Macro Properties.

![](https://2472585788-files.gitbook.io/~/files/v0/b/gitbook-x-prod.appspot.com/o/spaces%2F-MFqFFf4143HS0_Wagnz%2Fuploads%2FFQvkOQTeNUeBxzm9yQPE%2FWorkflow%20Macro.png?alt=media\&token=2aa93ad7-c78f-4f28-9c04-64cfe8f3a8a0)

Macro properties has only Step name and an Edit button to edit actual Macro Task associated with the step.

<div align="left"><img src="https://2472585788-files.gitbook.io/~/files/v0/b/gitbook-x-prod.appspot.com/o/spaces%2F-MFqFFf4143HS0_Wagnz%2Fuploads%2FvYnHf7GhD5YIMZvcRRkM%2FWorkflow%20Macro%201.png?alt=media&amp;token=39181cde-4d85-4411-979a-49853df106bd" alt="" width="563"></div>


# Dataset

Designers will create a Dataset task to put it under the workflow. Refer Macro to know hot to write a macro.&#x20;

Open the [**Dataset**](/valorx-fusion/design-studio/tasks/dataset) properties from the workflow on the left-hand side.&#x20;

Drag and drop the Dataset in the workflow as shown in the image and, the warning symbol that we have to provide the data intake.

![](https://2472585788-files.gitbook.io/~/files/v0/b/gitbook-x-prod.appspot.com/o/spaces%2F-MFqFFf4143HS0_Wagnz%2Fuploads%2F1nTV3BxNhiakaFAuMDwn%2FWorkflow%20Dataset.png?alt=media\&token=d957499a-1cc5-4d3b-86dc-6aac6c6a7e8c)

Dataset task takes multiple Data Intakes of same object and result is merged records based on Dataset operator. To hold the result Dataset property always have Output Name to uniquely identify result data of the step. Similar to other tasks it also has Edit button to edit actual Dataset Task associated with the step.

![](https://2472585788-files.gitbook.io/~/files/v0/b/gitbook-x-prod.appspot.com/o/spaces%2F-MFqFFf4143HS0_Wagnz%2Fuploads%2FmqbQYZ1TEiaFabFWaZQs%2FWorkflow%20Dataset%201.png?alt=media\&token=bbdd4c03-b6c6-4319-9b71-a3a0dd8dc1c2)


# Add/Delete

Designers will create a Add/Delete task to put it under the workflow. Refer [**Add/Delete**](/valorx-fusion/design-studio/tasks/add-delete) to know more information on how to create a task.

Drag and drop the Add/Delete in the workflow and on the right hand side Designers can find Add/Delete Properties.&#x20;

![](https://2472585788-files.gitbook.io/~/files/v0/b/gitbook-x-prod.appspot.com/o/spaces%2F-MFqFFf4143HS0_Wagnz%2Fuploads%2F7x7OrJUcTFJVf82NeLMC%2FWorkflow%20Add-Delete.png?alt=media\&token=8e954bbd-8145-4782-8847-7a7d35cbfc11)

In addition to Step Name property Add/Delete task can have single Data Intake to be selected only if associated task is of type "Add" and it is adding rows based on Record count. It has Edit button to edit actual Add/Delete Task associated with the step.

![](https://2472585788-files.gitbook.io/~/files/v0/b/gitbook-x-prod.appspot.com/o/spaces%2F-MFqFFf4143HS0_Wagnz%2Fuploads%2FBYByb0Ze1gJwFSG01ccM%2FWorkflow%20Add-Delete%201.png?alt=media\&token=de6486c0-3126-4290-ae73-15d5e0d2cba5)


# Document

Designers will create a Document task first under Design Studio to put it under the workflow under Runtime. Refer [**Document**](/valorx-fusion/design-studio/tasks/document) to know more information on how to create a Document task.

Drag and drop the Document properties in the workflow  which will be shown under the Document.

![](https://2472585788-files.gitbook.io/~/files/v0/b/gitbook-x-prod.appspot.com/o/spaces%2F-MFqFFf4143HS0_Wagnz%2Fuploads%2F8RN66SzsUmgrwnltQru9%2FWorkflow%20Document.png?alt=media\&token=cceeacc2-aaa2-4238-8adf-bd1737676ec9)

On the right hand side Designers can find Document Properties to edit actual Document Task associated with the step. Document task always need a Data Intake which represents the record which will hold the uploaded document in CRM.&#x20;

![](https://2472585788-files.gitbook.io/~/files/v0/b/gitbook-x-prod.appspot.com/o/spaces%2F-MFqFFf4143HS0_Wagnz%2Fuploads%2FqciKFHdqU9ZGsXgjkvjm%2FWorkflow%20Document%201.png?alt=media\&token=1de224ed-7b4a-45ed-b8fb-7516a169f196)


# Refresh Ribbon

Designers will create a Refresh Ribbon task first under Design Studio to put it under the workflow under Runtime. Refer [**Refresh Ribbon**](/valorx-fusion/design-studio/tasks/refresh-ribbon) to know more information on how to create a Clear task.

Drag and drop the Refresh Ribbon properties in the workflow  which will be shown under the Refresh Ribbon.

![](https://2472585788-files.gitbook.io/~/files/v0/b/gitbook-x-prod.appspot.com/o/spaces%2F-MFqFFf4143HS0_Wagnz%2Fuploads%2FxtHhbdr1Lk8J6BSJhrwn%2FWorkflow%20Refresh%20Ribbon.png?alt=media\&token=e2881540-4549-43f9-ac8e-2f3a52b8cda5)

In addition to Step Name property if Refresh Ribbon task has any rule based condition which requires Data Intake then it will have Data Intakes section to select required Object data which is nothing but an output of other task. Warning symbol shows that data input required. Designers can edit the actual Refresh Ribbon Task associated with the step with the help of edit button on the right hand side.

![](https://2472585788-files.gitbook.io/~/files/v0/b/gitbook-x-prod.appspot.com/o/spaces%2F-MFqFFf4143HS0_Wagnz%2Fuploads%2Ftk8Pi8R9mSxUnAx1TA65%2FWorkflow%20Refresh%20Ribbon%201.png?alt=media\&token=bc3c96e7-6581-4a2a-bfd8-6b82b19fa0e3)


# Clear

Designers will create a Clear task first under Design Studio to put it under the workflow under Runtime. Refer [**Clear**](/valorx-fusion/design-studio/tasks/clear) to know more information on how to create a Clear task.

Drag and drop the Clear properties in the workflow  which will be shown under the Clear and, on the right hand side Designers can find Clear Properties.&#x20;

![](https://2472585788-files.gitbook.io/~/files/v0/b/gitbook-x-prod.appspot.com/o/spaces%2F-MFqFFf4143HS0_Wagnz%2Fuploads%2F82UPwtFYOWgAvAIEOzLL%2FWorkflow%20Clear.png?alt=media\&token=028b07d8-0dcb-48ae-ab5c-c3502aec08b7)

Similar to Macro task Clear Task has no other properties except Step Name and an Edit button to edit actual Clear Task associated with the step.

![](https://2472585788-files.gitbook.io/~/files/v0/b/gitbook-x-prod.appspot.com/o/spaces%2F-MFqFFf4143HS0_Wagnz%2Fuploads%2FNJXJ3nKclemlYgzj7EMV%2FWorkflow%20Clear%201.png?alt=media\&token=28fd2373-b85e-4e09-94d4-567834675827)


# Refresh Map

Designers will create a Refresh Map task first under Design Studio to put it under the workflow under Runtime. Refer [**Refresh Map**](/valorx-fusion/design-studio/workflow-and-ux/refresh-map) to know how to create Refresh Map task.

Drag and drop the Refresh Map properties in the workflow  which will be shown under the Refresh Map.

![](https://2472585788-files.gitbook.io/~/files/v0/b/gitbook-x-prod.appspot.com/o/spaces%2F-MFqFFf4143HS0_Wagnz%2Fuploads%2F3rcK2JVAZIVfyvtPicOm%2FWorkflow%20Refresh%20Map.png?alt=media\&token=9bfc44d8-2edb-449a-986b-0c5fdf021274)

Refresh Map has no other properties except Step Name and, on the right hand side Designers can find Refresh Map Properties.

![](https://2472585788-files.gitbook.io/~/files/v0/b/gitbook-x-prod.appspot.com/o/spaces%2F-MFqFFf4143HS0_Wagnz%2Fuploads%2FVYDeQQS7mgmGug8jqALU%2FWorkflow%20Refresh%20Map%201.png?alt=media\&token=a514cc96-7dd0-4e75-bf75-3176081549d4)


# Add Field

Designers will first create a Refresh Map task under Design Studio to put it under the workflow in Runtime. Refer to [**Add Field**](/valorx-fusion/design-studio/tasks/add-field) to know how to create Add Field task.

Drag and drop the Add Field task properties in the workflow which will be shown under Add Field.

<figure><img src="https://2472585788-files.gitbook.io/~/files/v0/b/gitbook-x-prod.appspot.com/o/spaces%2F-MFqFFf4143HS0_Wagnz%2Fuploads%2FBKeTtOdwZh9Ev9CrBxpm%2FFusion%20Docs%20Update%20as%20per%20V15%20-%2036.png?alt=media&amp;token=0dc017ba-4cae-4cca-a6dd-a66a6d66bbaf" alt=""><figcaption></figcaption></figure>

To edit the task, designers can click on Edit Add Field Task on the right-hand side. A window will open where they can make changes to the task. They can also choose a button from Workflow Trigger to show on the Ribbon.

<figure><img src="https://2472585788-files.gitbook.io/~/files/v0/b/gitbook-x-prod.appspot.com/o/spaces%2F-MFqFFf4143HS0_Wagnz%2Fuploads%2FNocMO7GtACruO3hPTrdb%2FFusion%20Docs%20Update%20as%20per%20V15%20-%2037.png?alt=media&amp;token=7d6a89b0-f7e6-4cd6-b5d1-9659b58d13d3" alt=""><figcaption></figcaption></figure>


# Dynamic API

Designers must first create a **Dynamic API task** in **Design Studio** before adding it to a workflow in **Runtime**. For information about creating a Dynamic API task, see [**Dynamic API**](/valorx-fusion/design-studio/tasks/dynamic-api)**.**

Drag and drop the Dynamic API properties in the workflow which will be shown under the Dynamic API.

In the workflow, expand **Dynamic API** and drag and drop the required properties into the workflow.

<figure><img src="https://2472585788-files.gitbook.io/~/files/v0/b/gitbook-x-prod.appspot.com/o/spaces%2F-MFqFFf4143HS0_Wagnz%2Fuploads%2FI0rpm4x4QFvOhNNVZ8ab%2FDynamic%20API%20workflow%20v2.gif?alt=media&amp;token=95153639-70c2-402e-8145-e8ef8b53dfdf" alt=""><figcaption><p>Dynamic API in workflow</p></figcaption></figure>

The **Dynamic Task** has three properties: **Step Name**, **Data Intake**, and **Edit**.

* **Step Name** - Specify the name of the workflow step.
* **Data Intake** - If a Dynamic API value uses **Field** as its source, select the query result that provides the field value.
* **Edit** - Click **Edit** to modify the Dynamic API task associated with the step.

<figure><img src="https://2472585788-files.gitbook.io/~/files/v0/b/gitbook-x-prod.appspot.com/o/spaces%2F-MFqFFf4143HS0_Wagnz%2Fuploads%2FvgDCHrwwlE4w16APnFne%2FDynamic%20API%20Workflow%20v3.gif?alt=media&amp;token=2f5c4a6e-fe13-48b6-8a11-1436be9fae0d" alt=""><figcaption><p>Edit Dynamic API task in workflow</p></figcaption></figure>


# Runtime UX

Designers once done with designing an App it is time for the users to run the same app designed and check its functionality. Designers can make the changes to the app at any time in Design Studio if there is need for any further additions to be made to the app. Designers will configure the app in **Design** **Studio** and users will run an app in **Runtime** mode. Users should have been assigned with **Runtime** access level to run an app.&#x20;

Below is the image of our Design Studio Valorx Ribbon.

<div align="left"><img src="https://2472585788-files.gitbook.io/~/files/v0/b/gitbook-x-prod.appspot.com/o/spaces%2F-MFqFFf4143HS0_Wagnz%2Fuploads%2FwL36DMfqAZqgIZ2hkT6V%2FDesign%20Studio.png?alt=media&amp;token=831b7105-3887-418a-9350-0f1a56b4a729" alt="" width="563"></div>

Runtime is defined by the **Workflow and UX**. Designers will configure all the actions of the **Runtime** in **Workflow**. Users can run the app both in **Runtime** and  **Runtime + Express Mode**. Users can launch an app in three different ways like Button Click, App Launch and Launch from CRM.

**Button Click**: Designer will configure the workflow and add a button which will be displayed on the Valorx Fusion Ribbon. Users can launch the app just by clicking on the button. Designers can choose the button of their choice. Refer [**Workflow Settings - Button Click**](/valorx-fusion/design-studio/workflow-and-ux/workflow-settings-button-click) for more information.

**Run at App Launch** : Users can launch an app through App Lunch. Users can select the Workflow settings and select the properties to **Run at App Launch** this enables the app to launch when users open an app in Runtime. Refer [**Run at App Launch**](/valorx-fusion/runtime/runtime-ux/run-at-app-launch) to know more.

**Launch from CRM**: Users has an option to launch an app from Salesforce. Users needs to visit the Salesforce and click on Launch from CRM then, the app will be launched from Salesforce. Temporary connection with "one time" org will be displayed when a user launches an app from **Salesforce**. \
***Example*** : Connection name will now show up as "Launch for \<FirstName>".

Refer [**Launch from CRM**](/valorx-fusion/runtime/runtime-ux/launch-from-salesforce-lfs) to know more information.

Users needs to click on **Start**, and click on **Run** button beside the app. Let's have a look at the Runtime ribbon.

Runtime Ribbon will have few sections like all the buttons which users add in workflow, Toolbox, Quickstart, Control Panel.

![](https://2472585788-files.gitbook.io/~/files/v0/b/gitbook-x-prod.appspot.com/o/spaces%2F-MFqFFf4143HS0_Wagnz%2Fuploads%2Flfd92fzcdVZ7SgqEH9YP%2FMicrosoftTeams-image%20\(13\).png?alt=media\&token=14329644-56e0-4d17-896e-7c24e432b96c)

**Workflow Buttons**: Users will add a workflow and configure the actions of the app and add a button which will be displayed on the Valorx Ribbon tab for runtime. In the below image users has added the buttons and named the ribbon as My Opportunities. Once users click on the buttons the result will be displayed in runtime.

![](https://2472585788-files.gitbook.io/~/files/v0/b/gitbook-x-prod.appspot.com/o/spaces%2F-MFqFFf4143HS0_Wagnz%2Fuploads%2Fpsi3mBDhPS5Es4Zsr7fL%2FRuntime%203.png?alt=media\&token=a413f787-5c2d-4644-bca9-1bd319877d4b)

**Toolbox**: Toolbox will have six elements like Inset 1 Row, Clear 1 Row, Delete Rows, Lookup, Customize Grids and Mass Modifier. Refer [**Toolbox**](/valorx-fusion/runtime/toolbox) for more information on the elements.

**Quickstart**: As the name suggests this is used to start the app in a quick way. This has two elements like Express Mode and Favorites. Follow [**Express Mode**](/valorx-fusion/getting-started/building-your-first-app/express-mode) for more information.

**Favorites**: Users can add the apps to **Runtime Favorites**. Let us follow the below steps to add an app to **Favorite** list. App is now added to the Favorite list now user can see the ribbon button for **Favorite** list. Refer [**Favorite List**](/valorx-fusion/getting-started/getting-started-with-valorx/favorite-apps) for more information on favorite list.

**Control Panels**: Users will find five components like Settings, Valorx App Store, Community, Support and User info.

**Settings**: Users will find the information related to the users license, Fusion Settings and Logs information. Refer [**Valorx Fusion Settings**](/valorx-fusion/settings/valorx-fusion-settings) for more information.

Refer [**Logs**](/valorx-fusion/settings/logs) for more information on Logs.

**Valorx App Store** : Users can submit a Valorx Fusion App to Valorx App Store. App Designers can build Apps for Valorx App Store that will be available to all Valorx Fusion customers.

**User info**: **App Permissions** is a new feature added under **User Information** in the Valorx Control Panel Ribbon. This will allow the user to verify the accessibility of the required objects and fields (Read, Create, Update and Filter).

### ***Flyout Menu***:

Flyout Menu, is an innovative addition to our Workflow and UX. This feature transforms the way buttons are organized by merging related buttons under a single menu. Not only does this optimization save valuable screen space, but it also enhances usability by providing a clear and easily accessible view of the available options.

With the Flyout Menu, users can group multiple buttons together without any limitations on the number of buttons that can be included. This flexibility empowers users to create comprehensive menus tailored to their specific needs, enabling quick access to a wide range of related functionalities.

By consolidating buttons under a single menu button, it provides a cleaner and more streamlined interface. The Flyout Menu ensures that all related buttons are organized logically, making it easier for users to locate and select the desired action. Users can simply expand the menu to reveal the available options.

***Note***: Menu button will not show the “Run at App Launch” option as it is a button on the ribbon, and it will not have any workflow. Button(s) under the Menu button will have this option available.

* Access the **Design Studio Mode** of the Valorx Fusion app. Navigate to the **Workflow and UX**.
* Next, locate the option labeled "**Add Button Group**" or the "**+**" icon located under the **Ribbon UX**.

<figure><img src="https://2472585788-files.gitbook.io/~/files/v0/b/gitbook-x-prod.appspot.com/o/spaces%2F-MFqFFf4143HS0_Wagnz%2Fuploads%2F2PkWqeCUKRNagwhcZCTE%2FFlyout%20Menu%201.png?alt=media&amp;token=e2c1cdb0-d019-4fd5-87d1-38ab309936a9" alt=""><figcaption></figcaption></figure>

* After opening the group button, you will see an option to add menu buttons. Click on "**Add Menu Button**" to add buttons to the group.
* Once you have clicked on "**Add Menu Button**," the buttons will be displayed. Proceed to edit the name of the button as desired.
* To add or remove menu buttons, you can either click on the number displayed next to the button or use the option "**Add or remove menu buttons**."
* To add the buttons to the newly created menu button, simply drag the button and drop it onto the **Menu Button**.

<figure><img src="https://2472585788-files.gitbook.io/~/files/v0/b/gitbook-x-prod.appspot.com/o/spaces%2F-MFqFFf4143HS0_Wagnz%2Fuploads%2FxTzQgwUnwopiz7zl1Kov%2FFlyout%20Menu%202.png?alt=media&amp;token=7211ed24-d907-4472-b681-8d0d70cdf817" alt=""><figcaption></figcaption></figure>

* Open the Workflow or click Edit button. By default, the buttons will be displayed under the Menu in the **Workflow Trigger**.
* From the drop-down menu, select the desired Menu button.

  ***Note***: If you select an empty area, the menu button will be moved to the group level.
* To select or change the icon associated with the button, simply click on the "**Change**" option.
* Once you have made the necessary modifications, click on the "**Save**" button to save your changes.

<div align="left"><figure><img src="https://2472585788-files.gitbook.io/~/files/v0/b/gitbook-x-prod.appspot.com/o/spaces%2F-MFqFFf4143HS0_Wagnz%2Fuploads%2F5GmSAC4wLfQayv82IzgJ%2FFlyout%20Menu%203.png?alt=media&amp;token=355b7500-445c-43d8-b8c7-2db23392660f" alt="" width="285"><figcaption></figcaption></figure></div>

***Note***: Please note that small buttons are supported for buttons within the Menu button.

* If there are empty menu buttons, a message will appear indicating this. To proceed, click on "Yes" if you want to continue with the empty menu buttons. Alternatively, you can click on "No" to add buttons to the empty menu.

<div align="left"><figure><img src="https://2472585788-files.gitbook.io/~/files/v0/b/gitbook-x-prod.appspot.com/o/spaces%2F-MFqFFf4143HS0_Wagnz%2Fuploads%2FHdMbeKlXIsdDVsmzIpqx%2FFlyout%20Menu%204.png?alt=media&amp;token=b87332ad-1872-487a-adc1-67666650cdac" alt="" width="376"><figcaption></figcaption></figure></div>

* Save and run the App to see the button menu under Runtime Ribbon.


# Run at App Launch

**Run at App Launch** this enables the app to launch when users launch an app. Users can launch an app through App Lunch. Users can open the Workflow settings and select the option to Run at App Launch.&#x20;

* Open the Workflow and on the right hand side of the Workflow users will find the **Workflow Settings**.
* Click on the name of the Workflow and users will find two options like **Run at App Launch** or **Launch From CRM**.
* Check-in the option for **Run at App Launch** and click on **Save**.

![](https://2472585788-files.gitbook.io/~/files/v0/b/gitbook-x-prod.appspot.com/o/spaces%2F-MFqFFf4143HS0_Wagnz%2Fuploads%2FSjBRU0zCU5FLYSHYExjC%2FApp%20Launch.png?alt=media\&token=d976733f-d98a-43cf-97bf-ee91f1b0fcba)


# Launch from Salesforce (LFS)

**Launch from Salesforce (LFS)** denotes a functionality enabling users to directly initiate or access specific apps from **Salesforce**. This feature offers a streamlined process for seamlessly transferring data from the **Salesforce CRM** platform to our Valorx Fusion apps, eliminating the need for additional logins.&#x20;

Designers can launch an app directly from **Salesforce** and export **CRM** data to **Excel**, by selecting the "**Launch from CRM**" option in **Workflow and UX**. To initiate the launch, users should access **Salesforce**, navigate to the desired location, and click on the Custom Button / Quick Action created within **Salesforce**.&#x20;

* Start an App and open the **Workflow and UX** from Valorx Fusion Ribbon and locate **Workflow Settings** on the right-hand side.
* Click on the name of the Workflow to access its settings.
* Select the "**Launch from CRM**" option by checking the corresponding box.&#x20;

<figure><img src="https://2472585788-files.gitbook.io/~/files/v0/b/gitbook-x-prod.appspot.com/o/spaces%2F-MFqFFf4143HS0_Wagnz%2Fuploads%2FsMtEvPFwi04fw41uFeso%2FLFS%2022.png?alt=media&amp;token=282bd425-280a-4cff-a0c9-588d798e16d7" alt=""><figcaption></figcaption></figure>

Click on **Launch from CRM instructions** and a popup window “Launch from CRM instructions” page will open which guides the users on how to configure a workflow to launch it from CRM. This page will have clear instructions with examples on how to create **Detail Page Buttons** and also shows how to add the buttons to the page layout.

![](https://2472585788-files.gitbook.io/~/files/v0/b/gitbook-x-prod.appspot.com/o/spaces%2F-MFqFFf4143HS0_Wagnz%2Fuploads%2FPuglbrVoQ73IZflORNTk%2FLaunch%20from%20CRM%201.png?alt=media\&token=7f29978b-9704-4996-88a4-131a31a19008)

Select the object from the "**Select Objects to open its Page Layouts**" dropdown.

<figure><img src="https://2472585788-files.gitbook.io/~/files/v0/b/gitbook-x-prod.appspot.com/o/spaces%2F-MFqFFf4143HS0_Wagnz%2Fuploads%2FKaXUVFA41PvwvgvcxnYd%2FLFS%2013.png?alt=media&amp;token=b0a40772-97dc-4200-9a03-e6c14b1d0890" alt=""><figcaption></figcaption></figure>

Upon clicking "**Open layouts**", the Designer will be redirected to **Salesforce**, where they can access the page layout for the selected object.

<figure><img src="https://2472585788-files.gitbook.io/~/files/v0/b/gitbook-x-prod.appspot.com/o/spaces%2F-MFqFFf4143HS0_Wagnz%2Fuploads%2FsO0TpYUJtFlVuNubBGMl%2FLFS%2012.png?alt=media&amp;token=ebb4a7f9-89c3-4372-88b9-ea96ea7ae8b9" alt=""><figcaption></figcaption></figure>

To create a **Detail Page Button** before adding it to the **Page Layout**, please follow the instructions below:

1. Log into **Salesforce** using your login credentials.
2. Navigate to **Object Manager** and select the relevant object from **Label**.

<figure><img src="https://2472585788-files.gitbook.io/~/files/v0/b/gitbook-x-prod.appspot.com/o/spaces%2F-MFqFFf4143HS0_Wagnz%2Fuploads%2FkcSjZzhR5D27E5KEuagJ%2FLFS%202.png?alt=media&amp;token=8e4d3af3-c0b4-452a-82cf-4a6492189767" alt=""><figcaption></figcaption></figure>

3. On the left-hand side, click on "**Button, Links, and Actions**".
4. Choose "**New Button or Link**" on the right-hand side.

<figure><img src="https://2472585788-files.gitbook.io/~/files/v0/b/gitbook-x-prod.appspot.com/o/spaces%2F-MFqFFf4143HS0_Wagnz%2Fuploads%2FgWFqlAszXfgaSiyJFyT3%2FLFS%203.png?alt=media&amp;token=f635a6d6-8bd4-4fdc-bd0e-88da0cd1bd02" alt=""><figcaption></figcaption></figure>

5. Provide a descriptive Label that explains the button and the Name will display when we do a tab.
6. Fill in the details for Display Type, Behavior, Display Type, and Content Source in the respective fields as mentioned in the **Launch from CRM instructions** page.
7. Select the object from the "**Select Field Type**" dropdown.
8. Copy the URL from the **Launch from CRM instructions** page and paste it into **Context Source**.

<figure><img src="https://2472585788-files.gitbook.io/~/files/v0/b/gitbook-x-prod.appspot.com/o/spaces%2F-MFqFFf4143HS0_Wagnz%2Fuploads%2FYswYl6V4J9lFtz2R17Hb%2FLFS%2014.png?alt=media&amp;token=ac00d838-37ad-424c-ade1-fa3b503c0782" alt=""><figcaption><p>Launch from CRM instructions</p></figcaption></figure>

Here are two example images illustrating the **URL with** and **without inbound** integrations.

<figure><img src="https://2472585788-files.gitbook.io/~/files/v0/b/gitbook-x-prod.appspot.com/o/spaces%2F-MFqFFf4143HS0_Wagnz%2Fuploads%2FCO4YNxY3GyGdY06ByCR1%2FLFS%204.png?alt=media&amp;token=3dcb5d16-1604-4153-9b8b-fa8eab780aa7" alt=""><figcaption><p>Without  inbound integration</p></figcaption></figure>

<figure><img src="https://2472585788-files.gitbook.io/~/files/v0/b/gitbook-x-prod.appspot.com/o/spaces%2F-MFqFFf4143HS0_Wagnz%2Fuploads%2FBMePfNCpWr0E005gt4P8%2FLFS%205.png?alt=media&amp;token=84bf839a-89ce-4a8b-84cf-e1c7f958c24e" alt=""><figcaption><p>With inbound integration</p></figcaption></figure>

{% hint style="info" %}
Copy the URL with and without Inbound integrations as per the requirement.
{% endhint %}

9. Click **Check Syntax** to verify any syntax errors.
10. Click on **Save**.

<div align="left"><figure><img src="https://2472585788-files.gitbook.io/~/files/v0/b/gitbook-x-prod.appspot.com/o/spaces%2F-MFqFFf4143HS0_Wagnz%2Fuploads%2FhvG4D77DYWLjcruOISgP%2FLFS%2017.png?alt=media&amp;token=f2231436-2587-4798-ae7b-c1f815bb23e9" alt="" width="543"><figcaption></figcaption></figure></div>

11. A message will appear, prompting us to add the new button to page layouts. Now, click **Ok**.

<div align="left"><figure><img src="https://2472585788-files.gitbook.io/~/files/v0/b/gitbook-x-prod.appspot.com/o/spaces%2F-MFqFFf4143HS0_Wagnz%2Fuploads%2FMyOQufqmyTAiEOF0Euy9%2FLFS%2018.png?alt=media&amp;token=82419338-3c9c-4d25-8251-7522a8bec8d2" alt=""><figcaption></figcaption></figure></div>

12. To return to the **Page Layout**, you can either select "Open layouts" from the **Launch from CRM instructions** page or choose "**Page Layout**" in **Salesforce**.

<figure><img src="https://2472585788-files.gitbook.io/~/files/v0/b/gitbook-x-prod.appspot.com/o/spaces%2F-MFqFFf4143HS0_Wagnz%2Fuploads%2FawNNVcEaXvNTm9F2Vduy%2FLFS%2015.png?alt=media&amp;token=ad9cacb8-92c6-459a-8040-68b3bea10371" alt=""><figcaption></figcaption></figure>

13. Below mentioned are the two sections where Designer should add the newly created **Detail Page Buttons**.
    1. For Salesforce Lightning UI, add the button to "**Salesforce Mobile and Lightning Experience Actions**" by selecting "**Mobile & Lightning Actions**" from Fields.
    2. For Salesforce Classic UI, add the button to "**Custom Button**" by selecting " **Buttons**" from Fields.
14. Click **Save** to finalize.

<figure><img src="https://2472585788-files.gitbook.io/~/files/v0/b/gitbook-x-prod.appspot.com/o/spaces%2F-MFqFFf4143HS0_Wagnz%2Fuploads%2FiSNqPGAYV5iQ5tTABIkF%2FLFS%2016.png?alt=media&amp;token=88c8915d-3fa5-4a40-8178-6a7f251b9c6e" alt=""><figcaption></figcaption></figure>

#### Runtime Experience on Windows Platform

Once, the Designer has completed the creation of the **Detail Page Button** and its addition to the **Page Layout**. Now, it is time to run the app by clicking on the created button for Windows.

1. Navigate to the **Sales** section and either select the Object from the header or search for it. Then, click on the record to open it.

<figure><img src="https://2472585788-files.gitbook.io/~/files/v0/b/gitbook-x-prod.appspot.com/o/spaces%2F-MFqFFf4143HS0_Wagnz%2Fuploads%2F8JuSjkeWWNmnrilwIxN9%2FLFS%207.png?alt=media&amp;token=2482e5d0-d1ce-4369-b0c2-63a26d4d9f66" alt=""><figcaption></figcaption></figure>

2. On the right-hand side, choose the **Detail Page Button** from the dropdown menu.

<div align="left"><figure><img src="https://2472585788-files.gitbook.io/~/files/v0/b/gitbook-x-prod.appspot.com/o/spaces%2F-MFqFFf4143HS0_Wagnz%2Fuploads%2F3o8Poycwmttsgh86WO5c%2FLFS%2019.png?alt=media&amp;token=eabe9e3e-fa76-46d0-b634-284db40d7695" alt="" width="300"><figcaption></figcaption></figure></div>

3. Confirm the popup to open up in a new window and click **Open Valorx Home**.&#x20;

<div align="left"><figure><img src="https://2472585788-files.gitbook.io/~/files/v0/b/gitbook-x-prod.appspot.com/o/spaces%2F-MFqFFf4143HS0_Wagnz%2Fuploads%2FCAeMvA2MX0HyYmuoV1ki%2FLFS%201.png?alt=media&amp;token=f63fe29b-4dd9-46ed-804e-5c040a106179" alt=""><figcaption></figcaption></figure></div>

4. Before opening the app it will perform the steps of launch and set up in Valorx Fusion, then the Runtime app will open.

{% hint style="info" %}
The Valorx App will initiate or start from the designated Workflow where the LFC (Launch from CRM) has been set up.
{% endhint %}

#### Runtime Experience on Mac Platform

Once, the Designer has finished creating the **Detail Page Button** and adding it to the **Page Layout**, it is now time to run the app on **Mac**. Follow the steps below to run the app on the **Mac** platform.

1. Navigate to the **Sales** section and either select the Object from the header or search for it. Then, click on the record to open it.

<figure><img src="https://2472585788-files.gitbook.io/~/files/v0/b/gitbook-x-prod.appspot.com/o/spaces%2F-MFqFFf4143HS0_Wagnz%2Fuploads%2F8JuSjkeWWNmnrilwIxN9%2FLFS%207.png?alt=media&amp;token=2482e5d0-d1ce-4369-b0c2-63a26d4d9f66" alt=""><figcaption></figcaption></figure>

2. On the right-hand side, choose the **Detail Page Button** from the dropdown menu.

<div align="left"><figure><img src="https://2472585788-files.gitbook.io/~/files/v0/b/gitbook-x-prod.appspot.com/o/spaces%2F-MFqFFf4143HS0_Wagnz%2Fuploads%2F3o8Poycwmttsgh86WO5c%2FLFS%2019.png?alt=media&amp;token=eabe9e3e-fa76-46d0-b634-284db40d7695" alt="" width="300"><figcaption></figcaption></figure></div>

3. When the message "**Open this page?**" pops up, click on the **Open** button. This message displays when users have chosen the behavior to "**Display in a new window**".

<div align="left"><figure><img src="https://2472585788-files.gitbook.io/~/files/v0/b/gitbook-x-prod.appspot.com/o/spaces%2F-MFqFFf4143HS0_Wagnz%2Fuploads%2F8zIp4EBeBhHpvc7kjmaS%2FLFS%2020.png?alt=media&amp;token=938eeb42-2c7d-4ce2-a8b4-97200ed4f6d5" alt="" width="481"><figcaption></figcaption></figure></div>

4. When the message below appears, click on **Allow** to grant permission for downloading the file.

<div align="left"><figure><img src="https://2472585788-files.gitbook.io/~/files/v0/b/gitbook-x-prod.appspot.com/o/spaces%2F-MFqFFf4143HS0_Wagnz%2Fuploads%2FqyNLfJ2Ajms8JKfYuVr4%2FLFS%2021.png?alt=media&amp;token=3f70e0b9-ed4f-4c63-b373-3a0d4a41bc1d" alt=""><figcaption></figcaption></figure></div>

5. To launch the Runtime Valorx App on **Mac**, navigate to your downloads folder and open the downloaded file.

{% hint style="info" %}
Launch behavior from the **CRM** platform exhibits variations between **v1.9** and prior versions of the managed package compared to the **upcoming v2.0** release. This variation is applicable for **Windows** and **Mac** platforms. For more detailed information, please refer to the release notes of the managed package for [**version 2.0**](https://docs.valorx.com/Versions-and-release-notes/Versions-and-release-notes/managed-packages/version-2.0).
{% endhint %}

###


# App Permissions

The **App Permissions** feature in the Fusion App enables users to understand and review their field permissions while working in runtime mode. This helps ensure that users are aware of their access levels for various fields within the app.

**Accessing App Permissions**

Users can access the **App Permissions** window directly from the Fusion ribbon:

* In the **Control Panel** section of the Fusion ribbon, click the **User Info** button.
* Then, click on **App Permissions** button.

<figure><img src="https://2472585788-files.gitbook.io/~/files/v0/b/gitbook-x-prod.appspot.com/o/spaces%2F-MFqFFf4143HS0_Wagnz%2Fuploads%2FbJJEPzVI4fLgqy6Zn9pl%2FApp%20Permissions.gif?alt=media&amp;token=0b04c348-4a84-4ae1-a8b1-69bb50060eeb" alt=""><figcaption></figcaption></figure>

**Overview of the App Permissions Window**

The **App Permissions** window provides an overview of all objects and fields included in the Fusion App, along with the specific permissions applied to each field for the logged-in user. The permissions indicate the level of access (such as read, create, update and filter) that the user has for each field based on their assigned roles and permissions.

<figure><img src="https://2472585788-files.gitbook.io/~/files/v0/b/gitbook-x-prod.appspot.com/o/spaces%2F-MFqFFf4143HS0_Wagnz%2Fuploads%2FYdNPMsTWW4di7Wv4u4sY%2FApp%20Permissions%20Details.png?alt=media&amp;token=14e2f3bc-1b25-4cd8-94c0-45c33d2eb13c" alt=""><figcaption></figcaption></figure>

**Caching of Field Permissions**

It's important to note that field permissions are cached for the duration of the Excel process. This means:

* Permissions are loaded once when Excel is launched and remain in effect for that session.
* To refresh field permissions, users need to restart Excel, which will initiate a new session and update permissions according to the latest access levels.


# Toolbox

The **Toolbox** is part of the Runtime UX and provides quick access to essential grid actions. Designers can configure Toolbox options in **Design Studio** under **Workflow and UX**. Once enabled, selected Toolbox buttons will appear on the **Runtime Ribbon** for users.

> Note: Toolbox is not visible on the Valorx Fusion Ribbon in Design Studio.

***

## Accessing the Toolbox

1. Open the app in **Design Studio**.
2. Click **Workflow and UX**.
3. Under **Ribbon UX**, find the **Toolbox** section.
4. Select the buttons you want to display on the Runtime Ribbon.
5. Close it and click **Save and Run** to see the Toolbox in Runtime.

<figure><img src="https://2472585788-files.gitbook.io/~/files/v0/b/gitbook-x-prod.appspot.com/o/spaces%2F-MFqFFf4143HS0_Wagnz%2Fuploads%2Fh17MksmUhdonFJ19IpHr%2FAdd%20or%20Hide%20Toolbox%20item.gif?alt=media&amp;token=ad0a32d0-6eff-4686-a3dc-c8984c2a9204" alt=""><figcaption><p>Accessing Toolbox</p></figcaption></figure>

***

## Toolbox Features

### Insert Row(s)

Add **1–10,000 rows** directly into Workbook.

1. Place the cursor where the new rows should be inserted.
2. To add a single row, click **Insert 1 Row**.
3. To add 1–10 rows, use the **Insert Row(s)** dropdown and select the number.
4. For larger numbers, choose **Custom Rows**, enter the value (up to 10,000), and click **OK**.

<figure><img src="https://2472585788-files.gitbook.io/~/files/v0/b/gitbook-x-prod.appspot.com/o/spaces%2F-MFqFFf4143HS0_Wagnz%2Fuploads%2FV1vJrqppzjA0FquNtT7c%2FInsert%20Rows.gif?alt=media&amp;token=cc8c6aec-196d-4203-ae27-14d978d21788" alt=""><figcaption><p>Insert Row(s)</p></figcaption></figure>

***

### Clear Row(s)

Clear all the rows from the grid **without affecting the CRM**.

**Usage:**

1. Select the grid.
2. Click **Clear Row(s)**.
3. All rows are cleared from the grid, but records remain safe in the CRM.

**Note:** Use **Clear Row(s)** when you want to reset or clean up the entire workbook grid while keeping the records safe in the CRM.

<figure><img src="https://2472585788-files.gitbook.io/~/files/v0/b/gitbook-x-prod.appspot.com/o/spaces%2F-MFqFFf4143HS0_Wagnz%2Fuploads%2FPllb67TZUziJNZZ2gafO%2FClear%20Rows.gif?alt=media&amp;token=ea6539a3-7a93-4b8f-83e7-ba0d818c9696" alt=""><figcaption><p>Clear Rows</p></figcaption></figure>

***

### Delete Row(s)

Delete the selected rows from both the workbook **and the CRM**.

**Usage:**

1. Highlight the rows in the grid.
2. Click **Delete Row(s)**.
3. The data is removed from the workbook and permanently deleted from the CRM.

**Note:** Use **Delete Row(s)** when you want to completely remove records from both Excel and the CRM.

<figure><img src="https://2472585788-files.gitbook.io/~/files/v0/b/gitbook-x-prod.appspot.com/o/spaces%2F-MFqFFf4143HS0_Wagnz%2Fuploads%2FSkNm6l8JqURjlAtZuUo9%2FDelete%20Rows.gif?alt=media&amp;token=7259d012-457f-43a0-be2a-a5be8e351108" alt=""><figcaption><p>Delete Row(s)</p></figcaption></figure>

***

### Lookup

The **Lookup** feature allows users to update records in the grid using a Salesforce lookup field. Instead of typing values manually, you can search and select from existing records to ensure accuracy and consistency.

**How it works:**

1. In the grid, select one or more rows that contain a lookup field.
2. Click the **Lookup** button on the Runtime Ribbon.
3. A **Lookup window** opens, displaying available records for the lookup field.
   * Use the search option to quickly find the record you need.

**Update options:**

* **Single Value:**

  * If you select multiple rows but choose a *single* record in the Lookup window, all selected rows will be updated with that same record.

  <figure><img src="https://2472585788-files.gitbook.io/~/files/v0/b/gitbook-x-prod.appspot.com/o/spaces%2F-MFqFFf4143HS0_Wagnz%2Fuploads%2Fa7c4EJjn5UDPSTBxAELJ%2FLookup%20Single%20Select.gif?alt=media&amp;token=0a33fa0b-d3c4-4462-9590-79e5bd7f44ae" alt=""><figcaption><p>Lookup Single Value</p></figcaption></figure>

* **Multiple Values:**

  * If you select multiple rows, you can also choose a different value for each row by enabling the Select Multiple Values.

  <figure><img src="https://2472585788-files.gitbook.io/~/files/v0/b/gitbook-x-prod.appspot.com/o/spaces%2F-MFqFFf4143HS0_Wagnz%2Fuploads%2F93ubbCAyAszRIUNP8PE0%2FLookup%20Multi%20Select.gif?alt=media&amp;token=c4f2f10f-6126-4c80-b445-30ab56314f94" alt=""><figcaption><p>Lookup Multiple Values</p></figcaption></figure>

**Key benefits:**

* Ensures data integrity by only allowing valid Salesforce records.
* Saves time when updating multiple rows at once.
* Reduces errors compared to manual entry.

***

### Multiselect Picklist

The **Multiselect Picklist** feature allows users to update fields that support multiple selections.

**Setup:**

1. In **Design Studio**, configure the required multi-select picklist fields in **Data Modelling and Maps**.
2. Add at least one multi-select picklist field to the grid.

**Usage:**

* Once enabled and present in the grid, the **Multiselect Picklist** button will appear on the Runtime Ribbon.
* If no multi-select picklist fields are included in the app’s grid, the button will not be visible at runtime.

<figure><img src="https://2472585788-files.gitbook.io/~/files/v0/b/gitbook-x-prod.appspot.com/o/spaces%2F-MFqFFf4143HS0_Wagnz%2Fuploads%2FbK9WZWL6UvcSepJWsE1n%2FMultiselect%20Picklist.gif?alt=media&amp;token=ad0b8375-281b-465b-b60d-755e059f6d29" alt=""><figcaption><p>Multiselect Picklist</p></figcaption></figure>

**Key benefit:**\
Provides users with a quick and reliable way to work with Salesforce multi-select picklist fields directly in Workbook.

***

### Customize Grid

The **Customize Grid** feature lets users add or remove fields in the grid at runtime.

**Setup:**

1. In **Design Studio**, go to **Maps**.
2. Select the Object Map and click **Edit**.
3. Under **Display Options**, enable **Allow adding dynamic columns (runtime mode)**.
4. Click **Save**.
5. The **Customize Grid** button will now appear on the Runtime Ribbon.

<figure><img src="https://2472585788-files.gitbook.io/~/files/v0/b/gitbook-x-prod.appspot.com/o/spaces%2F-MFqFFf4143HS0_Wagnz%2Fuploads%2F1lEGe0Me8bkrMPnBGXfr%2FCustomized%20Grid%20Setup.gif?alt=media&amp;token=7bbae070-7aed-4864-a88a-6b271f11fce0" alt=""><figcaption><p>Setup - Customized Grid</p></figcaption></figure>

**Usage:**

1. Click **Customize Grid** in Runtime.
2. To **add fields**, check the boxes next to the fields and click **Customize**.
3. To **remove fields**, uncheck the boxes or click **Remove New Fields** to clear all added fields.
   * Note: Existing fields in the grid cannot be removed.

<figure><img src="https://2472585788-files.gitbook.io/~/files/v0/b/gitbook-x-prod.appspot.com/o/spaces%2F-MFqFFf4143HS0_Wagnz%2Fuploads%2Fe9ewjaRtXgdTtQyF5KMm%2FCustomized%20Grid.gif?alt=media&amp;token=b06944f6-2ac3-4db4-83c4-bd8c0f45e5bd" alt=""><figcaption><p>Customized the grid</p></figcaption></figure>

***

### Mass Modifier

The **Mass Modifier** helps you apply bulk changes to large sets of data directly from the Runtime Ribbon. Designers must enable this feature under **Workflow and UX** in Design Studio.

**Using Mass Modifier:**

1. Open the app in **Runtime** and click **Mass Modifier**.
2. In the **Mass Modifier window**, configure the following:
   * **Field Name** – select the field to update.
   * **Apply On** – choose where to apply the changes:
     * *All Records* – update every record.
     * *Selection* – update only the rows you selected.
     * *Visible Records* – update the rows currently visible in Workbook.
   * **Action** – choose how to update the field (*Change To, Suffix, Prefix*).
   * **Input Value** – required if you choose *Change To, Suffix,* or *Prefix*.
3. (Optional) Click **Change To** and select a grid from the available Maps.
4. Click **Apply** to update the records.

<figure><img src="https://2472585788-files.gitbook.io/~/files/v0/b/gitbook-x-prod.appspot.com/o/spaces%2F-MFqFFf4143HS0_Wagnz%2Fuploads%2FxFxWi6EnXj9GsCctqNO7%2FMass%20Modifier%20v3.gif?alt=media&amp;token=2294f303-a756-41f2-bb31-1c6f6a830247" alt=""><figcaption><p>Mass Modifier</p></figcaption></figure>

***

### Rich Text Editor

Rich Text Editor is a powerful feature of our **Workflow and UX** **Toolbox**. With this feature, users now have the ability to edit the "**Text Area**" using the dedicated Valorx editor. The **Rich Text Editor** can be accessed conveniently through the **Toolbox** buttons located under the **Valorx Runtime** ribbon.

To take advantage of this exciting feature, users will need to enable the Rich Text Editor button under Workflow and UX settings. Once enabled, users can leverage the full functionality of the Rich Text Editor to enhance their text editing experience.

* Open an App in **Design Studio** and click **Workflow and UX** from the Valorx Fusion ribbon button.
* Enable “Rich Text Editor” under Toolbox.

<figure><img src="https://2472585788-files.gitbook.io/~/files/v0/b/gitbook-x-prod.appspot.com/o/spaces%2F-MFqFFf4143HS0_Wagnz%2Fuploads%2FKjzowsK05Dm3zSlSrAJQ%2FRich%20Text%20Editor.png?alt=media&amp;token=4e023cc5-ec2b-4792-939c-33e1573f5e8e" alt=""><figcaption></figcaption></figure>

* Click **Data Modelling** and select the fields with text under Data Modelling. (Long text or Rich text).

<figure><img src="https://2472585788-files.gitbook.io/~/files/v0/b/gitbook-x-prod.appspot.com/o/spaces%2F-MFqFFf4143HS0_Wagnz%2Fuploads%2FC30l0NIdczZR4zLg5E97%2FRich%20Text%20Editor%201.png?alt=media&amp;token=25289226-419e-485f-a49d-c671611492e9" alt=""><figcaption></figcaption></figure>

{% hint style="info" %}
Create a Custom object and add a Field in Salesforce in case you do not find fields with Rich Text in Data Modelling.
{% endhint %}

* Save and run the app.&#x20;
* Select a field and click on **Rich Text Editor** from the Runtime ribbon button under **Toolbox**.
* Make the desired changes to the content using the available formatting options provided by the Rich Text Editor.
* Once done with the changes click on **Continue**.

<figure><img src="https://2472585788-files.gitbook.io/~/files/v0/b/gitbook-x-prod.appspot.com/o/spaces%2F-MFqFFf4143HS0_Wagnz%2Fuploads%2FhXMVjFOxhfwXhvXyN83i%2FRich%20Text%20Editor%202.png?alt=media&amp;token=e0041875-1e22-41b8-b73b-c6cbca23098d" alt=""><figcaption></figcaption></figure>

***Note***: Editing will overwrite the text and direct changes to the columns is not allowed.

The Long text field will show up in the dropdown of the Rich Text Editor if the content of the Long text field exceeds the workbook cell limit (32,767 characters).

#### Expected behavior of the Rich Text Editor

**Scenario 1**: If the data is not displayed, clicking on the Rich Text Editor button should not open the editor interface, allowing you to enter or edit text.

**Scenario 2**: If data is present and your cell focus is outside the map-range, clicking on the Rich Text Editor button would typically have no direct impact on the displayed data. The Rich Text Editor button is usually used to format or edit text within a specific range or field. If the cell focus is outside the map-range, the button's functionality may not be directly applicable to the displayed data in that scenario.

<div align="left"><figure><img src="https://2472585788-files.gitbook.io/~/files/v0/b/gitbook-x-prod.appspot.com/o/spaces%2F-MFqFFf4143HS0_Wagnz%2Fuploads%2Fi83B1qk3cvpltujZ5sPX%2FRich%20Text%20Editor%20Message.png?alt=media&amp;token=8645b3b0-09f1-41d0-8d4e-56e2b988ef7c" alt="" width="373"><figcaption></figcaption></figure></div>

**Scenario 3**: When there is no Rich Text area on the map, the message displayed would typically inform the user that the Rich Text Editor functionality is not available for the current context. This message is intended to communicate that the Rich Text Editor feature cannot be utilized because there are no applicable areas or fields where text editing or formatting is supported using the Rich Text functionality.

<div align="left"><figure><img src="https://2472585788-files.gitbook.io/~/files/v0/b/gitbook-x-prod.appspot.com/o/spaces%2F-MFqFFf4143HS0_Wagnz%2Fuploads%2F4IEBXu4E882iVAE8GEe6%2FRich%20Text%20Editor%20Message%201.png?alt=media&amp;token=f185c356-220b-40d5-a1de-c88023a04d07" alt=""><figcaption></figcaption></figure></div>

**To create a field in Salesforce, follow these steps:**

1. Log in to **Salesforce** and go to **Setup**.
2. From the Setup menu, navigate to **Object Manager**.

<figure><img src="https://2472585788-files.gitbook.io/~/files/v0/b/gitbook-x-prod.appspot.com/o/spaces%2F-MFqFFf4143HS0_Wagnz%2Fuploads%2FWWhHsCXSPyI9GADvwqXK%2FRich%20Text%20Editor%203.png?alt=media&amp;token=2ec98e37-80c8-44e4-a8ed-e9a53620e2dd" alt=""><figcaption></figcaption></figure>

3. Open the desired Object and select **Fields & Relationships**.
4. On the right-hand side, click on **New**.

<figure><img src="https://2472585788-files.gitbook.io/~/files/v0/b/gitbook-x-prod.appspot.com/o/spaces%2F-MFqFFf4143HS0_Wagnz%2Fuploads%2FeRugl0wQNTjfoK3NDBuf%2FRich%20Text%20Editor%204.png?alt=media&amp;token=1c21d696-9a74-4f0f-9450-12cc1cbf0bd6" alt=""><figcaption></figcaption></figure>

5. Choose **Text Area** (Long, Rich) and click **Next**.

<figure><img src="https://2472585788-files.gitbook.io/~/files/v0/b/gitbook-x-prod.appspot.com/o/spaces%2F-MFqFFf4143HS0_Wagnz%2Fuploads%2F2i0nGsc2ZKaHL0kMJiFV%2FRich%20Text%20Editor%205.png?alt=media&amp;token=32bd4fe3-794a-408c-bca8-a13bb45108bd" alt=""><figcaption></figcaption></figure>

6. Enter the desired name for the field in the **Field Label** field.
7. Modify the Length if necessary and click **Next**.
8. Proceed to the next steps by clicking **Next** and then **Save**.

<figure><img src="https://2472585788-files.gitbook.io/~/files/v0/b/gitbook-x-prod.appspot.com/o/spaces%2F-MFqFFf4143HS0_Wagnz%2Fuploads%2FRbBW8Mt8dbMhij1NzbZO%2FRich%20Text%20Editor%206.png?alt=media&amp;token=a944153e-71d7-4841-a190-5b692a30c1f8" alt=""><figcaption></figcaption></figure>

**To add records to an object in Salesforce, adhere to the following guidelines:**

1. Go to **Sales** and access the **Object** you want to modify.
2. Select **New** and specify the **Account Name** by providing the field name.

<div align="left"><figure><img src="https://2472585788-files.gitbook.io/~/files/v0/b/gitbook-x-prod.appspot.com/o/spaces%2F-MFqFFf4143HS0_Wagnz%2Fuploads%2FgogXbMI8sVq9VaEPMsbl%2FRich%20Text%20Editor%2067.png?alt=media&amp;token=fbed1a9f-18ee-43e4-8ea8-8ae856256e86" alt="" width="563"><figcaption></figcaption></figure></div>

3. Enter the desired input in the any of **Rich text** or **Text Area** field.
4. Click on **Save** to save the changes.

<figure><img src="https://2472585788-files.gitbook.io/~/files/v0/b/gitbook-x-prod.appspot.com/o/spaces%2F-MFqFFf4143HS0_Wagnz%2Fuploads%2F2ickKoKMc1aAijw3tugU%2FRich%20Text%20Editor%208.png?alt=media&amp;token=996f8871-92ce-4d24-b9ff-c3bda833add1" alt=""><figcaption></figcaption></figure>


# Supported Platforms

Windows, Mac and Google Sheets

Valorx brings your **CRM** into spreadsheet such as **Microsoft Excel** and **Google Sheet**. Valorx provides two way connectivity between **CRM** and **Excel**.

Valorx supports **Mac** and **Google** **Sheets**. Users who interact with Salesforce data on daily basis can try Valorx ultimate sheet connector - a mix of speed, amazing UI and bulk data processing.

Valorx will make this happen by providing a natural sheets experience for both simple and complex computation needs while maintaining the security, needs and controls established within **Salesforce**.

User can install the latest **Valorx** **Fusion** Versions on **Mac** and **Google** **Sheets**.

Visit the below to know more about these supported platforms.

{% content-ref url="/pages/-MGBByEo9v\_JFpFdDV7v" %}
[Microsoft Excel for Windows](/valorx-fusion/runtime/supported-platforms/microsoft-excel-for-windows)
{% endcontent-ref %}

{% content-ref url="/pages/-MGBCnjzgB6c1EBYSWki" %}
[Microsoft Excel for Mac](/valorx-fusion/runtime/supported-platforms/microsoft-excel-for-mac)
{% endcontent-ref %}

{% content-ref url="/pages/-MGBD7YreDRMeyaGnPmN" %}
[Google Sheet](/valorx-fusion/runtime/supported-platforms/google-sheet)
{% endcontent-ref %}


# Microsoft Excel for Windows

Excel is one of the supported platforms where users can run Valorx Fusion

Microsoft Excel is a widely used tool for data management and computation. Valorx enhances this experience by building a powerful bridge between **Excel** and **Salesforce**.

**Valorx Fusion** is designed with all users in mind—aiming to simplify complex workflows and deliver a seamless experience when working with Salesforce data directly in Excel.

In this section, you’ll find:

* **Minimum System Requirements** for running Valorx Fusion
* **Installation Instructions** to help you get started quickly

***

### Minimum Requirements for Valorx Fusion

To ensure the best experience with Valorx Fusion, please review the supported environments below:

🖥️ **Supported Windows Client Versions**

Valorx Fusion’s Excel add-in is built on widely supported Microsoft technologies and runs smoothly on the following Windows Client versions:

<table data-header-hidden><thead><tr><th width="213"></th><th width="166"></th><th></th></tr></thead><tbody><tr><td><strong>Windows Version</strong></td><td><strong>Compatible</strong></td><td><strong>Remarks</strong></td></tr><tr><td><strong>Windows 11</strong></td><td>✔ Yes</td><td>Fully supported and recommended</td></tr><tr><td><strong>Windows 10</strong></td><td>✔ Yes</td><td>Fully supported and recommended</td></tr><tr><td><strong>Windows 8.1</strong></td><td>✔ Yes</td><td>Supported with additional setup</td></tr></tbody></table>

> \*Although technically supported on Windows 7, we strongly recommend upgrading to Windows 10 or later for optimal security and performance.

📊 **Supported Microsoft Excel Versions**

The add-in works with the most widely used versions of Microsoft Excel:

<table data-header-hidden><thead><tr><th width="199"></th><th width="172"></th><th></th></tr></thead><tbody><tr><td><strong>Excel Version</strong></td><td><strong>Compatible</strong></td><td><strong>Remarks</strong></td></tr><tr><td><strong>Microsoft 365</strong></td><td>✔ Yes</td><td>Fully supported (32-bit and 64-bit)</td></tr><tr><td><strong>Excel 2021 / 2019</strong></td><td>✔ Yes</td><td>Fully supported</td></tr><tr><td><strong>Excel 2016 / 2013</strong></td><td>✔ Yes</td><td>Fully supported</td></tr><tr><td><strong>Excel 2010</strong></td><td>✔ Yes</td><td>Supported, but older</td></tr></tbody></table>

📌 **Our Recommendation**

For optimal performance and the most reliable experience, we recommend:

* Using **Microsoft Excel 2016 or later**
* Running on **Windows 10 or Windows 11**

***

### Installing Valorx Fusion

To get Valorx Fusion running on your computer, please follow the below steps.

* Click [**here**](https://api.valorx.com/api/download/latest) to download the latest **Valorx** **Fusion**.
* Once the installation page pops up, check in the **Terms and Conditions** and click on **INSTALL**.

<div align="left"><img src="https://2472585788-files.gitbook.io/~/files/v0/b/gitbook-legacy-files/o/assets%2F-MFqFFf4143HS0_Wagnz%2F-MjcemQxeyFxREXPJuro%2F-MjchmZy_Vus0AIaI8s-%2FMicrosoftTeams-image%20(5).png?alt=media&amp;token=f9d65394-aa6f-44da-af20-f86b4bd2b11c" alt="" width="375"></div>

* Once the installation is complete user need to click on **Finish**.

<div align="left"><img src="https://2472585788-files.gitbook.io/~/files/v0/b/gitbook-legacy-files/o/assets%2F-MFqFFf4143HS0_Wagnz%2F-MjcemQxeyFxREXPJuro%2F-MjciVaOV9ds3M01Uv6m%2FMicrosoftTeams-image%20(6).png?alt=media&amp;token=042ed828-21d8-414d-942e-82f2caff2f25" alt="" width="375"></div>

* Once the installation is completed, open Microsoft Excel, and you should see **Valorx** **Fusion** **Ribbon** tab. This means you have successfully installed Valorx on your computer.
* Select **Valorx Fusion** and click on **Start**.

![](https://2472585788-files.gitbook.io/~/files/v0/b/gitbook-x-prod.appspot.com/o/spaces%2F-MFqFFf4143HS0_Wagnz%2Fuploads%2F3sxiYXFEcwdiecdyh4gm%2FRelease%20Notes%20Fusion%20V15%20-%2010.png?alt=media\&token=c21b21bf-74fd-44e7-ba72-745467269e4f)


# Microsoft Excel for Mac

Microsoft Excel for Mac is one of the platforms where users can run the Valorx Fusion app

**Mac** and **Google** **Sheets** are the two other runtime platforms that Valorx supports. Let's have a look at Mac and its installation and also know how does it work.

Visit Valorx for Mac: [**Microsoft AppSource**](https://appsource.microsoft.com/en-us/product/office/WA200001612?tab=Overview) for more information.

### Installing Valorx Fusion for Mac

To get **Valorx** **Fusion** installed and running on your **Mac**, please follow the below steps.

* Open an Excel, and click on **Insert**.
* Select **Get Add-ins,** and click on **STORE**.
* Search for **Valorx** and click on it.
* **Valorx for Salesforce** will open once the user clicks on **Valorx**.
* Click **Add**.
* Follow the install process, and provide the required **Credentials** to get started with **Valorx** **Fusion**.
* Once the installation is completed, open **Microsoft** **Excel** and the user should see the **Valorx** **Fusion** **Ribbon** tab. This means you have successfully installed Valorx on your **Mac**.

<div align="center"><img src="https://2472585788-files.gitbook.io/~/files/v0/b/gitbook-legacy-files/o/assets%2F-MFqFFf4143HS0_Wagnz%2F-Mj3ZjABJC2RQuSDA4u7%2F-Mj3_lCkJ4h_IL1gxpQ0%2FMicrosoftTeams-image%20(4).png?alt=media&amp;token=51909708-483e-419b-adc0-21c945bcd19a" alt="Mac Installation"></div>

### Connecting to Salesforce

Once the installation is completed, open **Microsoft** **Excel**, and click on **Valorx** **Fusion** **Ribbon** tab for getting started.

The user needs to click on **Start** and a Task Pane on the side will open which will have a **Connections** tab,  **Apps** and **App** **Menus** tab will appear once the user is successfully authenticated.

**Connections**: This is used to create new connections and find any existing connections. Click on **Connect** button to connect with **Salesforce**. Users can connect to multiple **Salesforce** **Orgs**.

<div align="left"><figure><img src="https://2472585788-files.gitbook.io/~/files/v0/b/gitbook-x-prod.appspot.com/o/spaces%2F-MFqFFf4143HS0_Wagnz%2Fuploads%2FmYGBJxm2Vm1FIqoCxIz1%2FMac.png?alt=media&amp;token=3218b75c-8c0a-4a0e-a3ae-4e220e0d5094" alt="" width="266"><figcaption></figcaption></figure></div>

**Apps**: Users can open assigned apps from **Apps** List. Users can also search and find the apps from the list. Users can always create a New Copy or open the App in runtime by selecting the options.

<div align="left"><figure><img src="https://2472585788-files.gitbook.io/~/files/v0/b/gitbook-x-prod.appspot.com/o/spaces%2F-MFqFFf4143HS0_Wagnz%2Fuploads%2Fz5mAywnAAOcjy9iPegMS%2FMac%201.png?alt=media&amp;token=d2430a1a-dee5-49df-a99c-1b28d0b30f26" alt="" width="263"><figcaption></figcaption></figure></div>

**App** **Menus**: **App** **Menus** will open automatically when an app is opened. **App** **Menus** section will order the buttons configured for that particular app.

<div align="left"><figure><img src="https://2472585788-files.gitbook.io/~/files/v0/b/gitbook-x-prod.appspot.com/o/spaces%2F-MFqFFf4143HS0_Wagnz%2Fuploads%2F1FWYZZtJW6CdxS7HKE5M%2FMac%202.png?alt=media&amp;token=cc8d9471-61b1-4c76-b8df-14cf1ab2f738" alt="" width="265"><figcaption></figcaption></figure></div>

#### Features not supported by **Mac**

<table><thead><tr><th width="385">Features</th><th>Sub-Features</th></tr></thead><tbody><tr><td>Tasks</td><td>API<br>Refresh Map<br>Data Import<br>Launch CRM</td></tr><tr><td>Workflow and UX-Toolbox-Common Tasks-Decision Rule Type</td><td>Launch Mode</td></tr><tr><td>Workflow and UX-Toolbox-Display</td><td>Dynamic Icons</td></tr><tr><td>Maps-Settings-Display Options-General</td><td>Customized Grids<br>Allow adding dynamic columns in runtime</td></tr><tr><td>Offline Mode</td><td><p>Run when going Offline</p><p>Run when going Online</p><p>Enable in Offline mode (if possible)</p></td></tr></tbody></table>

#### Inserting Row Using Right-Click Options

Inserting rows using the right-click option is one way where users will be able to insert the rows. Select one or more entire rows by moving the cursor to the row numbers. Right-click the selection and select Insert rows from the selection. Select either the row that needs to be inserted above or below the selection.

<div align="left"><figure><img src="https://2472585788-files.gitbook.io/~/files/v0/b/gitbook-x-prod.appspot.com/o/spaces%2F-MFqFFf4143HS0_Wagnz%2Fuploads%2FYpW9tU5EQIr2K03XmZDj%2FInsert%20row.png?alt=media&amp;token=be24e962-5191-4e92-a89c-9a74f0914c48" alt="" width="271"><figcaption></figcaption></figure></div>

In the below image we inserted a row below E9 and when we click **Save** it will display the data in E10.

<figure><img src="https://2472585788-files.gitbook.io/~/files/v0/b/gitbook-x-prod.appspot.com/o/spaces%2F-MFqFFf4143HS0_Wagnz%2Fuploads%2FpAG2J3FuDR6Og3nZhlZl%2FInsert%20row1.png?alt=media&amp;token=f5997892-af37-4520-9de7-26e01bc9cbee" alt=""><figcaption></figcaption></figure>

<figure><img src="https://2472585788-files.gitbook.io/~/files/v0/b/gitbook-x-prod.appspot.com/o/spaces%2F-MFqFFf4143HS0_Wagnz%2Fuploads%2Fk8WCvEplJL3DxnUvCKhE%2FInsert%20row2.png?alt=media&amp;token=c3ff1e5c-5310-423c-a9ca-69630eba5141" alt=""><figcaption></figcaption></figure>

{% hint style="info" %}
Formulas and default values won't be dragged to the newly inserted rows with a right-click insert, unlike Insert rows in the toolbox.
{% endhint %}

#### Recent Updates

* Users will now find an option to download the file for Mac version 16.60. Previously, the file used to open automatically but due to security-related updates for v16.60 this change has taken place. Now, with v16.60 users need to manually open the file or app. [**Refer Mac Release Note 18**](/valorx-fusion/versions-and-release-notes/windows/older-versions/mac/mac-version-18) for more information on this update.

#### Known Issues

* Currently, **.xlsb** format apps are not supported by Mac and Google Sheets in **Runtime Mode**. Save the app in **.xlsx** or **.xlsm** format in **Design Studio** to overcome this issue.&#x20;
* ".xlsm" format files are not opening in Excel for Mac for versions above 16.59. User should open the “.xlsm” file manually from the Download folder in Mac for Excel - versions above 16.59.


# Google Sheet

Google Sheets are one of the platforms where users can run Valorx Fusion app

Google sheets is one of the platforms where users can run Valorx Fusion App. This page contains the below sections which provide information related to Google Sheets.

[**Introduction**](/valorx-fusion/runtime/supported-platforms/google-sheet/introduction)

[**Getting Started**](/valorx-fusion/runtime/supported-platforms/google-sheet/getting-started)

[**Pop-up Blockers**](/valorx-fusion/runtime/supported-platforms/google-sheet/pop-up-blockers)

[**Expected Behaviors**](/valorx-fusion/runtime/supported-platforms/google-sheet/expected-behaviors)

[**Runtime**](/valorx-fusion/runtime/supported-platforms/google-sheet/runtime)


# Introduction

**Google Sheets** is one of the two other runtime platforms that Valorx supports. Google sheets does not support Design Studio mode it suuports only Runtime. Let's have a look at **Google** **Sheets** and its installation and also know how it works.

Visit Valorx for Google Sheets: [**GSuite Marketplace**](https://gsuite.google.com/marketplace/app/valorx_fusion/823192635690)

### Installing Valorx Fusion for Google Sheets

To get **Valorx** **Fusion** installed and running on your **Google Sheets**, please follow the below steps.

* Open a blank **Google** **Sheet**
* Select **Add-ons**, and click on **Get add-ons**.

<div align="left"><img src="https://2472585788-files.gitbook.io/~/files/v0/b/gitbook-legacy-files/o/assets%2F-MFqFFf4143HS0_Wagnz%2F-MjDthWl0zq4CXsZsdKc%2F-MjDyBl-K9prpvvLbwec%2FGoogle%20Sheets.png?alt=media&amp;token=946c1397-3044-4e01-a40d-eef147e21e95" alt="" width="563"></div>

Search for **Valorx for Salesforce**, and click on **Valorx Fusion**.

![](https://2472585788-files.gitbook.io/~/files/v0/b/gitbook-legacy-files/o/assets%2F-MFqFFf4143HS0_Wagnz%2F-MjDthWl0zq4CXsZsdKc%2F-MjDxPgLpqOzzVFmDIKH%2FGoogle%20Sheets%201.png?alt=media\&token=e21411a3-31b4-46dc-9023-e8c3683e26eb)

* Click on **Install**.
* Follow the installation process, and provide the required **Credentials** to get started with **Valorx** **Fusion**.

![](https://2472585788-files.gitbook.io/~/files/v0/b/gitbook-legacy-files/o/assets%2F-MFqFFf4143HS0_Wagnz%2F-MjYSfIddyPhp2FjD8oK%2F-MjYTatmrxm540HXr56h%2FGoogle%20Sheets%202.png?alt=media\&token=8ceb574f-e8e3-4d79-949c-c77cc2b614c6)


# Getting Started

### Getting Started

* Once the installation is completed, open a blank **Google** **Sheet** and the user should go back to **Add-ons**, and here user will find **Valorx for Salesforce** hover on it, and click on **Start**.
* Now a Task pane will open where user can add a new connection by clicking on **New** **Connection**.
* Provide the credentials, and click on **Add**.

<div align="left"><figure><img src="https://2472585788-files.gitbook.io/~/files/v0/b/gitbook-x-prod.appspot.com/o/spaces%2F-MFqFFf4143HS0_Wagnz%2Fuploads%2FBDSLbtz8sRxFCQzNpyzV%2FGsheets%20new.png?alt=media&amp;token=152ed540-f759-44cc-824f-ddfa772d0751" alt="" width="279"><figcaption></figcaption></figure></div>

**Connections**: This is used to create new connections and find any existing connections. Users can find which Org they are connected. Users can connect to multiple **Salesforce** **Orgs**. This will show all the information like which org is connected, it will provide an option to logout from the connected org, gives an option to connect.

<div align="left"><figure><img src="https://2472585788-files.gitbook.io/~/files/v0/b/gitbook-x-prod.appspot.com/o/spaces%2F-MFqFFf4143HS0_Wagnz%2Fuploads%2FgpiAlzRsdxmi55nReOzS%2FGsheets%20new%201.png?alt=media&amp;token=cf12c325-eab0-4b70-9bf8-63b2773f3eca" alt="" width="283"><figcaption></figcaption></figure></div>

Users will receive the below warning message when they try to delete a connection.

<div align="left"><figure><img src="https://2472585788-files.gitbook.io/~/files/v0/b/gitbook-x-prod.appspot.com/o/spaces%2F-MFqFFf4143HS0_Wagnz%2Fuploads%2FcYNrTarHl8WxV3fFfrmA%2FGsheets%20new%202.png?alt=media&amp;token=056d6153-993e-412a-9535-61e220760692" alt="" width="283"><figcaption></figcaption></figure></div>

**Apps**: Users can open assigned apps from **Apps** List in Runtime mode. Users can search and find the apps from the list. Once an app is open users can find the option to open the App Menu or a  New Copy of the app.&#x20;

Users can find the owner information by hovering on the app name. This will show when the app modified or used.

<div align="left"><figure><img src="https://2472585788-files.gitbook.io/~/files/v0/b/gitbook-x-prod.appspot.com/o/spaces%2F-MFqFFf4143HS0_Wagnz%2Fuploads%2F1iS6TziW4UqjaFUOnnl5%2FApps.PNG?alt=media&amp;token=b199b3dc-de77-4bae-aa9d-1a38db9c817f" alt="" width="263"><figcaption></figcaption></figure></div>

#### App Menu

Users can find this **App Menu** when an app is opened. Users will find the Workflow action buttons which are created and the toolbox default buttons under App Menu.

<div align="left"><figure><img src="https://2472585788-files.gitbook.io/~/files/v0/b/gitbook-x-prod.appspot.com/o/spaces%2F-MFqFFf4143HS0_Wagnz%2Fuploads%2Fs1NtCZnDUVMSdOA2lVnx%2FGsheets%20new%204.png?alt=media&amp;token=9f1ba07a-3868-4024-ba11-daadaefa0ce5" alt="" width="281"><figcaption></figcaption></figure></div>


# Pop-up Blockers

#### MS Edge and Google Chrome Pop-ups

We have noticed that, users facing issues while opening an app due to pop-up blocked from the browser both **MS Edge** and **Google Chrome**. Below are the steps to follow when users are stuck with the pop-ups.

#### MS Edge Browser

* On **MS Edge Browser** go to **Settings**.
* Click **Cookies and Site Permissions** from the "Settings" bar on the left hand side.
* Click **Pop-ups and redirects** from "All Permissions".
* Select the URL from "Allow", and click **Remove**.

![](https://2472585788-files.gitbook.io/~/files/v0/b/gitbook-x-prod.appspot.com/o/spaces%2F-MFqFFf4143HS0_Wagnz%2Fuploads%2FY0XVodBIAhvkE8EpRspv%2FEdge.png?alt=media\&token=58050c08-b719-4f5e-b17a-cf1027358171)

#### Google Chrome Browser

* On **Google Chrome Browser** go to **Settings**.
* Click **Security and Privacy** from the "Settings" bar on the left hand side.
* Click **Site Settings**.
* Select Pop-ups and redirects from "Content".
* Select the URL from "Allowed to send pop-ups and redirects" and click **Remove**.

![](https://2472585788-files.gitbook.io/~/files/v0/b/gitbook-x-prod.appspot.com/o/spaces%2F-MFqFFf4143HS0_Wagnz%2Fuploads%2FERbao5SrZUuVI3NYg5dH%2FGoogle%20chrome.png?alt=media\&token=4867e881-f365-4d5f-aa9e-91120fe28864)


# Expected Behaviors

#### Expected Behaviors

When Google Drive API or SDK is disabled for user by the Admin in the Google workspace account, users may receive the below message while opening the App from the App list or opening an existing **Runtime App** from the Drive. Users need to contact their respective Admin if they receive these messages.

<div align="left"><figure><img src="https://2472585788-files.gitbook.io/~/files/v0/b/gitbook-x-prod.appspot.com/o/spaces%2F-MFqFFf4143HS0_Wagnz%2Fuploads%2FoFYSRg2CXJ305XsEcKx3%2FAPI%20DSK.png?alt=media&amp;token=29e5ffd9-8a94-4d0e-b326-f246de3403ae" alt="" width="272"><figcaption></figcaption></figure></div>

Below message will be displayed when new file creation is disabled by admin for the user in the Google workspace.

* When we uncheck "Allow users to create new Docs, Sheets, Slides, Drawings and Forms files

  Collaboration on existing files won't be affected."

<div align="left"><figure><img src="https://2472585788-files.gitbook.io/~/files/v0/b/gitbook-x-prod.appspot.com/o/spaces%2F-MFqFFf4143HS0_Wagnz%2Fuploads%2FnPIrL2OZIn2ft9M4Ol4D%2FMine%20type.png?alt=media&amp;token=b0a98e68-d0fa-4f7f-9156-4428a8247e77" alt="" width="272"><figcaption></figcaption></figure></div>

* When we uncheck "Allow users to create and upload any file Editing and sharing existing files won't be affected. Moving and organizing existing files may be limited. ".

<div align="left"><figure><img src="https://2472585788-files.gitbook.io/~/files/v0/b/gitbook-x-prod.appspot.com/o/spaces%2F-MFqFFf4143HS0_Wagnz%2Fuploads%2FzuA5XoDNkNlAH9DlWkLQ%2FParent%20Error.png?alt=media&amp;token=c78dbb78-101b-41e2-bfe8-32fab5c8a7a2" alt="" width="281"><figcaption></figcaption></figure></div>

When both options are checked for new file creation users will receive the below message.

<div align="left"><figure><img src="https://2472585788-files.gitbook.io/~/files/v0/b/gitbook-x-prod.appspot.com/o/spaces%2F-MFqFFf4143HS0_Wagnz%2Fuploads%2Fuz8XqdCq4hCCuWZeJxeY%2FDrive.png?alt=media&amp;token=a2f4b526-1530-4045-a0f4-fe351e27b9eb" alt="" width="279"><figcaption></figcaption></figure></div>

When user opens the existing runtime file and Google Drive is disabled by admin for the user in the Google workspace.

<div align="left"><img src="https://2472585788-files.gitbook.io/~/files/v0/b/gitbook-x-prod.appspot.com/o/spaces%2F-MFqFFf4143HS0_Wagnz%2Fuploads%2FknLc1BHDN0ltiUXjr2zC%2FGoogle%20sheets%20error%203.png?alt=media&amp;token=75cafed3-514b-4a90-b1b8-603e072b827a" alt=""></div>

When app is open and suddenly Google Drive is disabled by admin for the user in the Google workspace.

#### Features not supported by Google Sheets

<table><thead><tr><th width="384">Feature</th><th>Sub-Feature</th></tr></thead><tbody><tr><td>Tasks</td><td><p>API<br>Document<br>Launch CRM<br>Refresh Map</p><p>Data Import</p></td></tr><tr><td>Workflow and UX-Toolbox-Common Tasks</td><td>Notification Include Save Summary<br>Connect</td></tr><tr><td>Workflow and UX-Toolbox-Common Tasks-Decision Rule Type</td><td>Launch Mode</td></tr><tr><td>Workflow Ribbon UX-Toolbox</td><td>Toolbox</td></tr><tr><td>Workflow and UX-Toolbox-Display</td><td>Workflow<br>Dynamic Icons</td></tr><tr><td>Maps-Configure Lookup</td><td>Lookup</td></tr><tr><td>Maps-Settings-Display Options-General</td><td>Customized Grids<br>Allow adding dynamic columns in runtime</td></tr></tbody></table>


# Runtime

This page contains the below sections as part of the Runtime for Google Sheets.

[**Hot Upgrade**](/valorx-fusion/runtime/supported-platforms/google-sheet/runtime/hot-upgrade)

[**Google Sheets Collaboration**](/valorx-fusion/runtime/supported-platforms/google-sheet/runtime/google-sheets-collaboration)

[**Insert Row Using Right-Click Options**](/valorx-fusion/runtime/supported-platforms/google-sheet/runtime/insert-row-using-right-click-options)


# Hot Upgrade

#### Hot Upgrade

Hot Upgrade is a feature that allows the **Google Sheets** runtime users to upgrade their grid maps without opening a new runtime file. Runtime Users can view all the changes made to the App without opening a new runtime file.

* Open an Excel in Design Studio and click **Settings** from Valorx Fusion Ribbon.
* Select **Settings** from "App".
* Turn on "**Enable Hot Upgrade**" under App Performance.
* Click **Ok**.

<figure><img src="https://2472585788-files.gitbook.io/~/files/v0/b/gitbook-x-prod.appspot.com/o/spaces%2F-MFqFFf4143HS0_Wagnz%2Fuploads%2F95AcUy9924xQPAUJYXrv%2FHot%20Upgrade.png?alt=media&amp;token=02cf5314-ec5e-483e-8ec4-2975366ab44e" alt=""><figcaption></figcaption></figure>

{% hint style="info" %}
Open an existing file from **Google Drive** or hard refresh the file which is open already.
{% endhint %}

The **App Menu** will open directly when there are no changes made to the App. Runtime users will receive an App Modified message when there are any changes made in the App and users need to click on “**Yes**” which will regenerate the newer grid map. Grids will require to be cleared before the new map is loaded.

<div align="left"><figure><img src="https://2472585788-files.gitbook.io/~/files/v0/b/gitbook-x-prod.appspot.com/o/spaces%2F-MFqFFf4143HS0_Wagnz%2Fuploads%2FPveiRdzeL7yUGqEl7rSo%2FHot%20Upgrade%201.png?alt=media&amp;token=4aebed04-4c21-4ddf-a6cf-fdc895f042e2" alt="" width="283"><figcaption></figcaption></figure></div>

#### Following are the Design Studio scenarios where Hot upgrade will update the Maps:

* User has added/removed/updated/moved fields, changed [**display options**](/valorx-fusion/design-studio/maps/grid-map#display-options), and [**save options**](/valorx-fusion/design-studio/maps/grid-map#save-options) to the grid map using Fusion Grid Map screen.
* User has added/removed/updated/moved fields directly in Excel and has performed “Full Map Validation”.
* Filters and conditions are based on named ranges.
* New Grid Map is added to the existing mapped sheets.
* Changes in picklist values except Record Types (as they are not supported in Sheets).
* Replacing or changing the existing spacers in Grid Map will work however label of spacers will not match the label set in the app.

#### Additional Considerations for Hot Upgrade:

* Formulas, formats, and data validations added directly on Excel by the Design studio user within the map range would be lost.
* Filters and conditions based on cell references may not work.
* Deleted grid maps wouldn't be removed by the hot upgrade flow.
* If the Form map has some offline data, then it wouldn't be considered for save. User needs to run the workflow again to save data.
* Hiding or unhiding columns of the Map will not work.


# Google Sheets Collaboration

**Google Sheet** users who want to share runtime files with other users and use runtime files can do so without any difficulty. However, there are a few technical considerations to keep in mind when collaborating on shared runtime files.

When a runtime file is shared with other users in **Google Sheets**, it allows them to access the same file and make necessary changes. However, it's important to note that when single or multiple users collaborate on a shared file, users may notice latency in rendering the [**Form Map**](/valorx-fusion/design-studio/maps/form-map) compared to the original file that was initially shared.

This latency in rendering the **Form Map** during collaboration is due to the APIs used to run the shared file.

{% hint style="info" %}
The file owner typically uses "[**batchupdate**](https://developers.google.com/sheets/api/reference/rest/v4/spreadsheets.values/batchUpdate)" and "[**batchclear**](https://developers.google.com/sheets/api/reference/rest/v4/spreadsheets.values/batchClear)" methods, while the shared file utilizes "[**setValue(value)**](https://developers.google.com/apps-script/reference/spreadsheet/range#setValue\(Object\))" method.
{% endhint %}

Follow the below simple steps to share a file with other users.

* Open the runtime file in **Google Sheets**.
* Select **File** and click **Share** button and select "**Share with Others**".

<div align="left"><figure><img src="https://2472585788-files.gitbook.io/~/files/v0/b/gitbook-x-prod.appspot.com/o/spaces%2F-MFqFFf4143HS0_Wagnz%2Fuploads%2Fr0U62PjVTirEn9td74Qf%2FGsheets%20Collab.png?alt=media&amp;token=a634d9f3-f7a6-4098-881c-1a1de78e0832" alt="" width="536"><figcaption></figcaption></figure></div>

* Provide the email address of the user to whom it needs to be shared under "**Add people or groups**".
* Click **Done**.
* Once the file is shared it will be saved in **Google Drive** of the user receiving the file.

<div align="left"><figure><img src="https://2472585788-files.gitbook.io/~/files/v0/b/gitbook-x-prod.appspot.com/o/spaces%2F-MFqFFf4143HS0_Wagnz%2Fuploads%2FcZ11De8lPMtRy4eGl3aj%2FGsheets%20Collab%202.png?alt=media&amp;token=4e21849e-8984-4cc1-9443-eb08dac18898" alt="" width="465"><figcaption></figcaption></figure></div>

Here, are a few messages which Users may encounter when there is no active connection or when they are connected to a different org, and when a fresh copy of the runtime file needs to be opened.

* When a file is shared, and the User does not have the **Active Connection** (**comparing the owner of the file and the currently logged-in user**) a message will be shown to connect to that org to access the App Menu.

<div align="left"><figure><img src="https://2472585788-files.gitbook.io/~/files/v0/b/gitbook-x-prod.appspot.com/o/spaces%2F-MFqFFf4143HS0_Wagnz%2Fuploads%2FV0hK6Xg5tE9nKgzJ4nfY%2FActive.png?alt=media&amp;token=ad3d9d32-702c-4688-95b3-8c013ecbd634" alt="" width="276"><figcaption></figcaption></figure></div>

* Users will receive a message to connect to that org to access app menus when the active connection is different from the org.

<div align="left"><figure><img src="https://2472585788-files.gitbook.io/~/files/v0/b/gitbook-x-prod.appspot.com/o/spaces%2F-MFqFFf4143HS0_Wagnz%2Fuploads%2FGg0iLoJMt9grIsq4FbXR%2FNo%20connection.png?alt=media&amp;token=d57999bd-ebf5-44f5-94a3-93f3355f47f6" alt="" width="272"><figcaption></figcaption></figure></div>

* In case you're trying to open a saved runtime file in Google Drive, and you're not the owner of the file, a warning message may pop up asking you to open a fresh copy of the runtime file. This is because the owner of the file might have made changes to the runtime file after it was last saved, and opening a fresh copy ensures that the user is accessing the most up-to-date version of the runtime file.

<div align="left"><figure><img src="https://2472585788-files.gitbook.io/~/files/v0/b/gitbook-x-prod.appspot.com/o/spaces%2F-MFqFFf4143HS0_Wagnz%2Fuploads%2FGKDbbfNJsTQk8BJW74DF%2FApp%20modified.png?alt=media&amp;token=0bfcf9f8-bc1d-4759-a30e-62df0b82cc07" alt="" width="275"><figcaption></figcaption></figure></div>

To ensure smooth collaboration and usage of runtime files in **Google Sheets**, it's important for users to be aware of these considerations.


# Insert Row Using Right-Click Options

Inserting rows using the right-click option is one way where users will be able to insert the rows. Select one or more entire rows by moving the cursor to the row numbers. Right-click the selection and select Insert rows from the selection. Select either the row that needs to be inserted above or below the selection.

<div align="left"><figure><img src="https://2472585788-files.gitbook.io/~/files/v0/b/gitbook-x-prod.appspot.com/o/spaces%2F-MFqFFf4143HS0_Wagnz%2Fuploads%2FYpW9tU5EQIr2K03XmZDj%2FInsert%20row.png?alt=media&amp;token=be24e962-5191-4e92-a89c-9a74f0914c48" alt="" width="271"><figcaption></figcaption></figure></div>

In the below image we inserted a row below E9 and when we click **Save** it will display the data in E10.

<figure><img src="https://2472585788-files.gitbook.io/~/files/v0/b/gitbook-x-prod.appspot.com/o/spaces%2F-MFqFFf4143HS0_Wagnz%2Fuploads%2FpAG2J3FuDR6Og3nZhlZl%2FInsert%20row1.png?alt=media&amp;token=f5997892-af37-4520-9de7-26e01bc9cbee" alt=""><figcaption></figcaption></figure>

<figure><img src="https://2472585788-files.gitbook.io/~/files/v0/b/gitbook-x-prod.appspot.com/o/spaces%2F-MFqFFf4143HS0_Wagnz%2Fuploads%2Fk8WCvEplJL3DxnUvCKhE%2FInsert%20row2.png?alt=media&amp;token=c3ff1e5c-5310-423c-a9ca-69630eba5141" alt=""><figcaption></figcaption></figure>

{% hint style="info" %}
Formulas and default values won't be dragged to the newly inserted rows with a right-click insert, unlike Insert rows in the toolbox.
{% endhint %}


# Valorx Fusion Settings

Valorx Fusion Settings let users configure how Fusion behaves on their machine, separate from the app-level settings within Salesforce. The Settings screen is organized into four sections: **Information**, **Settings**, **Logs**, and **Runtime Cache**, each covering a different aspect of the Fusion experience.

#### Accessing Settings

To open Valorx Fusion Settings, click the **Settings** button on the Valorx Fusion Ribbon.

<figure><img src="https://2472585788-files.gitbook.io/~/files/v0/b/gitbook-x-prod.appspot.com/o/spaces%2F-MFqFFf4143HS0_Wagnz%2Fuploads%2FQi8IbV83FQBOyB4zHCXe%2FAccess%20Settings.gif?alt=media&amp;token=6300be0b-08fb-45e2-877a-8bff02959726" alt=""><figcaption><p>Accessing Settings</p></figcaption></figure>

## Information

The Information tab displays your current application version alongside your user and organization details, pulled directly from your connected CRM account.

<figure><img src="https://2472585788-files.gitbook.io/~/files/v0/b/gitbook-x-prod.appspot.com/o/spaces%2F-MFqFFf4143HS0_Wagnz%2Fuploads%2FgAobiHGU4OqgwFuLrwNP%2Fimage.png?alt=media&amp;token=d2375f77-8962-4247-81c2-ea1adc8569f2" alt=""><figcaption><p>Information</p></figcaption></figure>

#### Application Version

* **Version** – the currently installed version of Valorx Fusion (e.g., V21.43)

#### User Information

* **Full Name** – the name associated with your logged-in user account
* **User Email** – the email address tied to your account
* **User Name** – your CRM login username
* **User Id** – your unique CRM user identifier
* **License Type** – the type of Valorx license assigned to your account
* **Organization Name** – the name of your connected Salesforce organization
* **Organization Id** – the unique identifier for your Salesforce organization

This information is read-only and is primarily useful for troubleshooting or when contacting Valorx Support, since it lets support quickly confirm which version, user, and org you're working from.

## Settings

The Settings tab lets users configure how Valorx Fusion behaves, including Map appearance, general application behavior, active CRM connections, runtime file storage, and Valorx Support access.

<figure><img src="https://2472585788-files.gitbook.io/~/files/v0/b/gitbook-x-prod.appspot.com/o/spaces%2F-MFqFFf4143HS0_Wagnz%2Fuploads%2Fi0XnJSMQ9IeYkqOiAB7R%2Fimage.png?alt=media&amp;token=465c4251-4c79-427d-a4d3-1327911394b9" alt=""><figcaption><p>Settings</p></figcaption></figure>

### Maps

Map Color Settings let users customize the header and data background colors for Grid and Form Maps before creating them. To access these settings, click the color palette icon on the map toolbar to open the color picker. Colors can be set independently for both Grid and Form Maps, using either **Standard** (pre-defined colors) or **Advanced** (custom color) options. Users can reset colors to default at any time. This only affects map-level color settings and does not impact any other map customization.

<div align="left"><figure><img src="https://2472585788-files.gitbook.io/~/files/v0/b/gitbook-x-prod.appspot.com/o/spaces%2F-MFqFFf4143HS0_Wagnz%2Fuploads%2FMKlrQgm1Ha58qrNEu8Ob%2FMaps%20v2.gif?alt=media&amp;token=ea29e6a4-fcbf-4baa-af1b-451457588324" alt="" width="494"><figcaption><p>Maps</p></figcaption></figure></div>

**Pointer Text in Formula Row of Map** controls whether the formula currently used for a mapped column is displayed in the map's formula row. This is especially useful for blank columns or save-only fields where custom formulas have been applied, letting users quickly see which formula is driving a given column. Users can toggle this text to **Show** or **Hide** as needed.

#### General Options

* [ ] **Allow adding dynamic columns (runtime mode)** – Designers can allow users to add dynamic columns while in runtime mode by checking this checkbox.
* [ ] **Disable Valorx menu on right-click** – Disables the Valorx right-click context menu when checked.
* [ ] **Open new Excel for every Launch from CRM** – Opens a new Excel file each time "Launch from CRM" is executed. This improves Fusion App performance and prevents unintended changes to an existing Excel file.
* [ ] **Launch from CRM with the Logged In User** – Allows the logged-in user (Admin User) to use "Launch from CRM" to access any user's Valorx Fusion App directly, without creating a new connection or re-entering credentials. Triggered via the "Launch Valorx" button in Salesforce.
* [ ] **Activate new User Selection Screen** – Displays an updated user selection screen, letting users choose or switch accounts before launching Fusion.
* [ ] **Disable Automatic Single Sign On OS For Primary Account** – Prevents Fusion from automatically signing in the primary account using OS-level single sign-on, requiring manual login instead.
* [ ] **Disable announcements on startup** – Prevents announcement pop-ups from appearing when Fusion starts.

### Active CRM

Active CRM displays the CRM connections available on the Start Screen, letting users quickly view and switch between connections. Valorx Fusion currently supports three CRM connections: **Salesforce**, **Microsoft Dynamics 365**, and **ServiceNow**.

<div align="left"><figure><img src="https://2472585788-files.gitbook.io/~/files/v0/b/gitbook-x-prod.appspot.com/o/spaces%2F-MFqFFf4143HS0_Wagnz%2Fuploads%2FMwq2A28NEi10A54q09O5%2Fimage.png?alt=media&amp;token=cf715566-0c11-4579-9633-f1080c83782a" alt="" width="541"><figcaption></figcaption></figure></div>

### Runtime File Location

Runtime File Location lets users specify where Fusion's runtime files are stored. This setting only takes effect when **Store Runtime files in User's OneDrive folder** is enabled in the App Settings screen. By default, the folder is set to:

`C:\Users\<Name>\OneDrive - Valorx Inc`

Users can click **Change Folder** to select a different storage location if needed.

<div align="left"><figure><img src="https://2472585788-files.gitbook.io/~/files/v0/b/gitbook-x-prod.appspot.com/o/spaces%2F-MFqFFf4143HS0_Wagnz%2Fuploads%2FIZAAasrzc9mksprtZGsK%2Fimage.png?alt=media&amp;token=b2d96040-c4c6-4f56-a7b2-511ef7234f5b" alt="" width="535"><figcaption></figcaption></figure></div>

### Valorx Support

The Valorx Support section provides a password field that unlocks additional support-level options within Fusion. Since this password is not self-service, users who need access should contact Valorx Support at [**support@valorx.com**](mailto:support@valorx.com) to obtain it.

## Logs

Use the [**Logs**](/valorx-fusion/settings/logs) section to view activity logs for both Design Studio and Runtime. For more information, see [**Logs**](/valorx-fusion/settings/logs).

## Runtime Cache

When users run an application, certain files required for the app to start are downloaded and stored locally on the device. This caching reduces launch time on subsequent runs, since those files don't need to be downloaded again, resulting in a faster launch and a better overall experience.

The Runtime Cache tab lists all cached apps, showing:

* **App Name**: the name of the cached application
* **Connection**: the CRM connection associated with the app
* **Cached Time**: when the app's files were last cached, along with a relative time (e.g., "22 hours ago")

<figure><img src="https://2472585788-files.gitbook.io/~/files/v0/b/gitbook-x-prod.appspot.com/o/spaces%2F-MFqFFf4143HS0_Wagnz%2Fuploads%2FeccGInq5e31Hf7kY9uyH%2Fimage.png?alt=media&amp;token=df2b0e31-f7ce-4524-96a0-a71f9deba122" alt=""><figcaption><p>Runtime Cache</p></figcaption></figure>

### Deleting Cache Files for Individual Apps

If recent app design changes aren't reflected properly, users can clear the cache for a specific app:

1. Click **Settings**.
2. Then click on the **Runtime Cache** tab.
3. Locate the app in the list.
4. Click the **Delete** icon next to the app's name.

This removes the cached files for that app only, ensuring the latest design changes are loaded on the next launch.

<figure><img src="https://2472585788-files.gitbook.io/~/files/v0/b/gitbook-x-prod.appspot.com/o/spaces%2F-MFqFFf4143HS0_Wagnz%2Fuploads%2FmQVLYhMlRC5nyMiq0F2U%2FDelete%20Runtime%20Cache%20v2.gif?alt=media&amp;token=29f5e9f6-432d-4162-abca-23e9c63beed8" alt=""><figcaption><p>Delete cache file for individual apps</p></figcaption></figure>

### Deleting All Cache Files Using Purge Cache

To clear the cache for all apps at once, use **Purge Cache**:

1. Click **Settings**.
2. Click on the **Runtime Cache** tab.
3. Click the **Purge Cache** button.

This removes cache files for all apps simultaneously. It's useful when multiple apps aren't reflecting recent changes and a fresh load is needed across the board.

<figure><img src="https://2472585788-files.gitbook.io/~/files/v0/b/gitbook-x-prod.appspot.com/o/spaces%2F-MFqFFf4143HS0_Wagnz%2Fuploads%2FzoRmVZ8Ugnfyk2bS2KMI%2FDelete%20Runtime%20Purge%20Cache.gif?alt=media&amp;token=931843b8-682b-42e2-b324-61f912008f57" alt=""><figcaption><p>Delete all cache files using Purge Cache</p></figcaption></figure>


# App Settings

App Settings are those which Designers will set for the App. These settings are only for the apps that you create. App Settings will have four categories like Information, Settings, Security and Messaging and Reporting.

<figure><img src="https://2472585788-files.gitbook.io/~/files/v0/b/gitbook-x-prod.appspot.com/o/spaces%2F-MFqFFf4143HS0_Wagnz%2Fuploads%2Fkqif44PGHG1Tc1WFs73r%2FApp%20Settings%202.png?alt=media&amp;token=3cfe8b0c-eca3-4d74-9451-6071dd8162d7" alt=""><figcaption><p>App Settings</p></figcaption></figure>

## Information

This setting will provide the information related to the App. This will have two categories like **General** and **App History**.&#x20;

General information will have the App Name, Unique Id and CRM Id.&#x20;

App History will contain the information of history like the App Version, name of the Creator, date when the app was created, name who modified the app and the date when the app is modified.

![](https://2472585788-files.gitbook.io/~/files/v0/b/gitbook-x-prod.appspot.com/o/spaces%2F-MFqFFf4143HS0_Wagnz%2Fuploads%2FILix7Tq1DAre1X9PRGSM%2FApp%20Settings%202.png?alt=media\&token=3004baad-d0f2-46f2-89fe-7d0cd67305bd)

## Settings

This App Setting will have three categories – **App Behavior**, **App Performance**, and **Connection Settings**. App Behavior will have five check-ins through which Designers can set how an app should behave or run in Runtime.&#x20;

### App Behavior

This section includes five check-in points that allow Designers to configure how the app behaves during Runtime. Each option provides flexibility to define runtime interactions based on specific business requirements.

* **Prevent Local Save** - This will prevent the app from saving it offline. By enabling this option Designers will find that the option to "Show dialog for unsaved changes when closing Runtime file" as disabled.
* **Show dialog for unsaved changes when closing Runtime File** -&#x20;

  Enabling this checkbox prompts a confirmation dialog when closing the Runtime file if it is not saved locally.

  ***Note:** This option applies only to local saves of the Runtime file and does not affect Salesforce saves.*
* **Prevent Print** - This will prevent the app from print and this option will be disabled for offline mode.
* **Enable Offline Mode** - Users will be able to open an app even when they are offline by enabling this option. Designers should save the Runtime App. Once , the app is saved they can open the app on the local desktop.
* Enable Macro support for office in **Mac**

<figure><img src="https://2472585788-files.gitbook.io/~/files/v0/b/gitbook-x-prod.appspot.com/o/spaces%2F-MFqFFf4143HS0_Wagnz%2Fuploads%2FSvLKLoXPqk89q8BDBjCg%2FApp%20Settings%20Behavior.png?alt=media&amp;token=2fd362de-702a-4741-b900-0bbece8945bc" alt=""><figcaption><p>App Behavior</p></figcaption></figure>

### App Performance

This section offers two settings that help optimize how the app performs, particularly when working across Microsoft Excel and Google Sheets environments.

* **Apply Field format in** **Design Studio** - This setting will help the Designer in case of any field formats applied in Microsoft Excel to be applied in Google sheets by enabling this setting. This setting will also improve the app opening experience in Runtime.&#x20;
* **Remove Data Validation message in** **Google Sheets** - This setting is designed for Google sheets as the Excel will have two types of data validation messages however, Google Sheets will have will merge the two validation messages from Excel and have one message. By enabling this option validation messages will not pop up in Google sheets.

<figure><img src="https://2472585788-files.gitbook.io/~/files/v0/b/gitbook-x-prod.appspot.com/o/spaces%2F-MFqFFf4143HS0_Wagnz%2Fuploads%2FSLl2VEpKV2ufShMwnAd2%2FApp%20Performance.png?alt=media&amp;token=13504a5c-263a-456f-839a-bcee9a88bdc9" alt=""><figcaption><p>App Performance</p></figcaption></figure>

### Connection Settings

The "**Use Specific API version**" option allows the design studio users to select a specific API version supported by their Salesforce Org. By default, Fusion uses the latest API version supported by the Salesforce Org. This flexibility allows users to be on a specific version of the Salesforce API.

This app-specific setting allows users to use different API versions across different Fusion Apps.

<figure><img src="https://2472585788-files.gitbook.io/~/files/v0/b/gitbook-x-prod.appspot.com/o/spaces%2F-MFqFFf4143HS0_Wagnz%2Fuploads%2FGZd7pViufOpzNfUgXvZq%2FConnection%20Settings.png?alt=media&amp;token=18e65146-7cfa-499e-861b-bd9b04002bb9" alt=""><figcaption><p>Connection Settings</p></figcaption></figure>

## Security

This setting will allow the Designer to provide the password and protect their worksheet. Designer can decide if the sheet will be password protect only in **Design Studio** or in **Runtime**. If Designer decides to protect the sheet in Runtime mode then, Users can only view the information.

Below is the image when the sheet is not protected.

![](https://2472585788-files.gitbook.io/~/files/v0/b/gitbook-x-prod.appspot.com/o/spaces%2F-MFqFFf4143HS0_Wagnz%2Fuploads%2FmfxqtzRNjPd3S4uhCWSh%2FApp%20Settings%204.png?alt=media\&token=8272bc6b-3fc3-4a4a-b40c-4403fff0ae60)

Worksheets needs to be protected in Design Studio from Maps.

* In **Design** **Studio**, select **Maps**, hover over **Display Options**, select **Security**.
* Edit **Map** which needs to be protected, and check in "Secure worksheet based on field metadata".
* Provide the **Password,** and if the sheet needs to be protected in **Runtime** or **Design + Runtime**.
* User can also select the protection features available under "Allow all users of the worksheet to".
* Click **OK**.

Below image shows when the sheet is protected. Designers can make changes to the password and also change the access level to users by just unchecking or checking the "allow all users of the worksheet to". Below image shows 2 Maps on the worksheet, we have provided password for only one map on the worksheet. Password will be applied to both the Maps but FLS settings will apply only to that Map for which Designer will select.

![](https://2472585788-files.gitbook.io/~/files/v0/b/gitbook-x-prod.appspot.com/o/spaces%2F-MFqFFf4143HS0_Wagnz%2Fuploads%2FZqVrdQRC407HqwuJqkIO%2FApp%20Settings%205.png?alt=media\&token=de0259a6-d896-4240-b675-21ff3af99b48)

## Messaging and Reporting

Designers through this setting will decide at what time or at which level a message should be displayed on the screen.

Below are the five check-ins for Messaging and Reporting.

* Inform user when Query found no records
* Inform user when Query was not attempted as Dependent Query found no records
* Group CRM messages and display once workflow completes
* Include success CRM messages in the CRM Audit Log
* Inform user when Save task found no record to push to CRM

![](https://2472585788-files.gitbook.io/~/files/v0/b/gitbook-x-prod.appspot.com/o/spaces%2F-MFqFFf4143HS0_Wagnz%2Fuploads%2FazlzYQqwRw18PIpVGzvm%2FApp%20Settings%203.png?alt=media\&token=acb067ec-2ab0-4985-a801-13cb3135d11f)


# Logs

Detailed list of all the user activities

The Logs tab provides visibility into user and system activity across both Runtime and Design Studio, helping users identify the cause of any failed action. To view logs, go to **Settings > Logs** under Fusion.

Logs are organized into five categories, selectable via the **Active Log** tabs at the top of the screen:

* **Studio Logs**
* **Runtime Logs**
* **Audit Logs**
* **Diagnostics Logs**
* **Valorx Home Logs**

## Studio Logs

Displays logs related to Design Studio activity, including any failed configurations encountered while designing an app.

<figure><img src="https://2472585788-files.gitbook.io/~/files/v0/b/gitbook-x-prod.appspot.com/o/spaces%2F-MFqFFf4143HS0_Wagnz%2Fuploads%2FGpbS7BcmgyGxMOktBFuM%2Fimage.png?alt=media&amp;token=bca1b62d-bb82-40fc-8b91-8278f6027147" alt=""><figcaption></figcaption></figure>

## Runtime Logs

Displays logs related to Runtime activity, including details on any actions that failed while an app was running.

<figure><img src="https://2472585788-files.gitbook.io/~/files/v0/b/gitbook-x-prod.appspot.com/o/spaces%2F-MFqFFf4143HS0_Wagnz%2Fuploads%2F5O27XnBkvnUNcrn6r9Nf%2Fimage.png?alt=media&amp;token=87099d0f-b7bd-430e-bf0a-af0edc64b977" alt=""><figcaption></figcaption></figure>

## Audit Logs

Displays the Save Summary for apps in Runtime mode, showing whether each save was **Skipped**, **Successful**, or **Failed**.

<figure><img src="https://2472585788-files.gitbook.io/~/files/v0/b/gitbook-x-prod.appspot.com/o/spaces%2F-MFqFFf4143HS0_Wagnz%2Fuploads%2FarGtx76XHwUWBXLPb6M8%2Fimage.png?alt=media&amp;token=35c4e992-99e8-47d1-a162-32786758072c" alt=""><figcaption></figcaption></figure>

## Diagnostic Logs

Provides a structured, interactive view for analyzing and debugging app workflows. Designers can:

* Filter logs by Org, App Name, or Workflow Step, and by a date-time range
* View logs in a table with columns for **No.**, **Org Name**, **App Name**, **Workflow**, **No. of Steps**, **Start Time**, and **Elapsed Time**
* Sort any column
* Click into a workflow entry to drill down into individual steps, including sub-steps, start time, and elapsed time for each
* Open logs in a separate browser window
* Export a single log entry (multi-log export is planned for a future release)

<figure><img src="https://2472585788-files.gitbook.io/~/files/v0/b/gitbook-x-prod.appspot.com/o/spaces%2F-MFqFFf4143HS0_Wagnz%2Fuploads%2Fq8Ypicw3zsbBCyNrXlAJ%2FFusion%20Enhanced%20Log.gif?alt=media&amp;token=56d65218-0639-4431-88d9-160f77f4b90a" alt=""><figcaption><p>Diagnostic Logs</p></figcaption></figure>

Diagnostic Logs are only visible to **Fusion App designers**; Runtime and front-end users do not have access to this tab.

## Valorx Home Logs

Displays logs related to the Home screen and its background services, including the reason for any failed action, and detailed logging for the Auto Update process (covering each step and outcome of automatic update operations).

<figure><img src="https://2472585788-files.gitbook.io/~/files/v0/b/gitbook-x-prod.appspot.com/o/spaces%2F-MFqFFf4143HS0_Wagnz%2Fuploads%2FTW97NFCMeQd5q6kDFWfH%2Fimage.png?alt=media&amp;token=fd711f1e-50f5-487b-8c1a-ad0e1b34d367" alt=""><figcaption></figcaption></figure>

*Note: Valorx Home Logs previously included a separate "Service Logs" section; the two have since been merged into a single log view.*

{% hint style="info" %}
*Note: Valorx Home Logs previously included a separate "Service Logs" section; the two have since been merged into a single log view.*
{% endhint %}

## Managing Logs

Regardless of which log type is active, users can:

* **Clear Logs** – delete all entries in the current log view
* **Open File** – open the log file in Notepad for viewing outside Fusion
* **Copy** – copy an individual log entry to the clipboard using the copy icon next to that entry

<figure><img src="https://2472585788-files.gitbook.io/~/files/v0/b/gitbook-x-prod.appspot.com/o/spaces%2F-MFqFFf4143HS0_Wagnz%2Fuploads%2FsBN7oSnBqU4yjBXMLg0Q%2FFusion%20Logs.gif?alt=media&amp;token=2671b5de-16f3-4edb-bc6f-8227c86734b6" alt=""><figcaption></figcaption></figure>


# App Store Submission

Designers, Users or Customers can submit their Apps once approved and will be published to the Valorx App Store once reviewed and approved by our Valorx Team.&#x20;

Follow the below steps to submit an app to Valorx App Store.

Open an Excel, click on Start and now select App Admin from Valorx Fusion Ribbon.

<div align="left"><img src="https://2472585788-files.gitbook.io/~/files/v0/b/gitbook-x-prod.appspot.com/o/spaces%2F-MFqFFf4143HS0_Wagnz%2Fuploads%2FY1Sr0XbxamKAUV8BSFL8%2FApp%20store.png?alt=media&amp;token=77ab2544-646e-41cb-897e-54fae110c593" alt="" width="563"></div>

Select App Admin from the connections list which will open Administration page.

![](https://2472585788-files.gitbook.io/~/files/v0/b/gitbook-x-prod.appspot.com/o/spaces%2F-MFqFFf4143HS0_Wagnz%2Fuploads%2Fp0kKKjmfdujYsZo65Vis%2FApp%20store%201.png?alt=media\&token=27bad2c2-bd36-4172-9e43-5964bad4bd9d)

Select Valorx App Store from Configurations and on the right hand users will find "Manage your Valorx App listing".

![](https://2472585788-files.gitbook.io/~/files/v0/b/gitbook-x-prod.appspot.com/o/spaces%2F-MFqFFf4143HS0_Wagnz%2Fuploads%2FrWhOV6j5v5ZOnJx1Q2U8%2FApp%20store%202.png?alt=media\&token=fa02653e-170c-42eb-9a79-6038af00bc87)

Designers now need to fill the details of the app before submitting the app.

* Designers can Read, Write or Edit the name of the app from App Name.&#x20;
* Designers should define under which version the app will fall and provide the details under Version.
* It's time to decide whether the app is available at no cost or Users need to pay. Click Pricing drop down and select "Free" or "Paid".

![](https://2472585788-files.gitbook.io/~/files/v0/b/gitbook-x-prod.appspot.com/o/spaces%2F-MFqFFf4143HS0_Wagnz%2Fuploads%2FAFBoGgWV37p3bSdLlc1s%2FApp%20store%203.png?alt=media\&token=1e1228e3-6aa6-49a6-8762-e9dde0daa5df)

Click on App Category and a pop up with list of categories will open select from the list and click OK.

![](https://2472585788-files.gitbook.io/~/files/v0/b/gitbook-x-prod.appspot.com/o/spaces%2F-MFqFFf4143HS0_Wagnz%2Fuploads%2FIzi1b15xyeq3iQ39iVlt%2FApp%20store%204.png?alt=media\&token=2f770f58-45a5-4376-9a3d-236eb34e93ea)

Now, Designers need to describe about the app. Click Add Description and add the notes and click OK.

![](https://2472585788-files.gitbook.io/~/files/v0/b/gitbook-x-prod.appspot.com/o/spaces%2F-MFqFFf4143HS0_Wagnz%2Fuploads%2FNkYxsjL70QlXepNA7ymm%2FApp%20store%205.png?alt=media\&token=629944df-8bd8-4cc6-9394-4c745d572b53)

Click on Required Dependencies and add the dependencies and click OK.

![](https://2472585788-files.gitbook.io/~/files/v0/b/gitbook-x-prod.appspot.com/o/spaces%2F-MFqFFf4143HS0_Wagnz%2Fuploads%2FKPWgXNf1YdcDBeKAjRr4%2FApp%20store%206.png?alt=media\&token=75d0814c-50f4-4012-8e01-0c3c6a95ccec)

Designers should add Images or Video Links by clicking on Browse.

![](https://2472585788-files.gitbook.io/~/files/v0/b/gitbook-x-prod.appspot.com/o/spaces%2F-MFqFFf4143HS0_Wagnz%2Fuploads%2Fwjyq8ef51cw64ZzXylS4%2FApp%20store%207.png?alt=media\&token=319aa11d-dcee-4c90-b175-a6ae81240d23)

Click on Submit to Valorx App Store once done with filling the details.

![](https://2472585788-files.gitbook.io/~/files/v0/b/gitbook-x-prod.appspot.com/o/spaces%2F-MFqFFf4143HS0_Wagnz%2Fuploads%2FZtOz6ZVQyM4JC6PfnoIu%2FApp%20store%208.png?alt=media\&token=f95c4216-fa30-4248-8719-2003df29438e)

Valorx Team will review the app submitted to the Valorx App Store and publish the app to the store.


# Installing App

**Valorx App Store** will provide us with already designed Apps which are available for Designers. Designers can use these templates which will make the work easy as they are already built apps. Designers can make changes to the app as per their requirement.

Designers will find **Valorx App Store** on the Valorx Fusion Ribbon. Click on **Valorx App Store** then a list of Apps will be displayed. Some of the apps are provided at free of cost and some of the apps are chargeable.

<div align="left"><img src="https://2472585788-files.gitbook.io/~/files/v0/b/gitbook-x-prod.appspot.com/o/spaces%2F-MFqFFf4143HS0_Wagnz%2Fuploads%2FfFzf1IPeLdkvtOkpXOOE%2FInstalling%20App.png?alt=media&amp;token=0562e5cd-700e-4bfb-9de1-6145473934f1" alt="" width="563"></div>

Designers should have **Active Connection** to download the apps. Below validation message will be displayed when there is no active connection.

<div align="left"><img src="https://2472585788-files.gitbook.io/~/files/v0/b/gitbook-x-prod.appspot.com/o/spaces%2F-MFqFFf4143HS0_Wagnz%2Fuploads%2FE6pvRj1JfkAe7keFSbAb%2FInstalling%20App%203.png?alt=media&amp;token=b25b9211-d0ca-4b19-967e-7d2c010c91b1" alt="" width="375"></div>

To install any desired App. click on **GET**. In the below image, the app is listed as FREE; hence, no price will be charged. The app will be installed on the designer's desktop. Valorx even provides a free trial.

![](https://2472585788-files.gitbook.io/~/files/v0/b/gitbook-x-prod.appspot.com/o/spaces%2F-MFqFFf4143HS0_Wagnz%2Fuploads%2F4MF1iYCv8hH07ALGmQpB%2FRelease%20Notes%20Fusion%20V15%20-%208.jpg?alt=media\&token=1a5434f4-fa99-4e26-b237-2e8d43179594)

Let's have a look at the app in the image below, which is listed as $299. Designers need to pay $299 to get this app.

![](https://2472585788-files.gitbook.io/~/files/v0/b/gitbook-x-prod.appspot.com/o/spaces%2F-MFqFFf4143HS0_Wagnz%2Fuploads%2FZtAPxeVQreKM6MqKZC4C%2FRelease%20Notes%20Fusion%20V15%20-%209.png?alt=media\&token=664523b6-9634-4319-a01e-483c97207421)

Click on **Install,** and the app will be saved to the Org.

![](https://2472585788-files.gitbook.io/~/files/v0/b/gitbook-x-prod.appspot.com/o/spaces%2F-MFqFFf4143HS0_Wagnz%2Fuploads%2Fg9QC5ADw9qhbg2VgZQaB%2FInstalling%20App%204.png?alt=media\&token=3a156fb9-ccaf-43ba-80e4-a281745b0173)


# Customizing App

Customizing App is the next step once the app is installed from **Valorx App Store**. Designers can customize the app before installing the app or even after the installation.

Click on **Valorx App Store** and Click on **GET**. APP Customization : User Management page will open.

![](https://2472585788-files.gitbook.io/~/files/v0/b/gitbook-x-prod.appspot.com/o/spaces%2F-MFqFFf4143HS0_Wagnz%2Fuploads%2FyHiNMr9kAvXBDtszVaRX%2FCustomize%20App.png?alt=media\&token=ba1a9b6d-4361-4b0f-9e10-3090cbc25bf3)

Click on **Customize** option and a page will open. On the left hand we will find the APP and on the right hand we can see the unused fields from **CRM**. Designers can just drag and drop the unused fields if they want to add them to the app, and click on **Apply changes**.

![](https://2472585788-files.gitbook.io/~/files/v0/b/gitbook-x-prod.appspot.com/o/spaces%2F-MFqFFf4143HS0_Wagnz%2Fuploads%2Fx99DMoq6mhwFKesp7Ofd%2FCustomize%20App%201.png?alt=media\&token=aa691e60-0882-439f-aeee-f8f505eabe3b)


# Mass Rollout of Valorx

Valorx ships the **Windows client** in **.EXE** and **.MSI** formats. Valorx [support page](https://valorx.com/support/) includes the link to download Valorx Fusion setup.exe. MSI are provided for all major releases and can be used to mass rollout to end users using device management software like *Microsoft Endpoint Manager* (also known as *Microsoft Intune*). MSI links are available on-demand by reaching out to <support@valorx.com>.

## Silent Installation

Most users would require a desktop team to help with the installation. Valorx can be installed silently and pushed remotely using this switch.

Valorx Fusion V22.exe **/exenoui /qn**

## Prerequisite Software

Below is the list of prerequisite software required by the Valorx Fusion client. In case of MSI-based mass rollout, customers should ensure that this prerequisite software are installed.

1. Microsoft .NET Framework 4.7.2 or higher\
   [Download Link](https://go.microsoft.com/fwlink/?linkid=863265)
2. Microsoft VSTO 4.0 Runtime\
   [Download Link](https://download.microsoft.com/download/7/A/F/7AFA5695-2B52-44AA-9A2D-FC431C231EDC/vstor_redist.exe)
3. Microsoft Edge WebView2 Runtime\
   We have moved off of Internet Explorer 11 and its dependency from [V10](/valorx-fusion/versions-and-release-notes/windows/older-versions/windows/fusion-version-10) onwards. Microsoft Edge WebView2 provides a modern chromium-based browser experience.\
   [Download Link](https://go.microsoft.com/fwlink/p/?LinkId=2124703)

***Note***: setup.exe already installs these prerequisites automatically.

{% hint style="info" %}
Reach out to [Valorx Support](mailto:support@valorx.com) and provide the version to get the MSI link
{% endhint %}


# Open Source Licenses

Valorx uses **Open Source Software (OSS)** components licensed under MIT, BSD, Apache, and other open source licensing. Below is the list of OSS components used in our product.

<table><thead><tr><th width="298">NuGet</th><th width="182">Provider</th><th width="150">NuGet Link</th><th width="201">Licensing Agreement Link</th><th>Licence Type</th></tr></thead><tbody><tr><td>Castle Windsor (DI Framework) Castle.Core Castle.Core-Nlog Castle.LoggingFacility</td><td>Castle Project Contributors<a href="https://www.nuget.org/packages/Castle.Windsor"> </a></td><td>​<a href="https://www.nuget.org/packages/Castle.Windsor"><strong>Link</strong></a></td><td>​​<a href="https://github.com/castleproject/Windsor/blob/master/LICENSE"><strong>Link</strong></a>​</td><td>Apache License 2.0</td></tr><tr><td>Caliburn Micro (MVVM Framework) Caliburn.Micro.Core<a href="https://www.nuget.org/packages/Caliburn.Micro"> </a></td><td>Caliburn Micro</td><td><strong>​</strong><a href="https://www.nuget.org/packages/Caliburn.Micro"><strong>Link</strong></a></td><td><strong>​​</strong><a href="https://github.com/Caliburn-Micro/Caliburn.Micro/blob/master/License.txt"><strong>Link</strong></a></td><td>MIT License</td></tr><tr><td>Material Design For WPF (UI Framework)​​</td><td>Material Design In XAML</td><td><a href="https://www.nuget.org/packages/MaterialDesignThemes/3.2.0-ci1966"><strong>Link</strong></a></td><td><strong>​​</strong><a href="https://github.com/MaterialDesignInXAML/MaterialDesignInXamlToolkit/blob/master/LICENSE"><strong>Link</strong></a></td><td>MIT License</td></tr><tr><td>Gong-wpf</td><td>gong-wpf-dragdrop​</td><td><a href="https://www.nuget.org/packages/gong-wpf-dragdrop/"><strong>Link</strong></a></td><td><a href="https://www.nuget.org/packages/gong-wpf-dragdrop/2.2.0/License"><strong>Link</strong></a>​</td><td>BSD-3 License</td></tr><tr><td>Newtonsoft JSON (JSON parsing)​​​</td><td>Json.NET</td><td><a href="https://www.nuget.org/packages/Newtonsoft.Json/"><strong>Link</strong></a></td><td><a href="https://github.com/JamesNK/Newtonsoft.Json/blob/master/LICENSE.md"><strong>Link</strong></a>​</td><td>MIT License</td></tr><tr><td>NLog (Product Logging)​</td><td>NLog Projects</td><td><a href="https://www.nuget.org/packages/Nlog"><strong>Link</strong></a></td><td><strong>​​</strong><a href="https://github.com/NLog/NLog/blob/master/LICENSE.txt"><strong>Link</strong></a></td><td>BSD-3 License</td></tr><tr><td>WpfAnimatedGIF (Animated GIF in WPF)</td><td>WpfAnimatedGif</td><td><strong>​</strong><a href="https://www.nuget.org/packages/WpfAnimatedGif/"><strong>Link</strong></a></td><td><strong>​​</strong><a href="https://github.com/XamlAnimatedGif/WpfAnimatedGif/blob/master/LICENSE.txt"><strong>Link</strong></a></td><td>Apache License 2.0</td></tr><tr><td>Entity Framework (ORM for Database)​</td><td>Microsoft</td><td><a href="https://www.nuget.org/packages/EntityFramework/6.4.4"><strong>Link</strong></a></td><td><strong>​​</strong><a href="https://github.com/dotnet/ef6/blob/master/LICENSE.txt"><strong>Link</strong></a></td><td>Apache License 2.0</td></tr><tr><td>Okta SDK (Okta functionalities in APIs) Okta.AspNet 1.7.0 Okta.AspNet.Abstractions 3.1.0</td><td>Okta, Inc.</td><td><strong>​</strong><a href="https://www.nuget.org/packages/Okta.AspNet/1.7.0"><strong>Link</strong></a></td><td><strong>​​</strong><a href="https://github.com/okta/okta-aspnet/blob/master/LICENSE"><strong>Link</strong></a></td><td>Apache License 2.0</td></tr><tr><td>Quartz (Scheduling framework for Applog/Health check Jobs)​</td><td>Quartz</td><td><a href="https://www.nuget.org/packages/Quartz/3.1.0"><strong>Link</strong></a></td><td><strong>​​</strong><a href="https://github.com/quartznet/quartznet/blob/master/license.txt"><strong>Link</strong></a></td><td>Apache License 2.0</td></tr><tr><td>TopShelf (Windows Service Framework)</td><td>TopShelf</td><td><strong>​</strong><a href="https://www.nuget.org/packages/Topshelf/4.2.1"><strong>Link</strong></a></td><td><strong>​</strong><a href="https://github.com/Topshelf/Topshelf/blob/develop/LICENSE"><strong>Link</strong></a></td><td>Apache License 2.0</td></tr><tr><td>IdentityModel (OpenId Connect &#x26; Oauth 2 for Okta and APIs)</td><td>Identity</td><td><strong>​</strong><a href="https://www.nuget.org/packages/IdentityModel/4.3.1"><strong>Link</strong></a></td><td><a href="https://github.com/IdentityModel/IdentityModel/blob/main/LICENSE"><strong>Link</strong></a>​</td><td>Apache License 2.0</td></tr><tr><td>IPNetwork2</td><td>lduchosal</td><td><strong>​</strong><a href="https://www.nuget.org/packages/IPNetwork2/2.5.211"><strong>Link</strong></a></td><td><strong>​​</strong><a href="https://github.com/lduchosal/ipnetwork/blob/master/LICENSE"><strong>Link</strong></a></td><td>BSD-2-Clause License</td></tr><tr><td>Microsoft Application Insights​<a href="https://www.nuget.org/packages/Microsoft.ApplicationInsights/2.14.0"> </a><a href="https://github.com/microsoft/ApplicationInsights-dotnet/blob/develop/LICENSE"> </a>​</td><td>Microsoft</td><td><a href="https://www.nuget.org/packages/Microsoft.ApplicationInsights/2.14.0"><strong>Link</strong></a></td><td><strong>​​</strong><a href="https://github.com/microsoft/ApplicationInsights-dotnet/blob/develop/LICENSE"><strong>Link</strong></a></td><td>MIT License</td></tr><tr><td>Microsoft OWIN (API bootstrapper)​​</td><td>Microsoft​</td><td><a href="https://www.nuget.org/packages/Microsoft.Owin/"><strong>Link</strong></a></td><td><a href="https://github.com/aspnet/AspNetKatana/blob/dev/LICENSE.txt"><strong>Link</strong></a></td><td>Apache License 2.0</td></tr><tr><td>Microsot Azure SDK </td><td>Microsoft</td><td><p><strong>​</strong><a href="https://www.nuget.org/packages/Microsoft.Azure.ConfigurationManager/4.0.0"><strong>Link 1</strong></a><strong>​​</strong></p><p><a href="https://www.nuget.org/packages/Microsoft.Azure.KeyVault.Core/3.0.5"><strong>Link 2</strong></a></p><p><strong>​</strong><a href="https://www.nuget.org/packages/Microsoft.Azure.Storage.Blob/11.2.2"><strong>Link 3</strong></a></p><p><strong>​</strong><a href="https://www.nuget.org/packages/Azure.Storage.Common/12.5.2"><strong>Link 4</strong></a><strong>​</strong><a href="https://github.com/Azure/azure-sdk-for-net/blob/master/LICENSE.txt"> </a></p></td><td><strong>​</strong><a href="https://github.com/Azure/azure-sdk-for-net/blob/master/LICENSE.txt"><strong>Link</strong></a></td><td>MIT License</td></tr><tr><td>Swashbuckle (Swagger UI Framework for .NET)​</td><td>Swashbuckle</td><td><strong>​</strong><a href="https://www.nuget.org/packages/Swashbuckle/"><strong>Link</strong></a></td><td><strong>​</strong><a href="https://github.com/domaindrivendev/Swashbuckle.WebApi/blob/master/LICENSE"><strong>Link</strong></a>​</td><td>BSD-3-Clause License</td></tr><tr><td>Simple Helper (Assembly SimpleHelper)​</td><td>Simple Helper</td><td><strong>​</strong><a href="https://www.nuget.org/packages/SimpleHelper/"><strong>Link</strong></a></td><td><strong>​​</strong><a href="https://github.com/Nonobis/SimpleHelper/blob/master/LICENSE"><strong>Link</strong></a></td><td>MIT License</td></tr><tr><td>Microsoft.Xaml.Behaviors.Wpf​​<a href="https://github.com/microsoft/XamlBehaviorsWpf/blob/master/LICENSE"> </a></td><td>Microsoft​</td><td><a href="https://www.nuget.org/packages/Microsoft.Xaml.Behaviors.Wpf/"><strong>Link</strong></a></td><td><a href="https://github.com/microsoft/XamlBehaviorsWpf/blob/master/LICENSE"><strong>Link</strong></a></td><td>MIT License</td></tr></tbody></table>


# Valorx Home

Valorx Home for Windows

Users have to first download the [**latest Valorx Fusion**](https://api.valorx.com/api/download/latest). Once Valorx Fusion is installed users will find the Valorx Home icon on their windows desktop. Valorx Home will help the users to manage the Valorx Excel Add-in and the subscription. &#x20;

Valorx Home will provide information related to&#x20;

1. &#x20;Launching Valorx Home
2. &#x20;Valorx Fusion Updates
3. &#x20;Health Monitor
4. &#x20;Administering Valorx Account

{% hint style="info" %}
Customers and Trial Users can do this Online or by signing in to our website [**Valorx.com**](https://valorx.com/).
{% endhint %}

A pink icon named Valorx Home <img src="https://2472585788-files.gitbook.io/~/files/v0/b/gitbook-x-prod.appspot.com/o/spaces%2F-MFqFFf4143HS0_Wagnz%2Fuploads%2FdnC8VK51mdiQqyJzhxS9%2Fimage.png?alt=media&amp;token=1e7b4a68-41bf-4e4f-a0ba-3b1e132518d4" alt="" data-size="line"> on the windows desktop will be displayed once Valorx Fusion is installed. Users can also search for **Valorx Home** on the windows desktop.&#x20;

<div align="left"><img src="https://2472585788-files.gitbook.io/~/files/v0/b/gitbook-x-prod.appspot.com/o/spaces%2F-MFqFFf4143HS0_Wagnz%2Fuploads%2FpWR9w272JZASI9xL0b6h%2FFusion%20Docs%20Update%20as%20per%20V15%20-%2044.png?alt=media&amp;token=7dbd7f40-e5a8-4f24-a398-19657d09f5dc" alt="" width="563"></div>

Click on the **Valorx Home** app icon to launch the app. The Valorx Home page has a few sections, such as Valorx Updates, Version Information, Health Monitor, and Launch Excel.

<figure><img src="https://2472585788-files.gitbook.io/~/files/v0/b/gitbook-x-prod.appspot.com/o/spaces%2F-MFqFFf4143HS0_Wagnz%2Fuploads%2FlxZt7lhtmW8Iht46olJq%2FFusion%20Docs%20Update%20as%20per%20V15%20-%2040.png?alt=media&amp;token=61c828ab-9afe-4d92-95bc-442bf72587b2" alt=""><figcaption></figcaption></figure>

**Valorx Updates**: Users can find information related to product releases and version history updates and the status if users are up to date or if they need to update the Valorx Version. Users can even find the Version History by clicking on the hyperlink.

![](https://2472585788-files.gitbook.io/~/files/v0/b/gitbook-x-prod.appspot.com/o/spaces%2F-MFqFFf4143HS0_Wagnz%2Fuploads%2Far4JoPEVxHAvNW1vcNtm%2FFusion%20Docs%20Update%20as%20per%20V15%20-%2041.png?alt=media\&token=4ae23af7-9f61-4fcf-91bf-aeda97c1c7ed)

Click on **Version History** and a pop-up window of **Product Versions** will open which will show the history.

<figure><img src="https://2472585788-files.gitbook.io/~/files/v0/b/gitbook-x-prod.appspot.com/o/spaces%2F-MFqFFf4143HS0_Wagnz%2Fuploads%2F01U4RdDzbyhqApf08SzY%2FFusion%20Docs%20Update%20as%20per%20V15%20-%2041%20(a).png?alt=media&amp;token=ac550a10-8ebb-40e5-9511-ca78869737d3" alt=""><figcaption></figcaption></figure>

**Version Information:** Users can find which version they are using under this section. Users can find the release notes and video tutorials. Click on the hyperlink and it will direct you to the Valorx page.

<figure><img src="https://2472585788-files.gitbook.io/~/files/v0/b/gitbook-x-prod.appspot.com/o/spaces%2F-MFqFFf4143HS0_Wagnz%2Fuploads%2FDln4DSv94dEHLhp0Vb91%2FFusion%20Docs%20Update%20as%20per%20V15%20-%2042.png?alt=media&amp;token=6f8bd838-9116-48b0-b8ba-aa40a88aa713" alt=""><figcaption></figcaption></figure>

**Health Monitor:** Users need to do a health check when they find difficulty in running Excel or an App. Click on Run Health Check which would restart the Excel and usually fixes the issues. It will even show when was the last update done. Health check will show the status of the add-in.

<figure><img src="https://2472585788-files.gitbook.io/~/files/v0/b/gitbook-x-prod.appspot.com/o/spaces%2F-MFqFFf4143HS0_Wagnz%2Fuploads%2F1dskPe0QcGZu5K9urkiy%2FFusion%20Docs%20Update%20as%20per%20V15%20-%2043.png?alt=media&amp;token=b759f825-b4f1-4b4f-b6a6-acaaa873e8d9" alt=""><figcaption></figcaption></figure>

**Launch Excel:** Users can launch an Excel file by clicking on **Launch Excel**. Users can open Valorx Fusion by clicking on the **Valorx Fusion** ribbon button.

<figure><img src="https://2472585788-files.gitbook.io/~/files/v0/b/gitbook-x-prod.appspot.com/o/spaces%2F-MFqFFf4143HS0_Wagnz%2Fuploads%2FWFMDVDz0jUQiG2Qnas23%2FLaunch%20Excel.gif?alt=media&amp;token=14997e4b-5228-4947-b8bb-87f3ddfe5394" alt=""><figcaption></figcaption></figure>

**Update Now:** If a new version is available, the **Update Now** button will appear under the **Valorx Updates** column. Click **Update Now** to start the update.

<figure><img src="https://2472585788-files.gitbook.io/~/files/v0/b/gitbook-x-prod.appspot.com/o/spaces%2F-MFqFFf4143HS0_Wagnz%2Fuploads%2FRJsuIdA7TX2KMfjx7PkB%2FUpdate%20Valorx.gif?alt=media&amp;token=ea9a234e-4725-4989-bff4-35d11394be19" alt=""><figcaption></figcaption></figure>


# Fusion Client

Latest Release 09/04/2026 (v22.10)

Welcome to the Fusion Client Release Notes.

{% hint style="info" %}
Download Fusion Client:

<a href="https://api.valorx.com/api/download/latest" class="button primary" data-icon="windows">Windows</a> <a href="https://appsource.microsoft.com/en-us/product/office/WA200001612?tab=Overview" class="button secondary" data-icon="apple">Mac</a> <a href="https://workspace.google.com/marketplace/app/valorx_for_salesforce/823192635690" class="button secondary" data-icon="google">Google Sheets</a>
{% endhint %}

Here you’ll find the latest updates, enhancements, and fixes for **Fusion Client**. Each release is listed in the version table for quick reference, followed by release dates on availability.

<table><thead><tr><th width="117">Version</th><th width="304">Release Name</th><th width="188">Release Date</th><th>Availability</th></tr></thead><tbody><tr><td><a href="/valorx-fusion/versions-and-release-notes/windows/fusion-version-22.10"><mark style="color:$primary;"><strong>v22.10</strong></mark></a></td><td><a href="/valorx-fusion/versions-and-release-notes/windows/fusion-version-22.10"><mark style="color:$tint;"><strong>August 26 Release (v22.10)</strong></mark></a></td><td>09/04/2026</td><td>✅ <mark style="color:$primary;"><strong>GA</strong></mark></td></tr><tr><td><a href="/valorx-fusion/versions-and-release-notes/windows/fusion-version-22">v22</a></td><td><a href="/valorx-fusion/versions-and-release-notes/windows/fusion-version-22">July 26 Release (v22)</a></td><td>07/17/2026</td><td>✅ GA</td></tr><tr><td><a href="/valorx-fusion/versions-and-release-notes/windows/fusion-version-21.40">v21.40 </a></td><td><a href="/valorx-fusion/versions-and-release-notes/windows/fusion-version-21.40">July 26 Release (v21.40) - Hotfix</a></td><td>07/08/2026</td><td>✅ GA</td></tr><tr><td><a href="/valorx-fusion/versions-and-release-notes/windows/fusion-version-21.30">v21.30</a></td><td><a href="/valorx-fusion/versions-and-release-notes/windows/fusion-version-21.30">June 26 Release (v21.30)</a></td><td>06/19/2026</td><td>✅ GA</td></tr><tr><td><a href="/valorx-fusion/versions-and-release-notes/windows/fusion-version-21.20">v21.20</a></td><td><a href="/valorx-fusion/versions-and-release-notes/windows/fusion-version-21.20">May 26 Release (v21.20)</a></td><td>05/30/2026</td><td>🟡 Limited</td></tr><tr><td>v21.10</td><td><a href="/valorx-fusion/versions-and-release-notes/windows/april-26-release-v21.10">April 26 Release (v21.10)</a></td><td>05/08/2026</td><td>🟡 Limited</td></tr><tr><td>v21</td><td><a href="/valorx-fusion/versions-and-release-notes/windows/fusion-version-21">March 26 Release (v21)</a></td><td>04/04/2026</td><td>🟡 Limited </td></tr><tr><td>v20.20</td><td><a href="/valorx-fusion/versions-and-release-notes/windows/fusion-version-20.20">Feb 26 Release (v20.20)</a></td><td>03/07/2026</td><td>🟡 Limited </td></tr><tr><td>v20.10</td><td><a href="/valorx-fusion/versions-and-release-notes/windows/fusion-version-20.10">Jan 26 Release (v20.10)</a></td><td>01/31/2026</td><td>🟡 Limited </td></tr><tr><td>v20</td><td><a href="/valorx-fusion/versions-and-release-notes/windows/fusion-version-20">Dec 25 Release (v20)</a></td><td>01/01/2026</td><td>🟡 Limited </td></tr><tr><td>v19</td><td><a href="/valorx-fusion/versions-and-release-notes/windows/fusion-version-19">Sept 25 Release (v19)</a></td><td>09/27/2025</td><td>🟡 Limited </td></tr><tr><td>v18</td><td><a href="/valorx-fusion/versions-and-release-notes/windows/fusion-version-18">June 25 Release (v18)</a></td><td>07/01/2025</td><td>🟡 Limited </td></tr><tr><td>v17</td><td><a href="/valorx-fusion/versions-and-release-notes/windows/fusion-version-17">April 25 Release (v17)</a></td><td>05/06/2025</td><td>🟡 Limited </td></tr><tr><td>v16</td><td><a href="/valorx-fusion/versions-and-release-notes/windows/fusion-version-16">Jan 25 Release (v16)</a></td><td>01/02/2025</td><td>🟡 Limited </td></tr><tr><td>v15</td><td><a href="/valorx-fusion/versions-and-release-notes/windows/fusion-version-15">Feb 24 Release (v15)</a></td><td>02/26/2024</td><td>🟡 Limited</td></tr><tr><td>v14</td><td><a href="/valorx-fusion/versions-and-release-notes/windows/fusion-version-14">Jul 23 Release (v14)</a></td><td>07/21/2023</td><td>🟡 Limited</td></tr><tr><td>v13</td><td><a href="/valorx-fusion/versions-and-release-notes/windows/older-versions/windows/fusion-version-13">Nov 22 Release (v13)</a></td><td>11/11/2022</td><td>🟡 Limited</td></tr><tr><td>v12</td><td><a href="/valorx-fusion/versions-and-release-notes/windows/older-versions/windows/fusion-version-12">Aug 21 Release (v12)</a></td><td>08/15/2021</td><td>🔴 EOS</td></tr><tr><td>v11</td><td><a href="/valorx-fusion/versions-and-release-notes/windows/older-versions/windows/fusion-version-11">Apr 21 Release (v11)</a></td><td>04/23/2021</td><td>🔴 EOS</td></tr><tr><td>v10</td><td><a href="/valorx-fusion/versions-and-release-notes/windows/older-versions/windows/fusion-version-10">Dec 20 Release (v10)</a></td><td>12/23/2020</td><td>🔴 EOS</td></tr><tr><td>v9</td><td><a href="/valorx-fusion/versions-and-release-notes/windows/older-versions/windows/fusion-version-9">Nov 20 Release (v9)</a></td><td>10/08/2020</td><td>🔴 EOS</td></tr><tr><td>v8</td><td><a href="/valorx-fusion/versions-and-release-notes/windows/older-versions/windows/fusion-version-8">Aug 20 Release (v8)</a></td><td>08/21/2020</td><td>🔴 EOS</td></tr><tr><td>v7</td><td><a href="/valorx-fusion/versions-and-release-notes/windows/older-versions/windows/fusion-version-7">Jul 20 Release (v7)</a></td><td>06/03/2020</td><td>🔴 EOS</td></tr><tr><td>v6</td><td><a href="/valorx-fusion/versions-and-release-notes/windows/older-versions/windows/fusion-version-6">May 20 Release (v6)</a></td><td>05/06/2020</td><td>🔴 EOS</td></tr><tr><td>v4</td><td><a href="/valorx-fusion/versions-and-release-notes/windows/older-versions/windows/fusion-version-4">Feb 20 Release (v4)</a></td><td>03/26/2020</td><td>🔴 EOS</td></tr><tr><td>v3</td><td>Not Available</td><td>01/03/2020</td><td>🔴 EOS</td></tr><tr><td>v2</td><td>Not Available</td><td>12/13/2019</td><td>🔴 EOS</td></tr><tr><td>v1</td><td>Not Available</td><td>12/13/2019</td><td>🔴 EOS</td></tr></tbody></table>

#### Legends

* 🟢 GA (General Availability): Fully rolled out and recommended for all users.
* 🟡 Limited Support: <mark style="background-color:$warning;">Critical/compatibility fixes only.</mark>
* 🔴 EOS (End of Support): <mark style="color:$danger;background-color:$danger;">No maintenance; upgrade is required.</mark>

Starting August 2025, we will publish a unified release notes document for Windows, Mac, and Google Sheets Fusion Clients. Previous release notes have been archived and are available [here](/valorx-fusion/versions-and-release-notes/windows/older-versions).

## **Versioning Lifecycle Policy**

To provide clarity on support and upgrade paths, Fusion now follows a Versioning Lifecycle Policy:

* **Latest Supported Version (LSV):** The most recent release and the previous three versions receive full support.
* **Oldest Supported Version (OSV):** The minimum supported version continues to receive limited support.
* **End-of-Life (EOL):** Versions older than the OSV are no longer supported and require an upgrade.

This policy ensures flexibility while maintaining stability and security across all supported versions.


# August 26 Release (v22.10)

This release brings some exciting updates to Fusion. Dynamic API opens the door to connecting Fusion with virtually any external system, bringing more of your data into one place than ever before. Alongside that, we've made two improvements that make building and running workflows even smoother: workflows now avoid running into trouble when a query comes back empty, and ribbon groups have twice the room to keep related actions together.

Explore what’s new in **Fusion v22.10** and download the latest version [here](https://valorx.com/fusion-support/)!

***

<h2 align="center"><mark style="color:blue;">Release Highlight</mark> <span data-gb-custom-inline data-tag="emoji" data-code="2728">✨</span></h2>

### Dynamic API

Fusion can now connect directly to outside systems, like an ERP, a financial platform, or a logistics tool, and bring that data straight into Excel alongside your Salesforce data. No coding needed.

#### Here's how it works:

* An admin sets up the connection once, choosing where the data comes from and where it should land in your grid.
* From there, anyone with access can run it with a single click, just like any other Fusion task.

<figure><img src="https://2472585788-files.gitbook.io/~/files/v0/b/gitbook-x-prod.appspot.com/o/spaces%2F-MFqFFf4143HS0_Wagnz%2Fuploads%2FV3757UHgZAseZy4soTdi%2FDynamic%20API%20Release%20Notes.gif?alt=media&amp;token=5421842e-9343-4a10-ac21-7bb0558ed757" alt=""><figcaption><p>Dynamic API Task</p></figcaption></figure>

Your login details, tokens, and passwords stay securely on your own computer. They're never shared with other users or sent to Salesforce.

For a full walkthrough of setting up and running a Dynamic API task, see \[[Dynamic API documentation](/valorx-fusion/design-studio/tasks/dynamic-api)].

***

<h2 align="center"><mark style="color:blue;">New Improvements</mark> <span data-gb-custom-inline data-tag="emoji" data-code="2728">✨</span></h2>

### Smarter Workflows

Workflows can now automatically stop when a query returns no records. This prevents subsequent steps from running without data, helping avoid blank saves, empty display sheets, and confusing errors. Your apps can now handle no-data scenarios more predictably.

<figure><img src="https://2472585788-files.gitbook.io/~/files/v0/b/gitbook-x-prod.appspot.com/o/spaces%2F-MFqFFf4143HS0_Wagnz%2Fuploads%2F2mhzANftxNX43KWx8ba4%2FSmarter%20Workflows.gif?alt=media&amp;token=2b19562e-cfd2-426d-9ce0-c26a86daea8d" alt=""><figcaption><p>Smarter Workflows</p></figcaption></figure>

### 20 Buttons for Ribbon Group

Ribbon groups now support up to 20 buttons each, double the previous limit. This means more related actions can live together under one heading, instead of being split across separate groups just to work around a button count limit, keeping your app's navigation cleaner and more intuitive.

<figure><img src="https://2472585788-files.gitbook.io/~/files/v0/b/gitbook-x-prod.appspot.com/o/spaces%2F-MFqFFf4143HS0_Wagnz%2Fuploads%2FvY5dHWdqd96kv2TidJ7O%2F20%20Buttons.gif?alt=media&amp;token=c280bd2f-3626-42ba-bdc0-8fdec03eff97" alt=""><figcaption></figcaption></figure>

***

## <mark style="color:blue;">Bug Fixes</mark> 🐞

We've addressed several issues in this update to improve your experience. Here are the details of the bug fixes included:

* **Preloaded Grid Map Rows No Longer Hide in Runtime**\
  Fixed an issue where preloaded rows in previously created Grid Maps could be hidden in Runtime when multiple Grid Maps used **Preload Grid – Based on Query**. Preloaded rows now remain visible independently for each Grid Map, even when new Grid Maps are created.
* **Multiple Clear Tasks Now Clear Records from Their Respective Grid Maps**\
  Fixed an issue where only the first configured Grid Map was cleared when multiple Clear Tasks were used in the same workflow. Each Clear Task now correctly clears records from its associated Grid Map when the workflow is executed.

***

Thank you for using Fusion. We remain committed to simplifying your workflows while giving you greater control over your configurations. For any questions, please contact our support team at <support@valorx.com>


# July 26 Release (v22)

Valorx Fusion v22 introduces in-app announcements, significantly faster log file loading, and more consistent update controls for admin-managed environments.&#x20;

Explore the highlights and bug fixes included in this release below.

*This page includes updates for Fusion Mac v49.2, and v49.3.*

Explore what’s new in **Fusion v22** and download the latest version [here](https://valorx.com/fusion-support/)!

***

## <mark style="color:blue;">New Improvements</mark> :sparkles:

### <mark style="color:$tint;">Fusion In-App Announcements</mark>

Fusion now shows helpful announcements directly inside the product, so you're informed about important changes, new features, and release updates without having to look elsewhere.

<figure><img src="https://2472585788-files.gitbook.io/~/files/v0/b/gitbook-x-prod.appspot.com/o/spaces%2F-MFqFFf4143HS0_Wagnz%2Fuploads%2F2i9VtyGO6jfF4Y1T4Q8A%2FNew%20Announcements%20v3.gif?alt=media&amp;token=aab1e579-3cc9-4dfc-b13b-8a6abc0deb00" alt=""><figcaption></figcaption></figure>

#### What you'll notice:

* You may occasionally see announcements when you open Excel.
* Announcements are targeted to your Fusion product and version.
* Announcement types include:
  * **Action Required** – Important changes that require your attention.
  * **Release Notes** – A summary of new features and improvements.
  * **Announcements** – Information about upcoming features or important updates.
* Each announcement includes a title and short description.
* Viewed announcements won't appear again.
* You can also check for announcements anytime using the **Announcement** button in the Excel ribbon. If there's nothing new, it will simply show "There are no new announcements at this time"
* Want to turn off the startup pop-up? Go to [**Settings > Disable announcements on startup**](/valorx-fusion/settings/valorx-fusion-settings#settings). You'll still be able to check announcements anytime via the ribbon button.

### <mark style="color:$tint;">Now Valorx Fusion Updates Can Be Controlled by Org Admins</mark>

Fusion now properly honors your admin's update preferences across the Excel Add-in.

<figure><img src="https://2472585788-files.gitbook.io/~/files/v0/b/gitbook-x-prod.appspot.com/o/spaces%2F-MFqFFf4143HS0_Wagnz%2Fuploads%2FtVEsiw1aDlFN6p1LazDi%2FUpdate%20v2.png?alt=media&amp;token=513ef6a5-f0d6-4a7e-ae68-80f54cae2338" alt=""><figcaption><p>Update button (Excel Ribbon)</p></figcaption></figure>

<figure><img src="https://2472585788-files.gitbook.io/~/files/v0/b/gitbook-x-prod.appspot.com/o/spaces%2F-MFqFFf4143HS0_Wagnz%2Fuploads%2FKeS30PsChlkGNgeM5hUU%2Fimage.png?alt=media&amp;token=08b58f22-d79a-412d-880c-e4affd277c71" alt=""><figcaption><p>Update Now button (Valorx Home)</p></figcaption></figure>

#### What you'll notice:

* If your admin has disabled auto-updates for your organization, the **Update** button (in the Excel Add-in ribbon, under Control Panel) and the **Update Now** button (in Valorx Home) will no longer be shown
* This ensures update behavior remains consistent with your organization's settings.
* If you don't see this change take effect right away, try refreshing your cache and logging in again

### <mark style="color:$tint;">Faster Log File Loading</mark>

Fusion now loads large log files significantly faster, reducing the time to display the first results from up to **2 minutes** to **under 100 ms**.

#### What you'll notice:

* Large log files open almost instantly.
* Previously opened log files load even faster using cached data.
* A progress indicator keeps you informed while logs are loading.
* Performance remains consistent even for large log files.
* This improvement changes performance only—the interface and workflow remain the same.

***

## <mark style="color:blue;">Bug Fixes</mark> 🐞

We've addressed several issues in this update to improve your experience. Here are the details of the bug fixes included:

* **Offline Files Now Respect "Close Without Saving"**\
  Fixed an issue where offline files could still save changes after reconnecting, even when users selected **Close Without Saving**. Unsaved changes are now correctly discarded.
* **Improved Session Recovery After Extended Inactivity**\
  Fixed an issue where Fusion displayed a runtime error after a Salesforce session expired following extended inactivity. Runtime and Design Studio now reconnect successfully.
* **\[Dynamics] Search Across Filters Now Returns Matching Results in Old SNS**\
  Fixed an issue where valid keywords returned **No Records Found** when related fields were included in Search Across and Display. Search results now update correctly.
* **Multi-Select Selections No Longer Cleared After an Invalid Search in User Selection Query**\
  Fixed an issue where previously selected records would disappear after an invalid search was cleared in the new Search & Select. Selected records now stay selected and visible, as expected.
* **"Contains" Filter Now Supports Free-Text Input for Record Type \[Name] Fields in User Selection**\
  Fixed an issue where the new Search & Select rendered the "Contains" filter as a dropdown-only field for Record Type \[Name] fields, preventing free-text entry. Users can now type values for "Contains," consistent with the old Search & Select behavior.

That covers everything in Fusion v22. If you have any questions or feedback, please visit our [Valorx Support page](https://valorx.com/support/). We are fully committed to enhancing and complimenting your CRM experience and look forward to hearing from you!

***

{% updates format="full" %}
{% update date="2026-08-04" %}

## <mark style="color:blue;">Valorx Fusion Mac v49.3 - Hotfix</mark>

We're pleased to share Fusion Mac v49.3, which focuses on improving query result accuracy and save reliability. This release includes the following bug fixes:

#### What's Improved

* **Improved reliability of User Selection Query results.** \
  Configured lookup fields and related lookup fields now display correctly in the query result grid, alongside standard fields.
* **Improved stability of the Save operation after Save as PDF.** \
  Users can now save reliably after generating and uploading a PDF, without encountering an unsaved-changes error.
  {% endupdate %}

{% update date="2026-07-24" %}

## <mark style="color:blue;">Valorx Fusion Mac v49.2 - Hotfix</mark>

We're pleased to share Valorx Fusion for Mac v49.2, which introduces a new sign-in option for a smoother Salesforce authentication experience. This release includes the following update:

### New Sign-In Experience option for Connected Apps.&#x20;

When creating or editing a Connected App, users can now choose between **Popup Window** and **Browser Login** for the sign-in experience. Browser Login ensures full support for passkey authentication prompts, giving users a smoother and more reliable Salesforce login experience.

<figure><img src="https://2472585788-files.gitbook.io/~/files/v0/b/gitbook-x-prod.appspot.com/o/spaces%2F-MFqFFf4143HS0_Wagnz%2Fuploads%2FtsapxeIQpDqCJYKmxbQv%2FNew%20Browser%20Login.gif?alt=media&amp;token=fbccbbb1-0ce5-441e-bd31-f537171bf91b" alt=""><figcaption><p>New Sign-In Experience option for Connected Apps</p></figcaption></figure>
{% endupdate %}
{% endupdates %}


---

[Next Page](/llms-full.txt/1)